Star Schema → Snowflake
One line: model a tiny star schema (3 dimensions + 1 fact), wire each table to its own CSV → Snowflake pipeline, build a Maestro from scratch to orchestrate them, and join the star at query time in Snowflake.
This walkthrough ships four CSVs, four pipelines, and a Maestro you build by hand. Reading time 15 minutes.
By the end you will know how to:
- Lay out a star schema as one pipeline per table (one fact + N dimensions) instead of one giant pipeline with branches
- Configure the Snowflake Target node — the seven Snowflake
coordinates, and the
Drop & Createtable operation - Build a Maestro from scratch in the UI — create, drag, drop, configure, wire up — not just open a pre-built one
- Read the Maestro execution detail in Monitor and confirm the four loads ran concurrently
- Perform the star JOIN in Snowflake — the query-time payoff for loading the data this way
Prerequisites
You need a Snowflake account with a warehouse, database, and schema you can write to. Snowflake's 30-day trial ($400 free credit) is more than enough — every load in this tutorial finishes in seconds.
Have these seven coordinates ready before you start (their values vary by account; you'll paste them into the Snowflake Target node in §3):
| Field | Where it comes from |
|---|---|
| Account | The locator in your URL <locator>.snowflakecomputing.com. |
| Warehouse | Snowflake UI → Admin → Warehouses. Any size; XS is fine for the demo dataset. |
| Database | Snowflake UI → Data → Databases. Use one you can write to. |
| Schema | Inside that database. PUBLIC is the default. |
| Username | A Snowflake user that can use the warehouse. |
| Password | The user's password. |
| Role | A role with USAGE on the warehouse and CREATE TABLE on the schema. Any role that satisfies that works. |
Files
Download into a folder on the same machine as the Odara API. The
demo uses /tmp/tutorials/star-schema/:
- dim_customers.csv — 20 rows (customer_key, customer_name, email, country, tier)
- dim_products.csv — 10 rows (product_key, product_name, category, unit_price)
- dim_dates.csv — 30 rows (date_key, full_date, year, month_num, month_name, day_of_month, day_of_week)
- fact_orders.csv — 100 rows (order_key, customer_key, product_key, date_key, quantity, total_amount)
The fact references all three dims by their *_key columns — the
classic star.
1. The shape
Four loaders, one orchestrator:
                    Maestro: tutorial-star-schema
                    └── Parallel Group: "Load star schema"
                          ├── tutorial-star-dim-customers
                          ├── tutorial-star-dim-products
                          ├── tutorial-star-dim-dates
                          └── tutorial-star-fact-orders
Each child is a tiny two-node pipeline: CSV Source → Snowflake Target. Splitting the work this way (instead of one mega-pipeline
with four branches) means:
- Each table can be re-run, retried, or scheduled independently.
- The Maestro is the only place that knows about ordering — swap parallel for sequential without touching any pipeline.
- Failures are scoped: if
fact_ordersfails, the dim loads still succeed and you don't redo their work.
2. A dimension pipeline
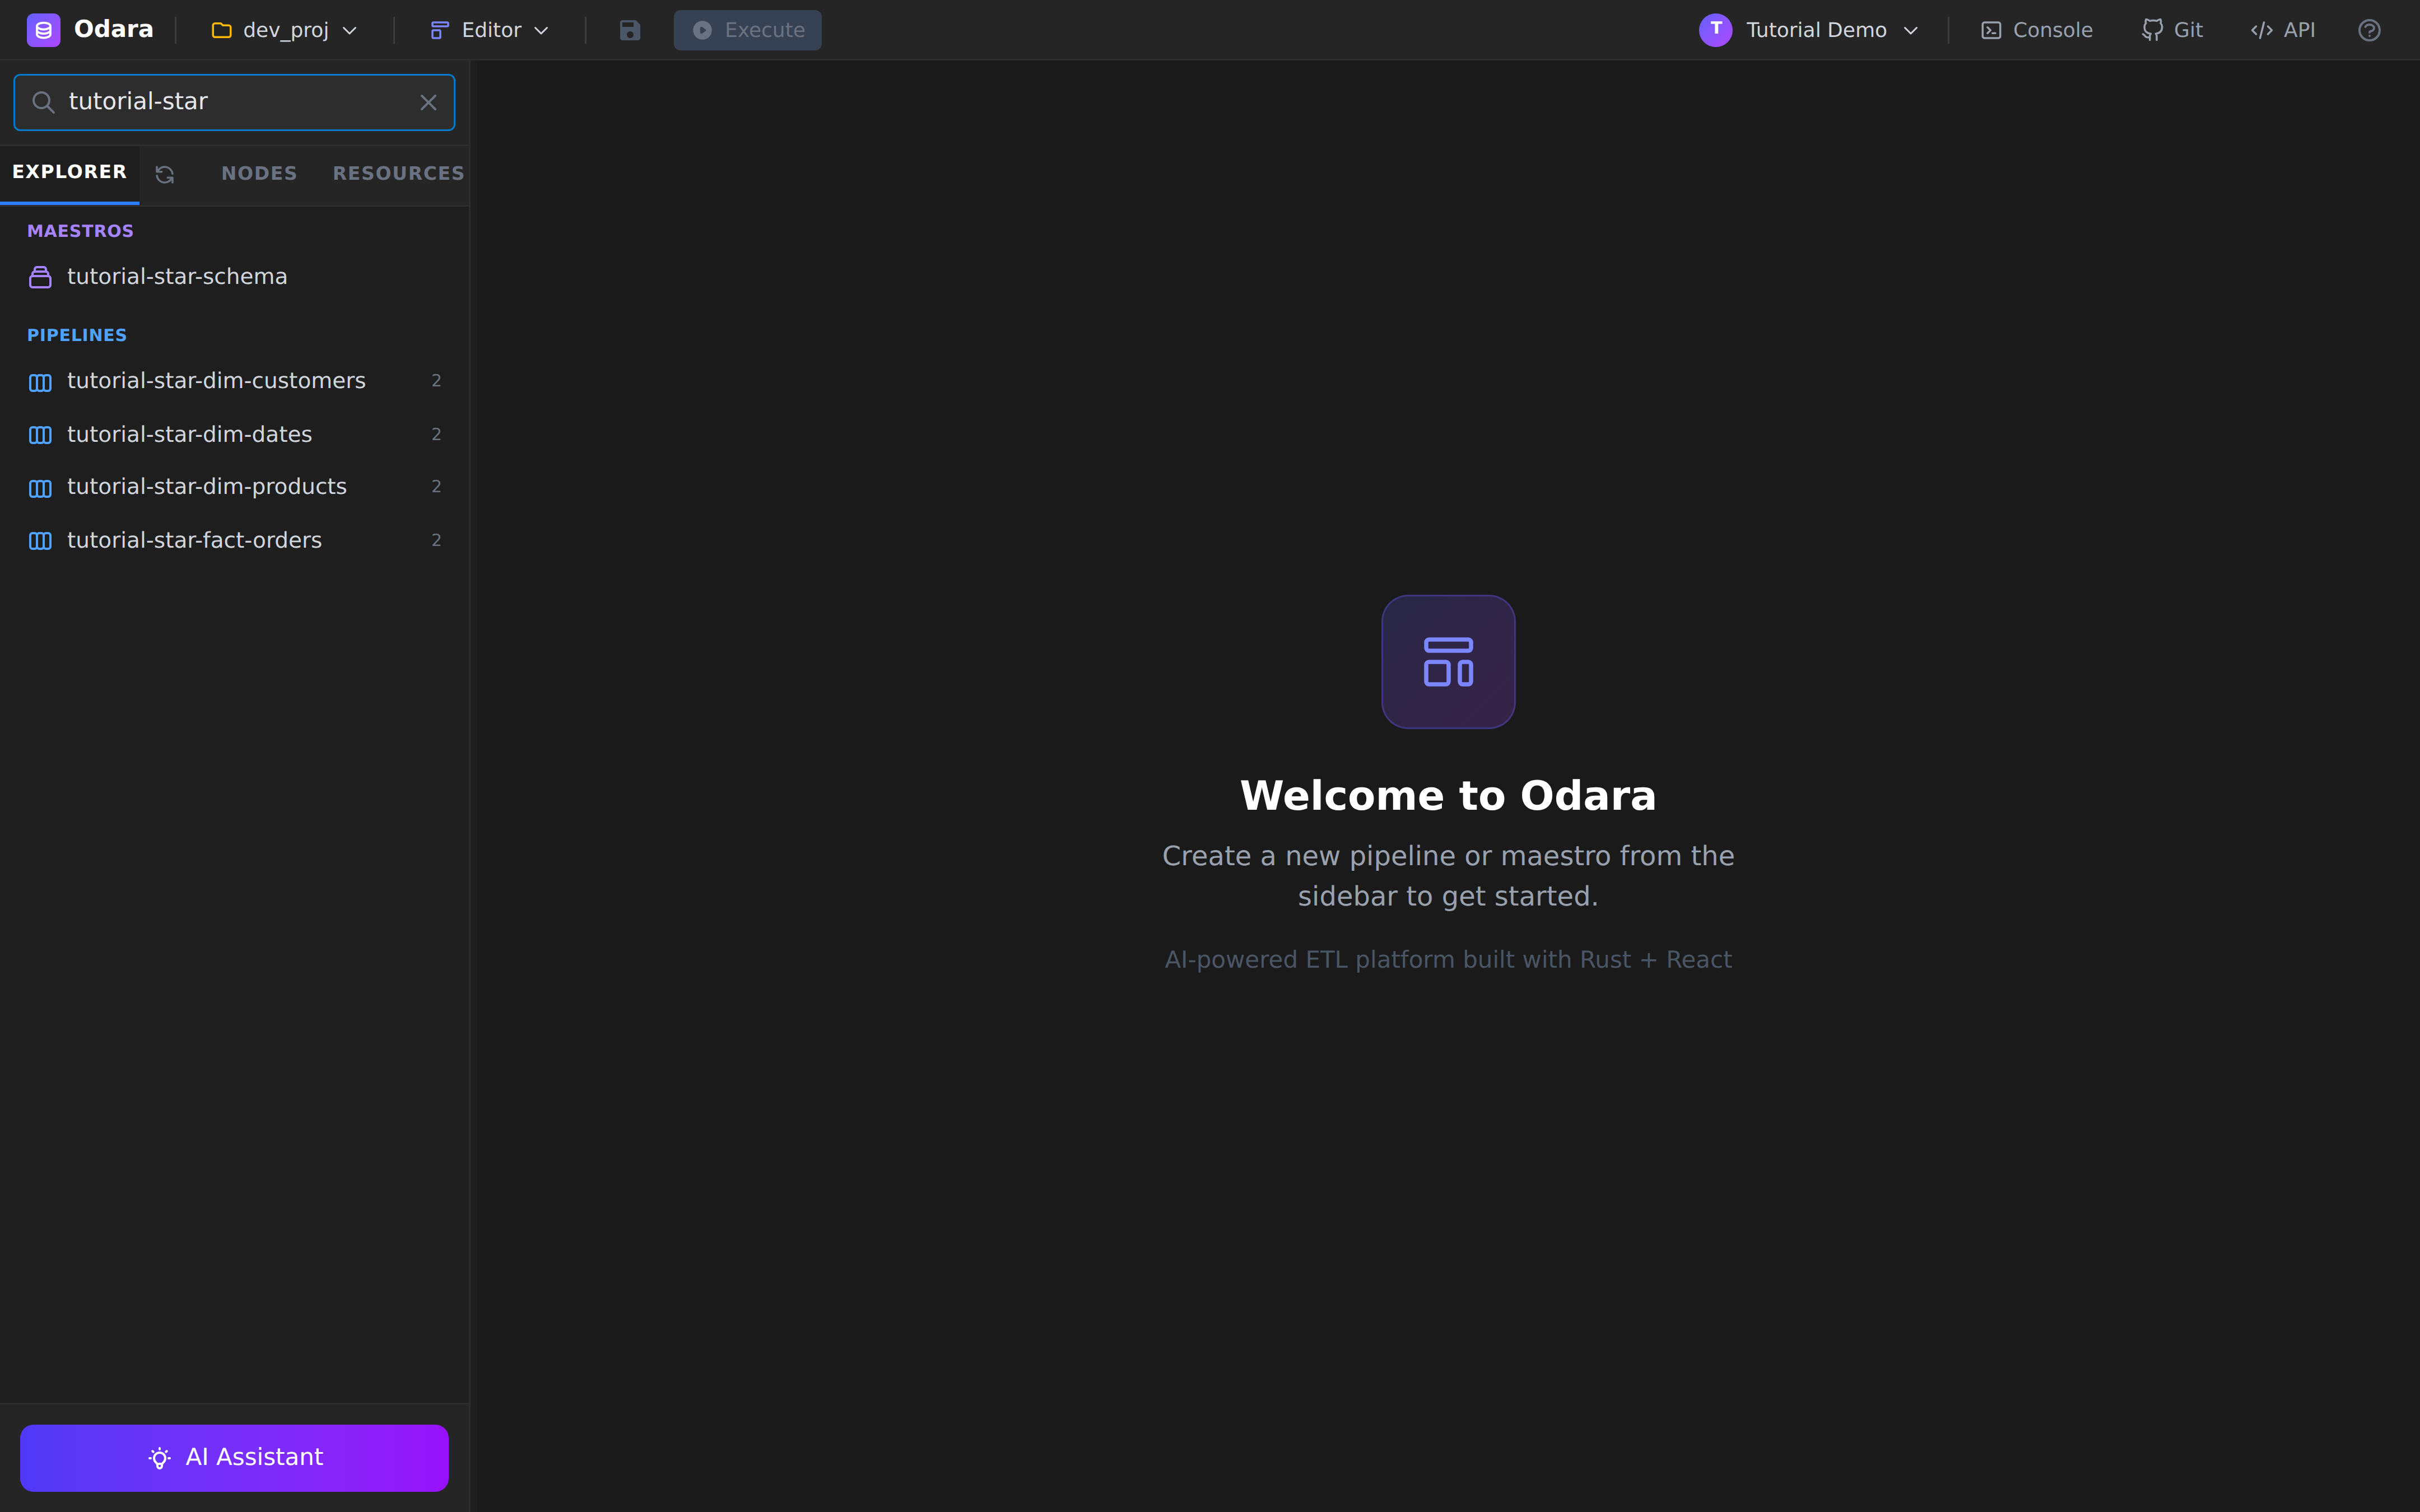
Open tutorial-star-dim-customers from the sidebar — two nodes:
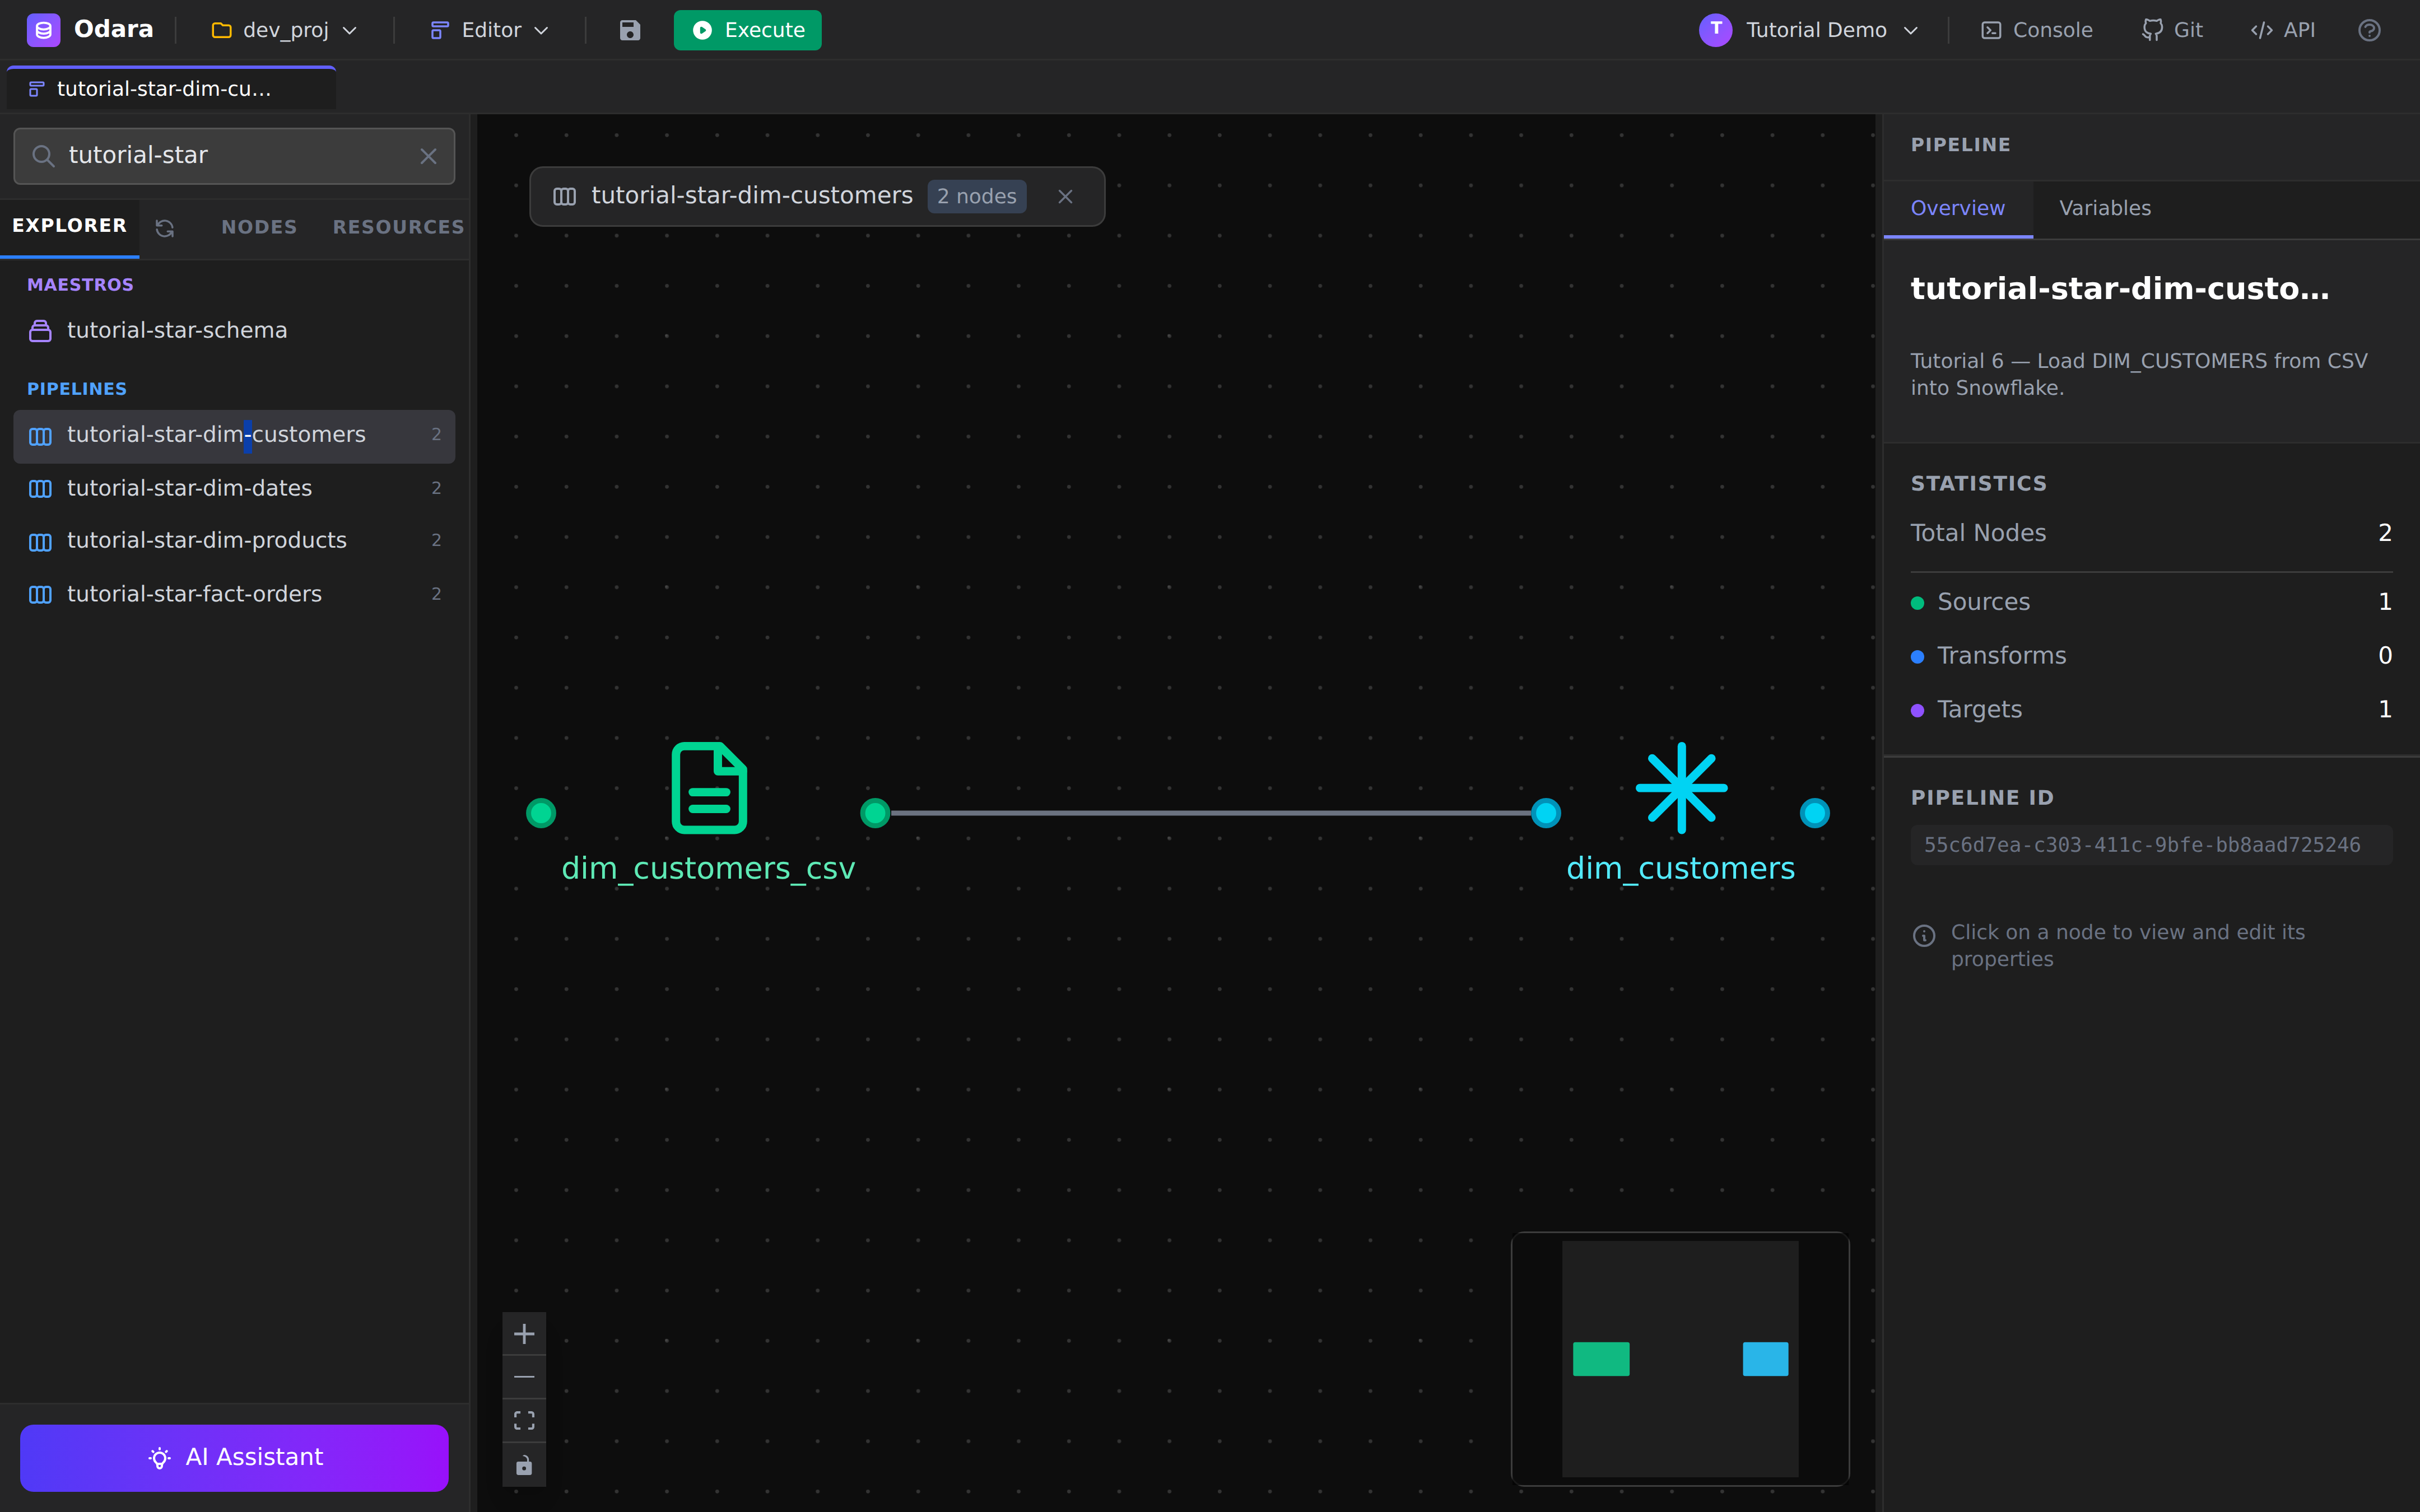
The CSV source is identical to anything you've done before — path, delimiter, has-header. Nothing Snowflake-specific.
The Snowflake Target
Click the Snowflake node on the right of the canvas:
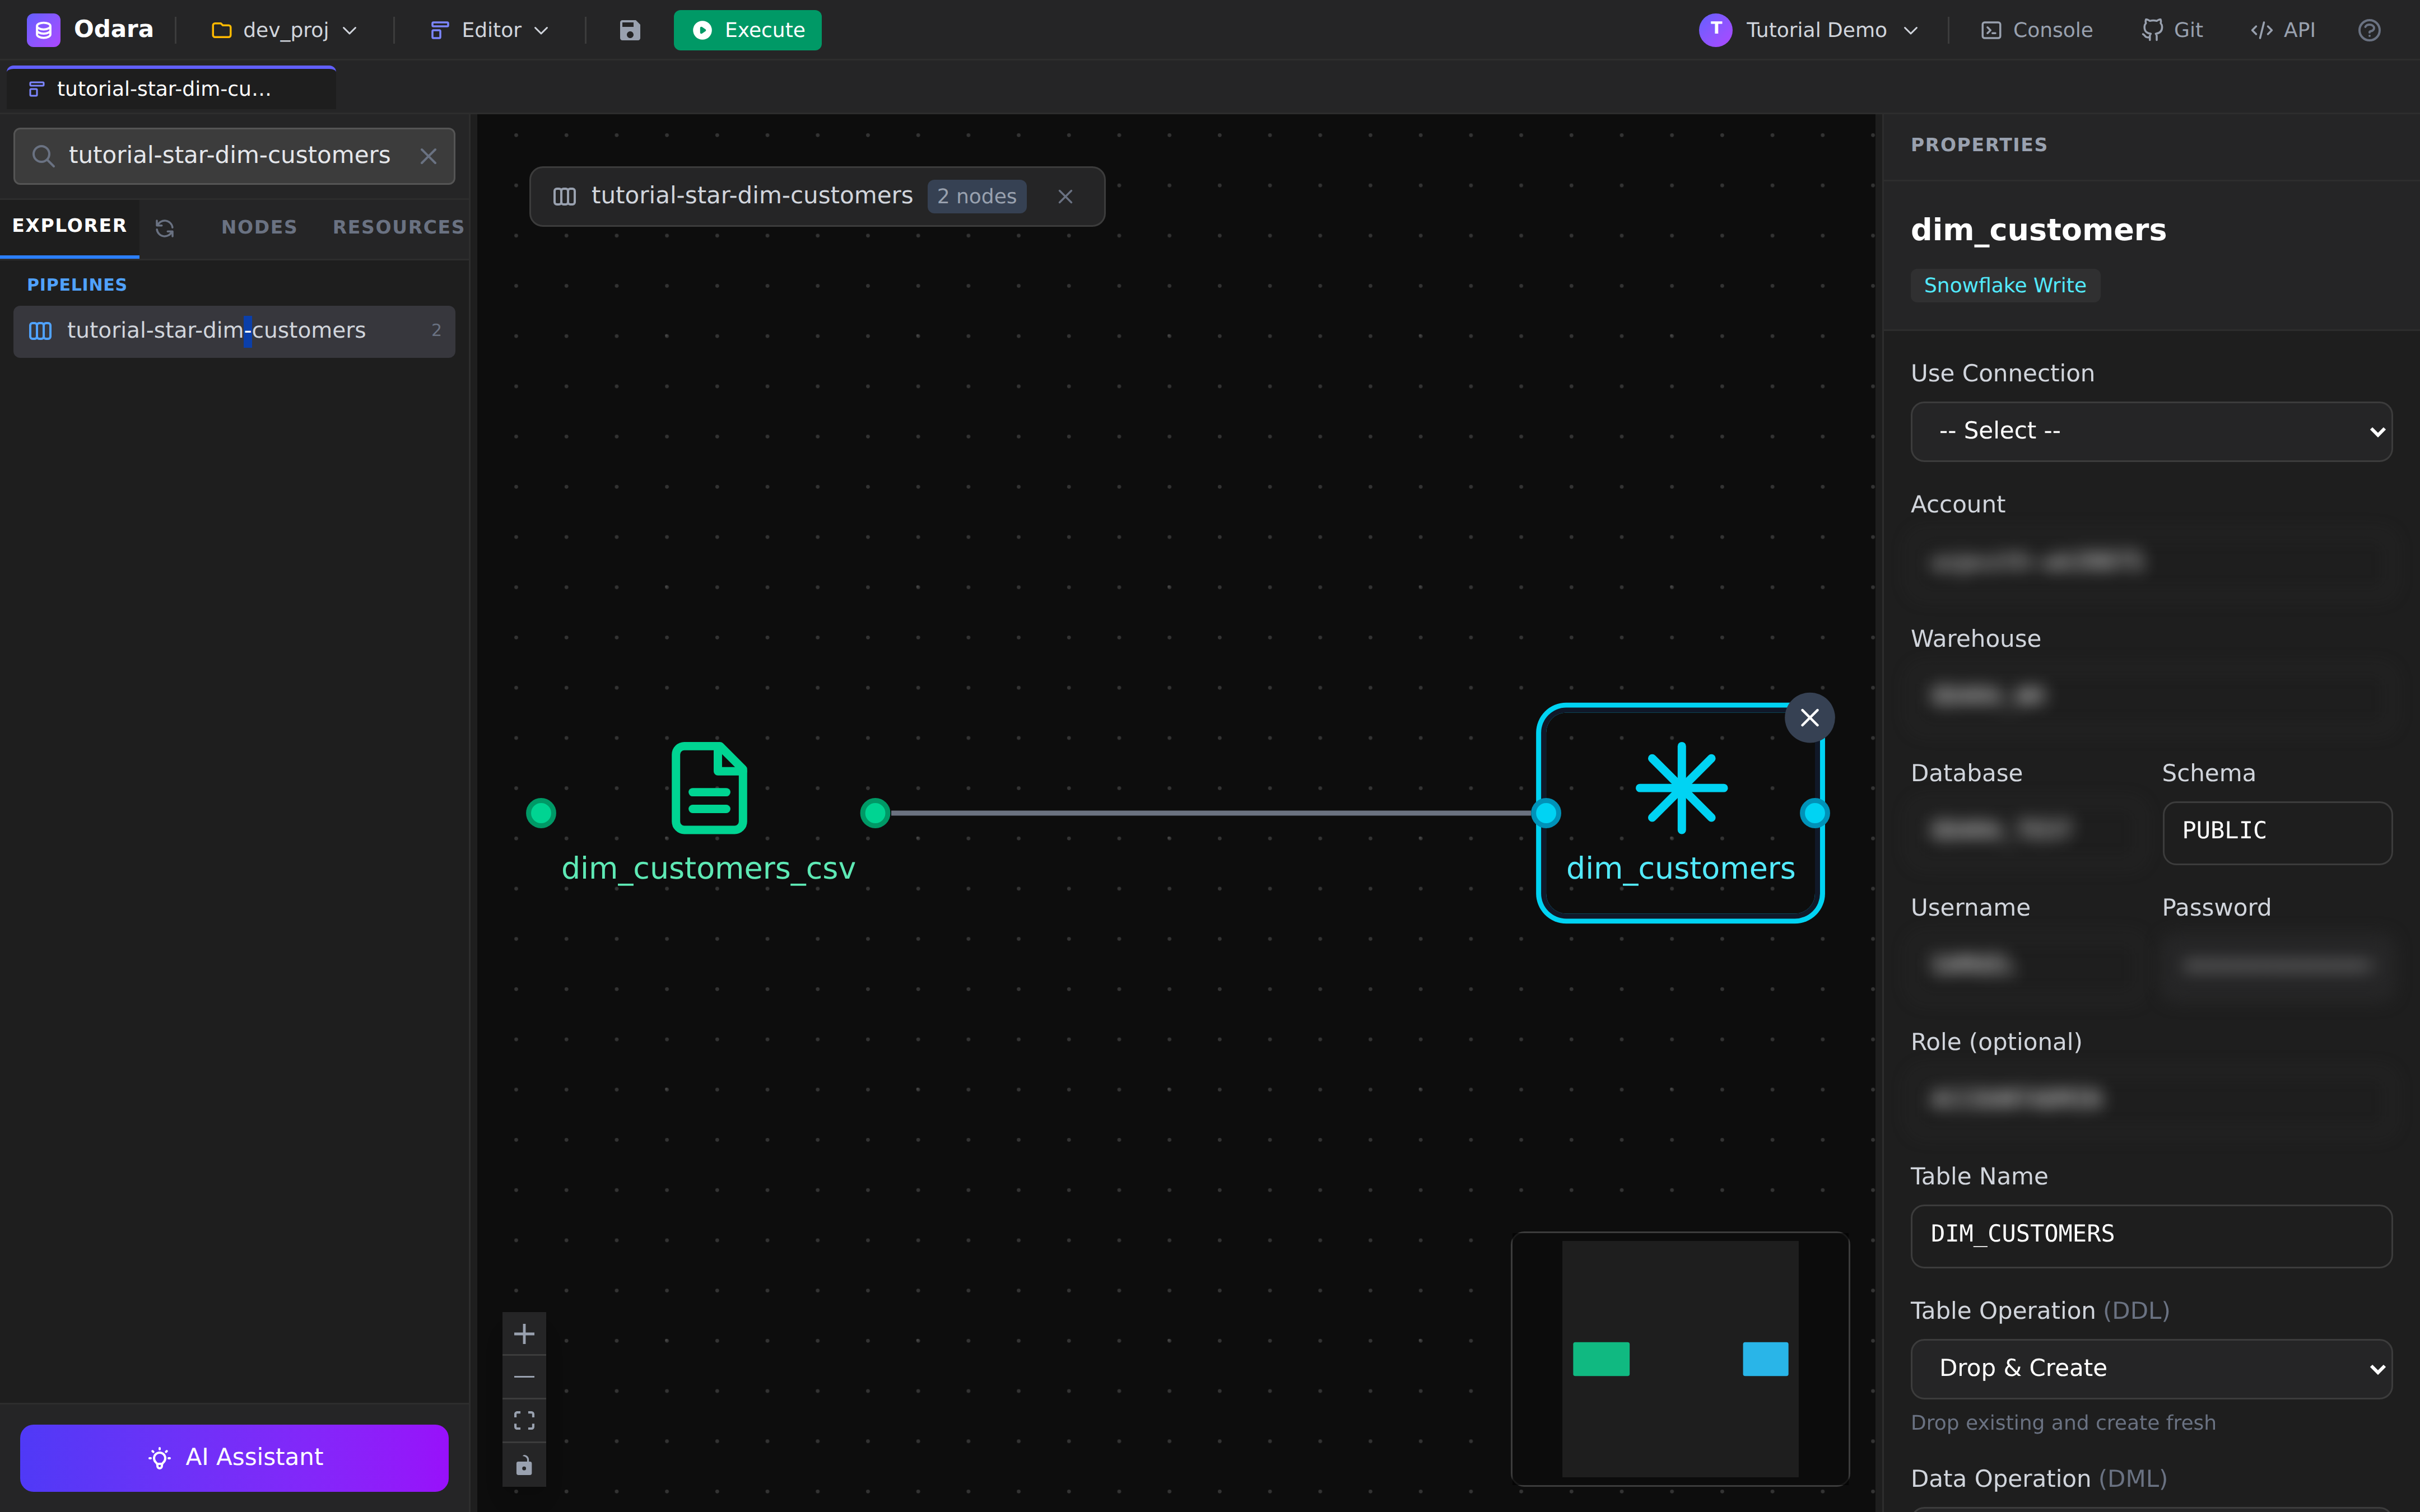
Snowflake is the only target that has no connection_string —
the seven fields are the configuration. Fill in every one with
your account's values:
| Field | What goes in |
|---|---|
| Account | Your Snowflake account locator (everything before .snowflakecomputing.com). |
| Warehouse | A compute warehouse the role can use. XS suspends in 60 s. |
| Database | The target database. |
| Schema | The target schema (commonly PUBLIC on a fresh account). |
| Username | Snowflake user. |
| Password | The user's password. Stored encrypted at rest with AES-GCM; once saved, the field shows ●●●●●●. |
| Role | A role with USAGE on warehouse + CREATE TABLE on schema. |
| Table Name | DIM_CUSTOMERS. Snowflake uppercases unquoted identifiers, so keep your table names UPPER_SNAKE to avoid surprises later. |
| Table Operation (DDL) | Drop & Create — drops the table if it exists and recreates from the Arrow schema. Idempotent re-runs. |
| Data Operation (DML) | Insert for the demo. Switch to Copy Into for production loads — it stages on the Snowflake side and bulk-loads, 20–100× faster than row-by-row INSERTs for anything > 10k rows. |
Repeat for dim_products and dim_dates. Same shape every time, two
fields change (CSV path + Table Name). That is the whole point of
the maestro pattern — children are clones with tiny variations.
3. The fact pipeline
Open tutorial-star-fact-orders:
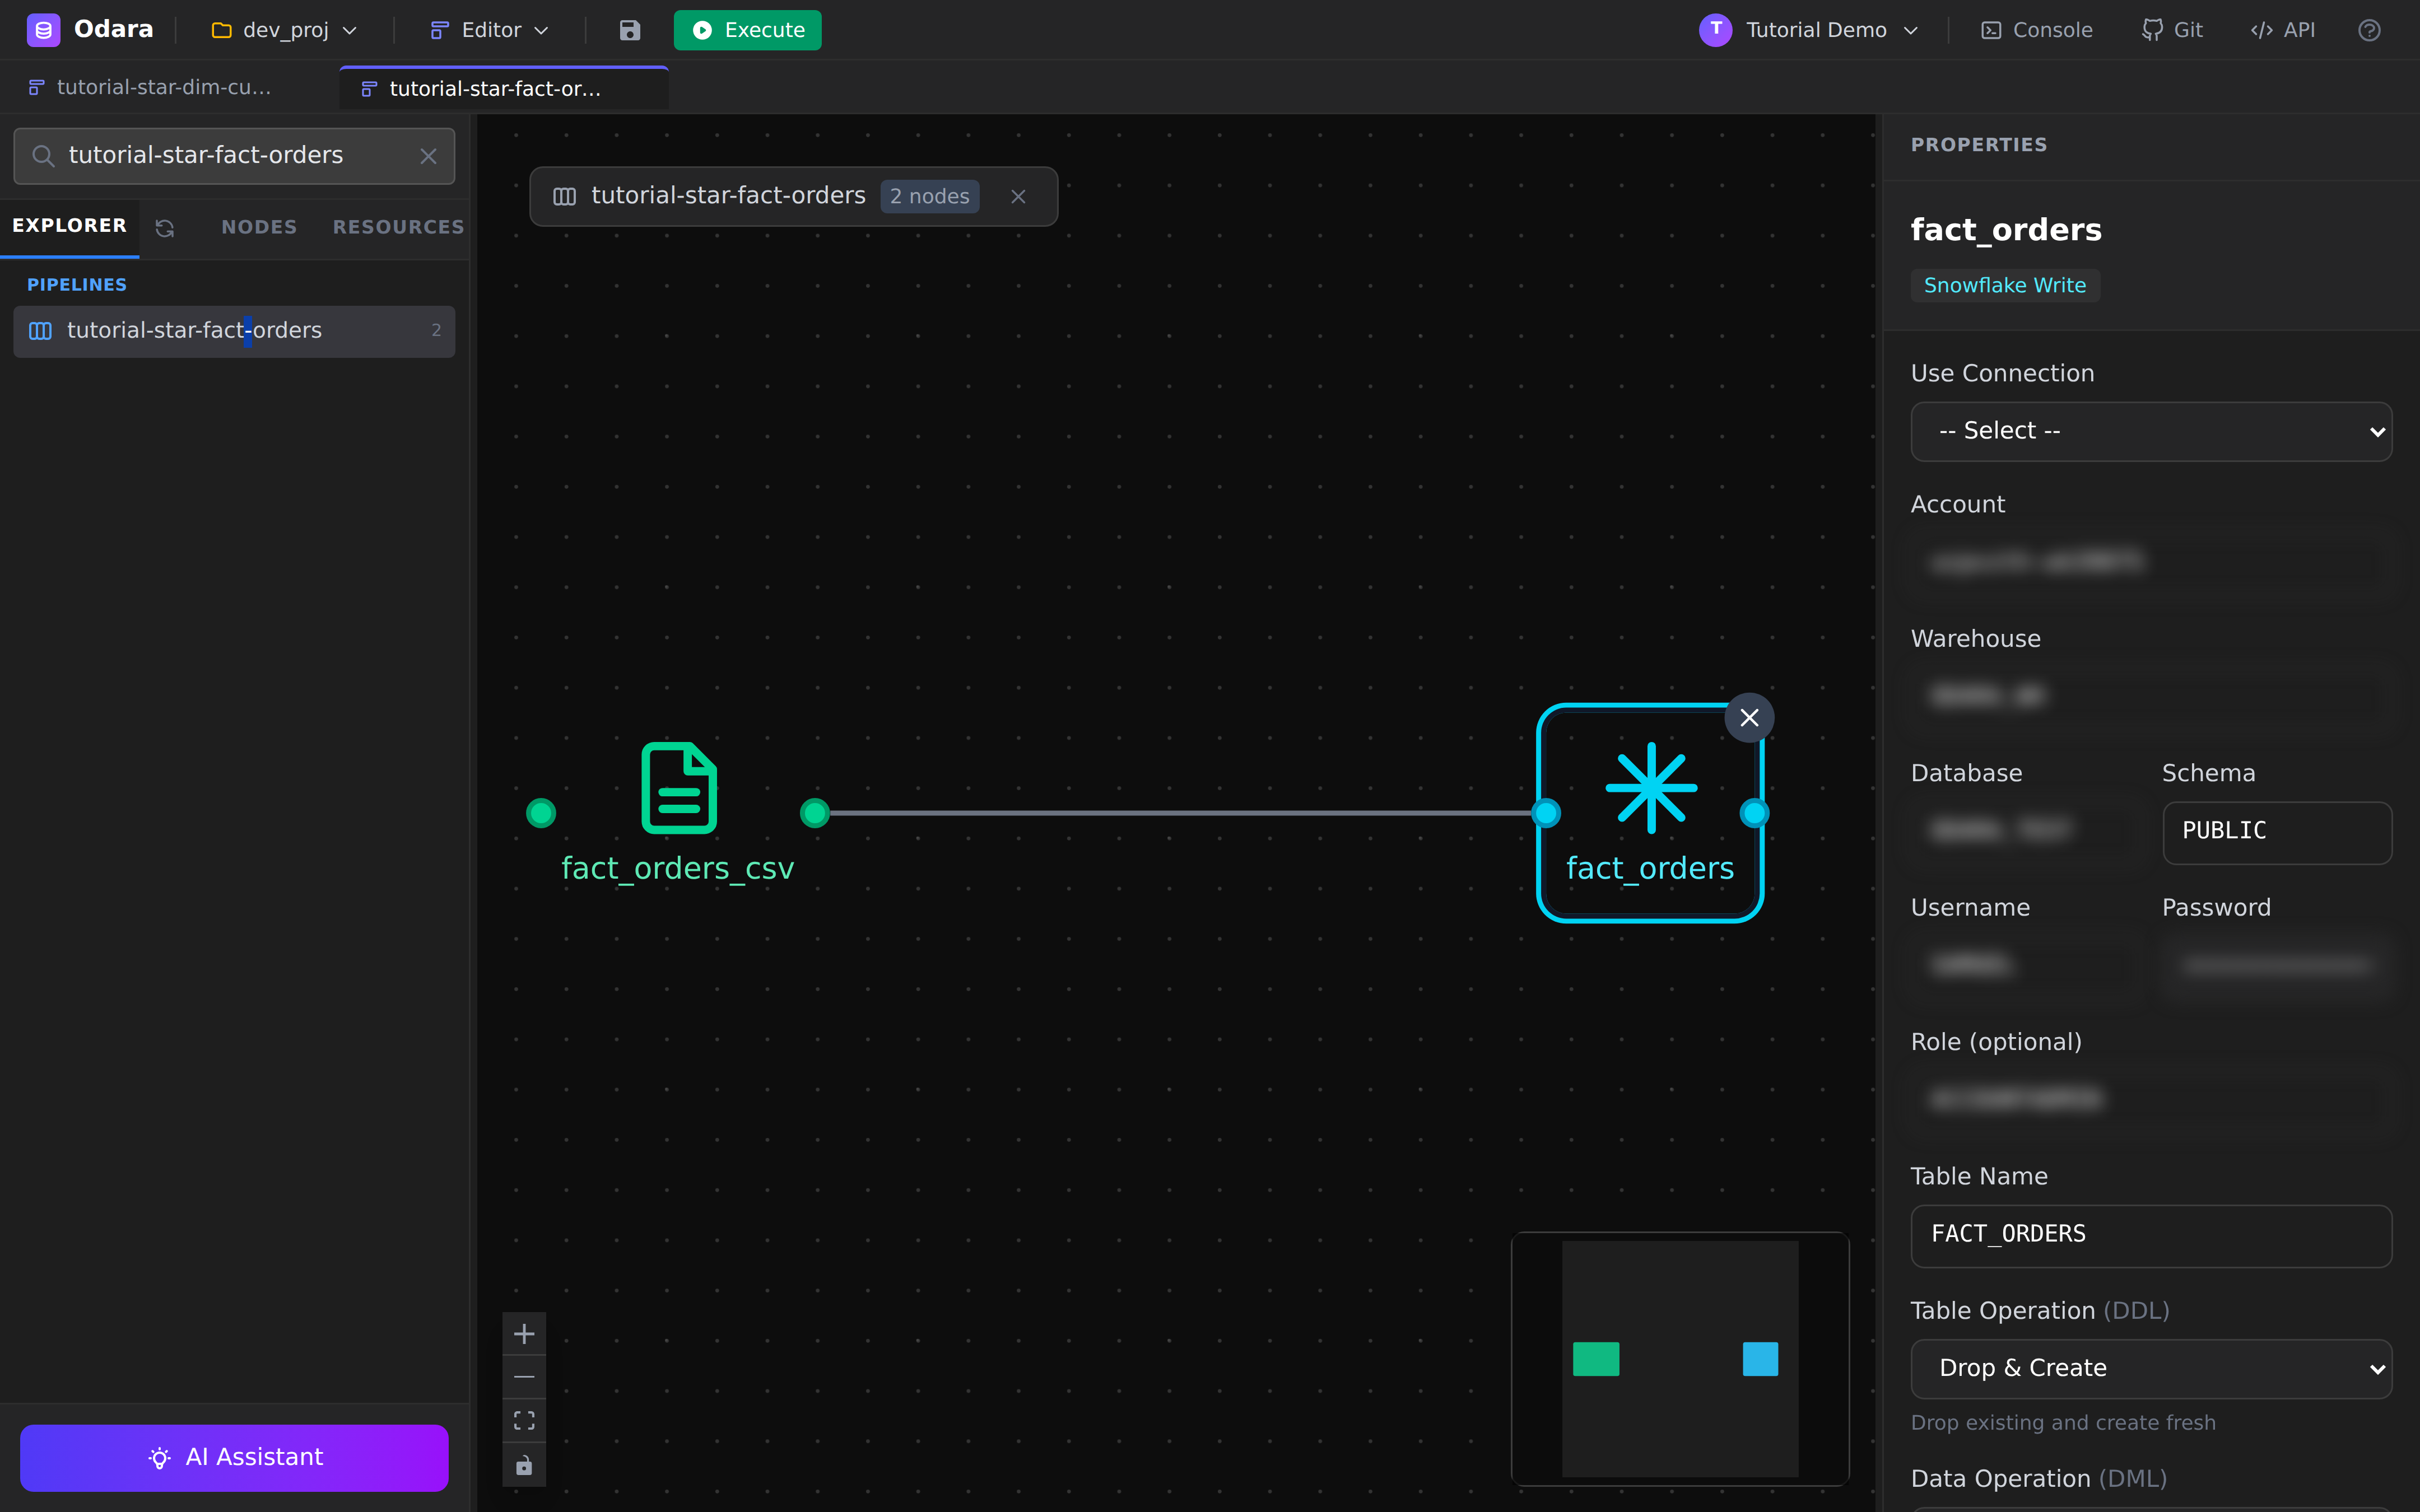
Structurally identical to the dim pipelines — CSV Source → Snowflake Target. The only differences are cosmetic:
- CSV path →
fact_orders.csv(100 rows vs 10–30 for the dims). - Table Name →
FACT_ORDERS.
The fact CSV's columns are deliberately foreign-key shaped —
customer_key, product_key, date_key, quantity, total_amount
— pointing into the three dim tables. Snowflake does not enforce
foreign keys (they're "informational" only), but the data still
follows the convention; if you point a BI tool at this schema, it
will discover the joins from column-name overlap or explicit
metadata.
About loading order
For the demo we load all four in parallel because Snowflake doesn't enforce FKs — the order doesn't matter. In production with a database that does enforce FKs (Postgres, MySQL), you'd load dimensions first, then the fact to satisfy the constraints. You'd model that with two sequential Maestro steps: a Parallel Group of dim loads, followed by a single Pipeline Call for the fact. We'll see Maestro steps next.
4. Build the Maestro — step by step
Now we build the orchestrator from scratch. Do not double-click
the existing tutorial-star-schema — we'll create a fresh one so
you can see every step.
4.1 — Create a new Maestro
Right-click the MY MAESTROS section header in the left sidebar. A small context menu opens:
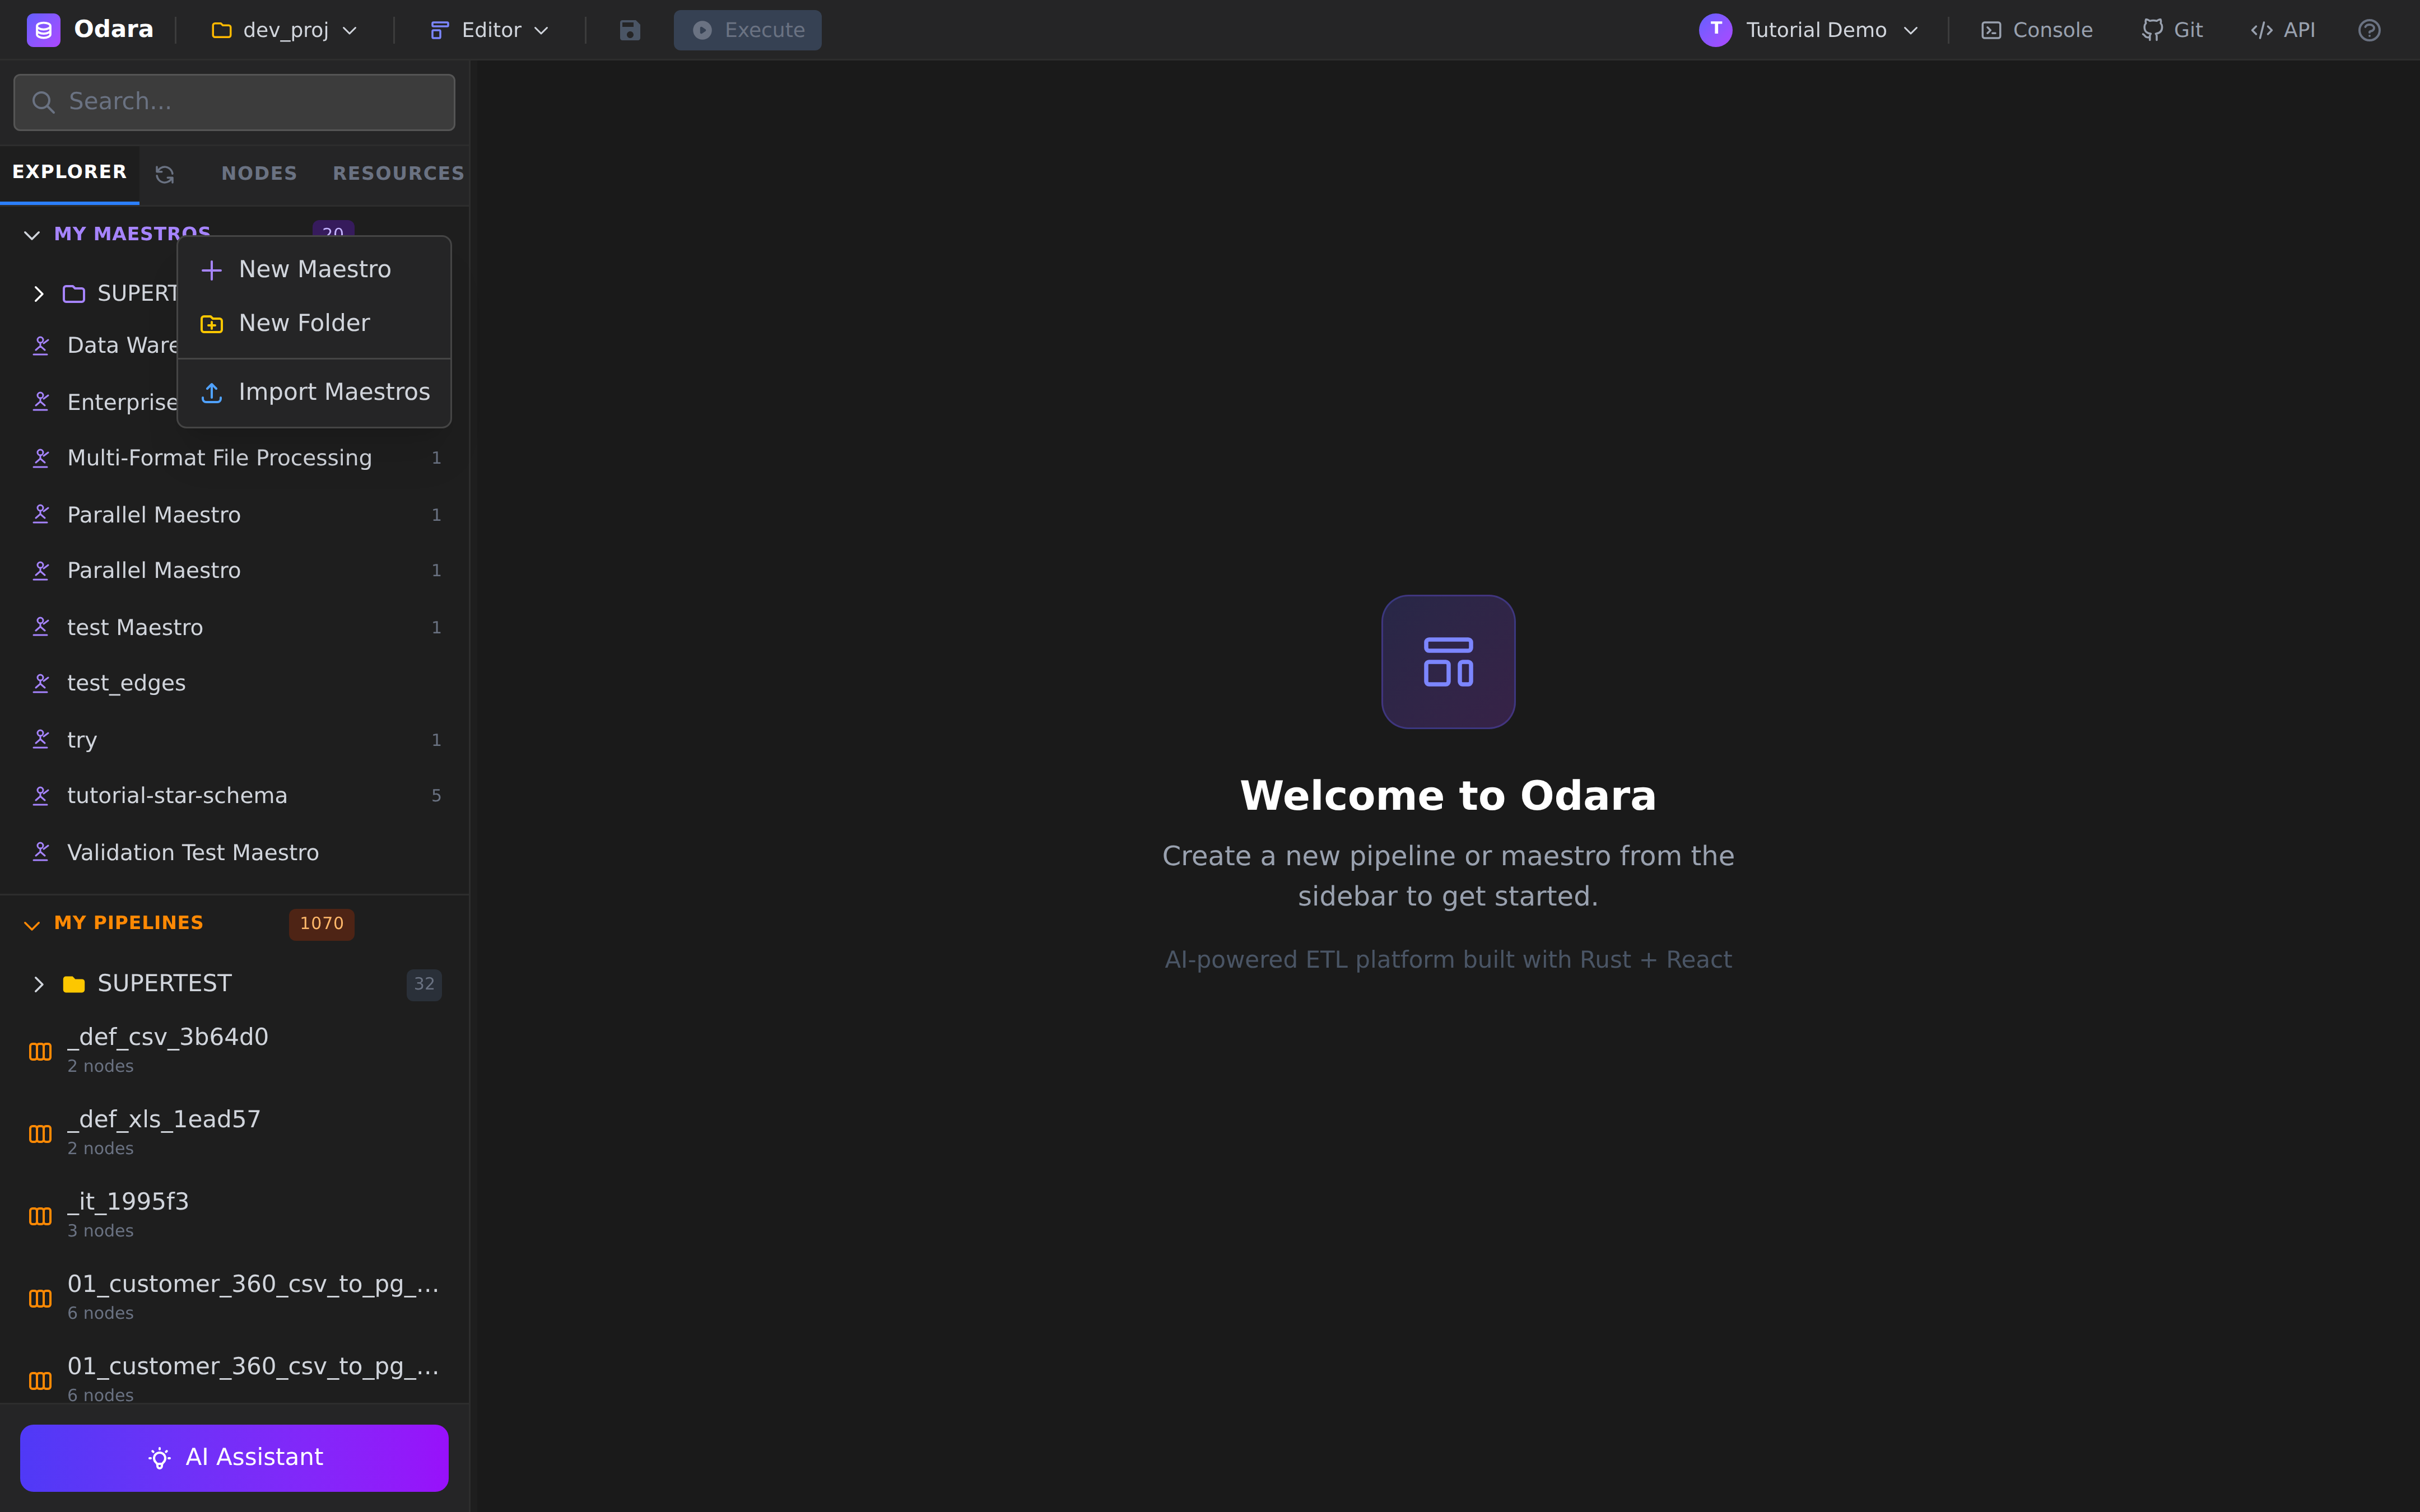
Click New Maestro. A new entry appears in the sidebar called "New Maestro" and the canvas switches to it.
4.2 — The empty canvas + Steps palette
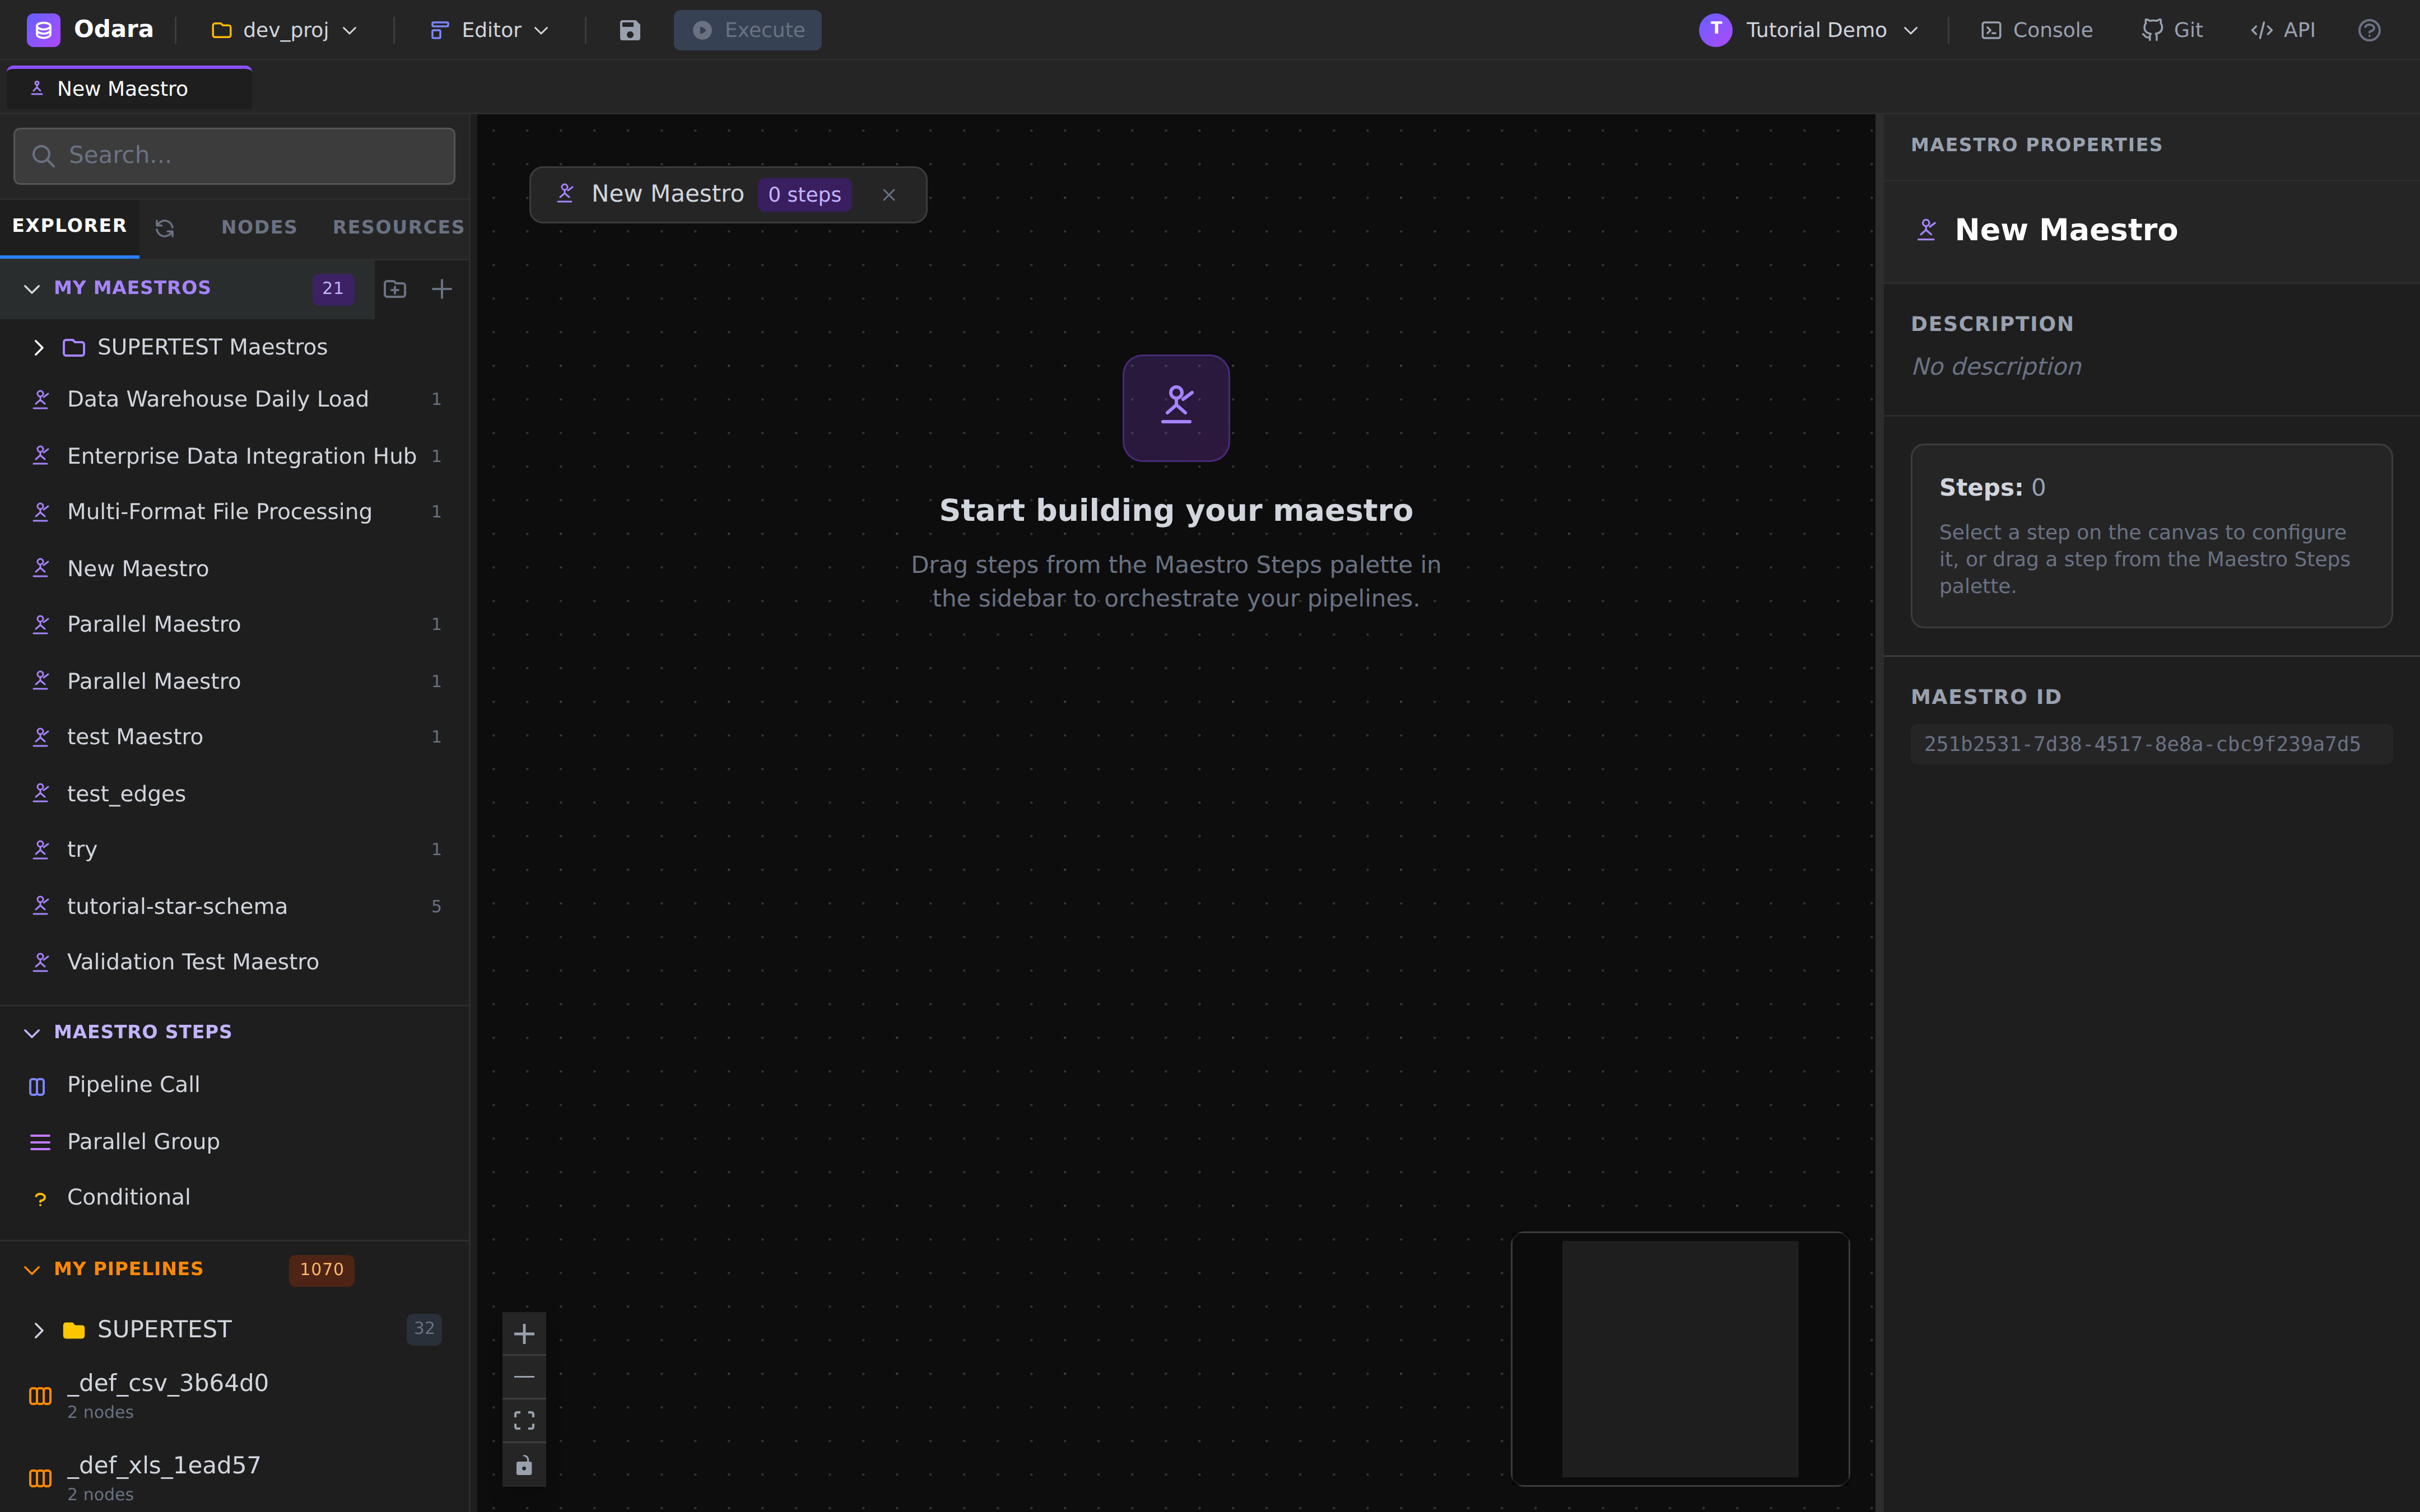
Two things to notice on this screen:
- Centre canvas says "Start building your maestro — Drag steps from the Maestro Steps palette in the sidebar to orchestrate your pipelines."
- Left sidebar has a new section near the bottom called
MAESTRO STEPS with three items:
- Pipeline Call — invoke a single pipeline
- Parallel Group — run nested steps concurrently
- Conditional —
if … then … else …over a condition string
The right-side MAESTRO PROPERTIES panel shows the maestro's
top-level metadata: name, description, step count (0 for now),
and the Maestro ID (UUID — handy for gh or API references).
4.3 — Drag a Parallel Group
Grab Parallel Group from the palette and drag it onto the canvas. Release the mouse somewhere in the middle.
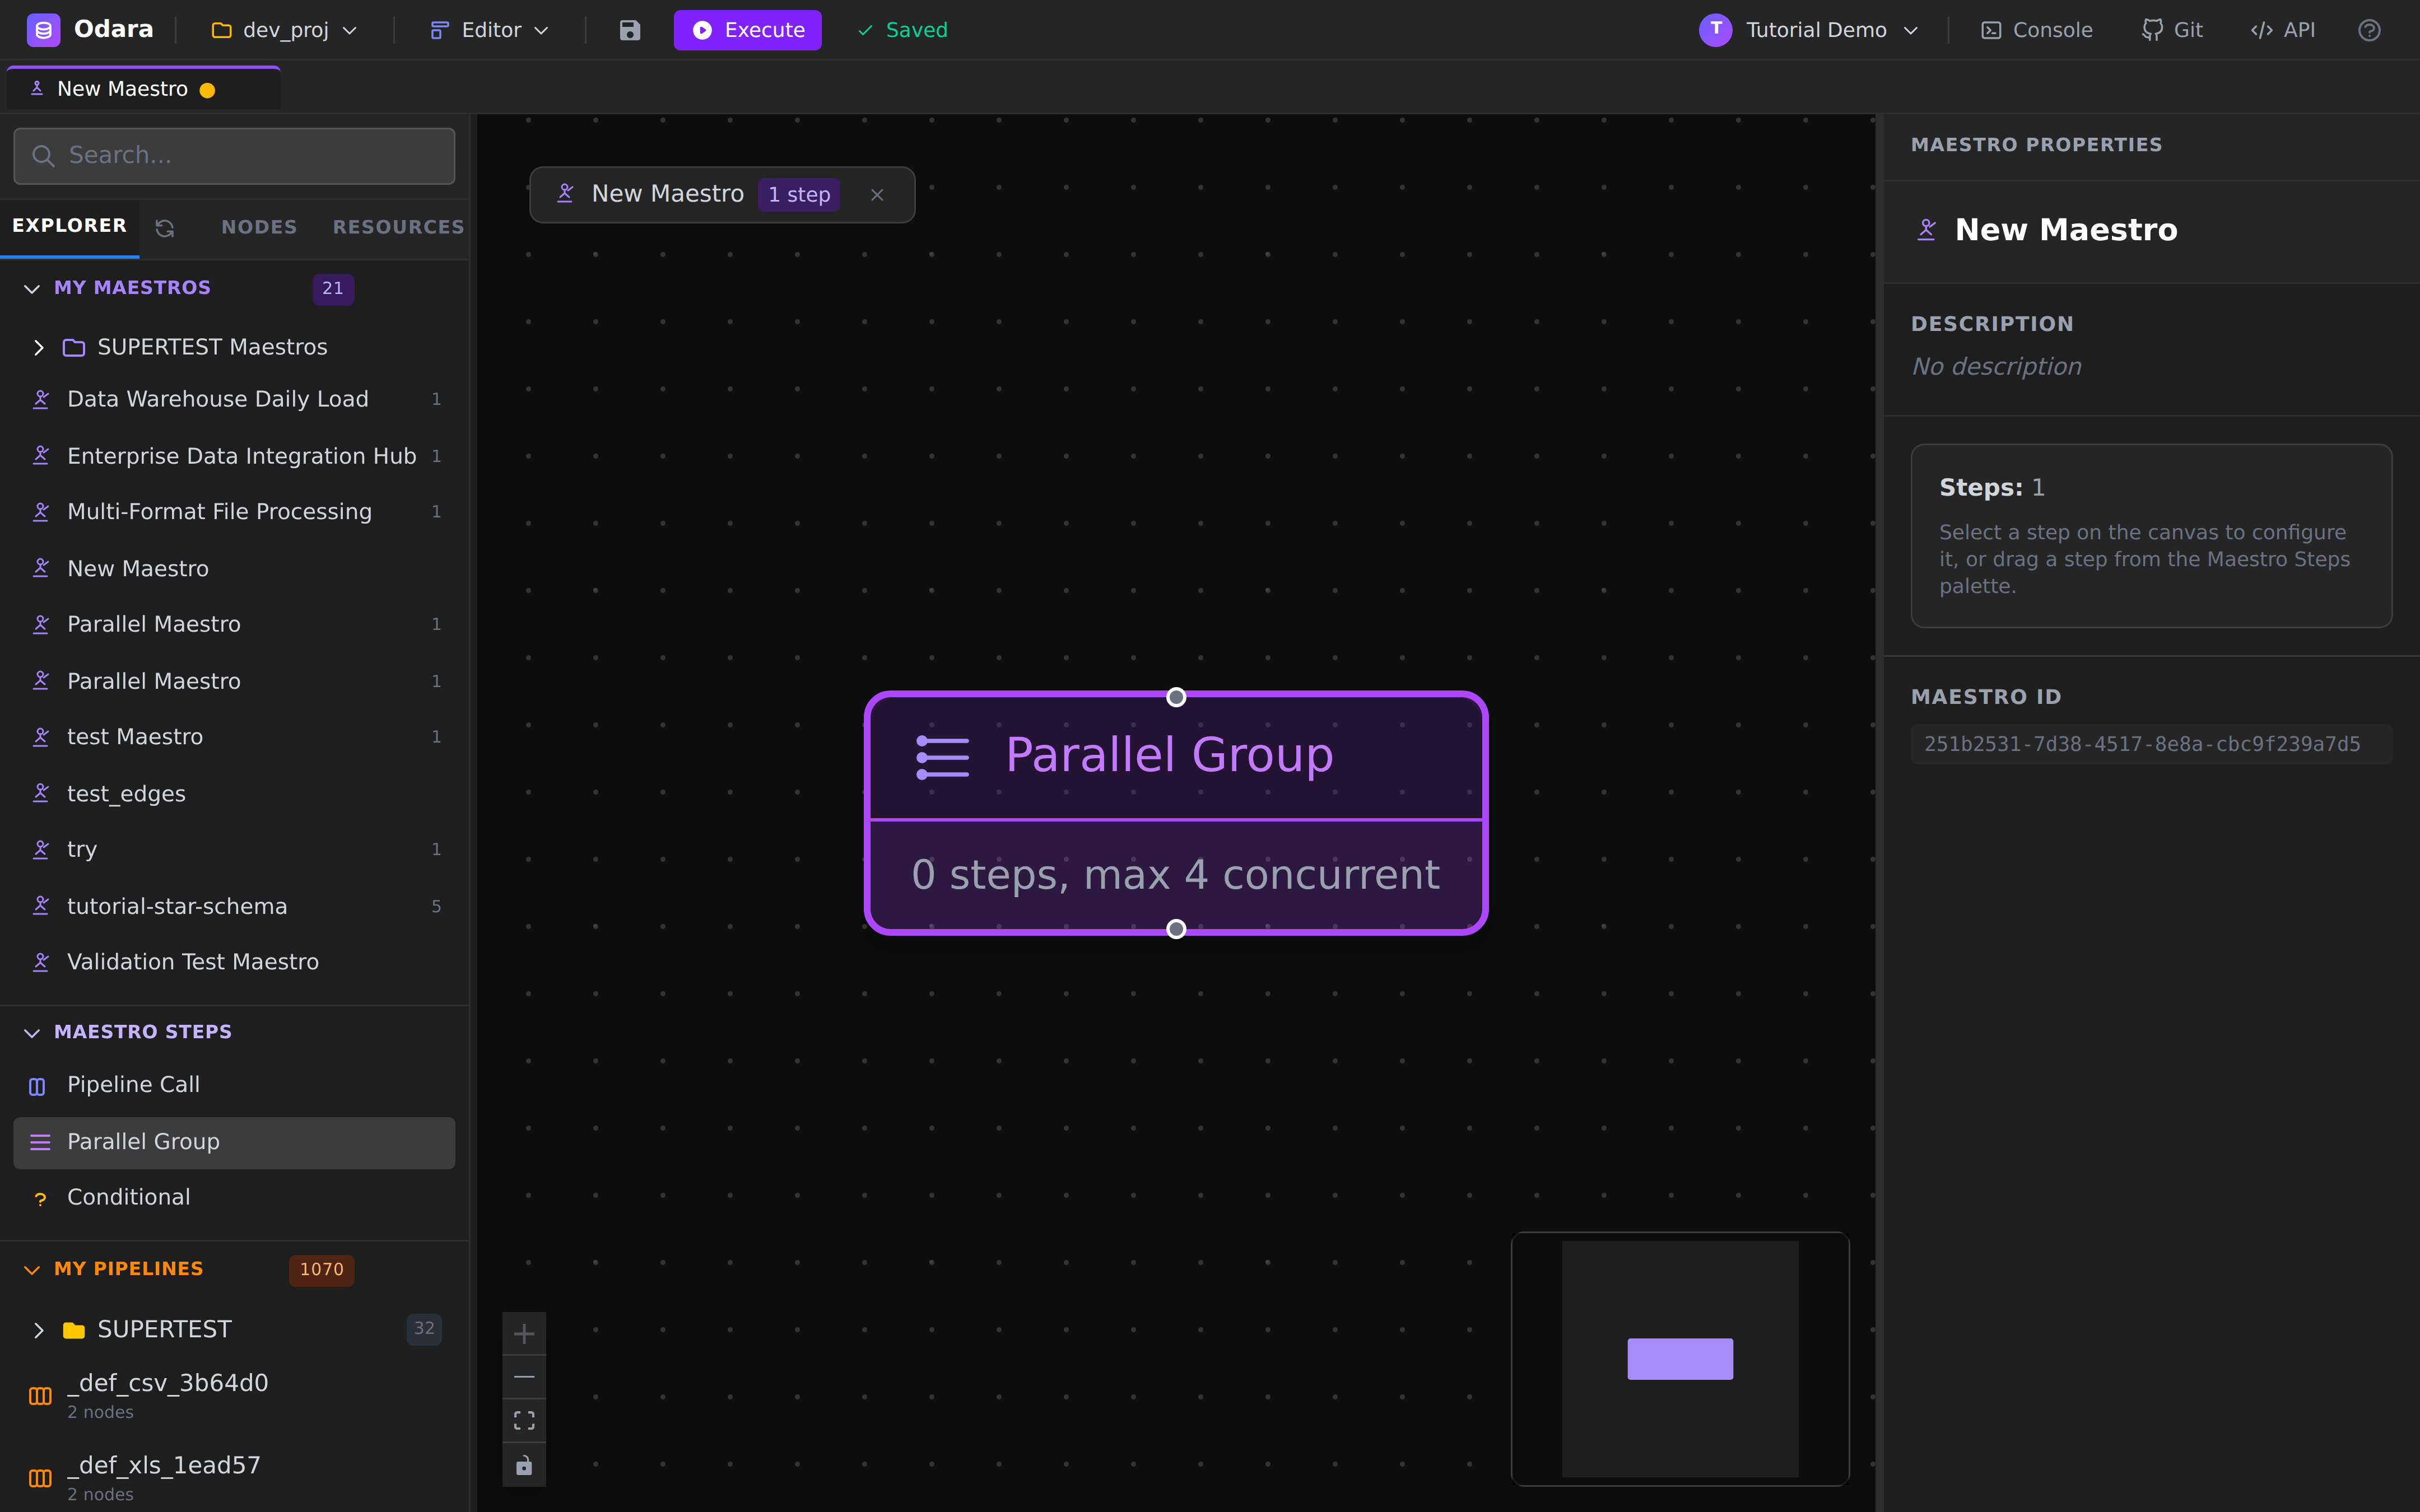
A single rounded block appears, captioned "Parallel Group — 0 steps, max 4 concurrent". The top tab shows 1 step and the toolbar reads ✓ Saved — Maestros auto-save on every change, no explicit save button.
Click the Parallel Group itself to open its STEP PROPERTIES:
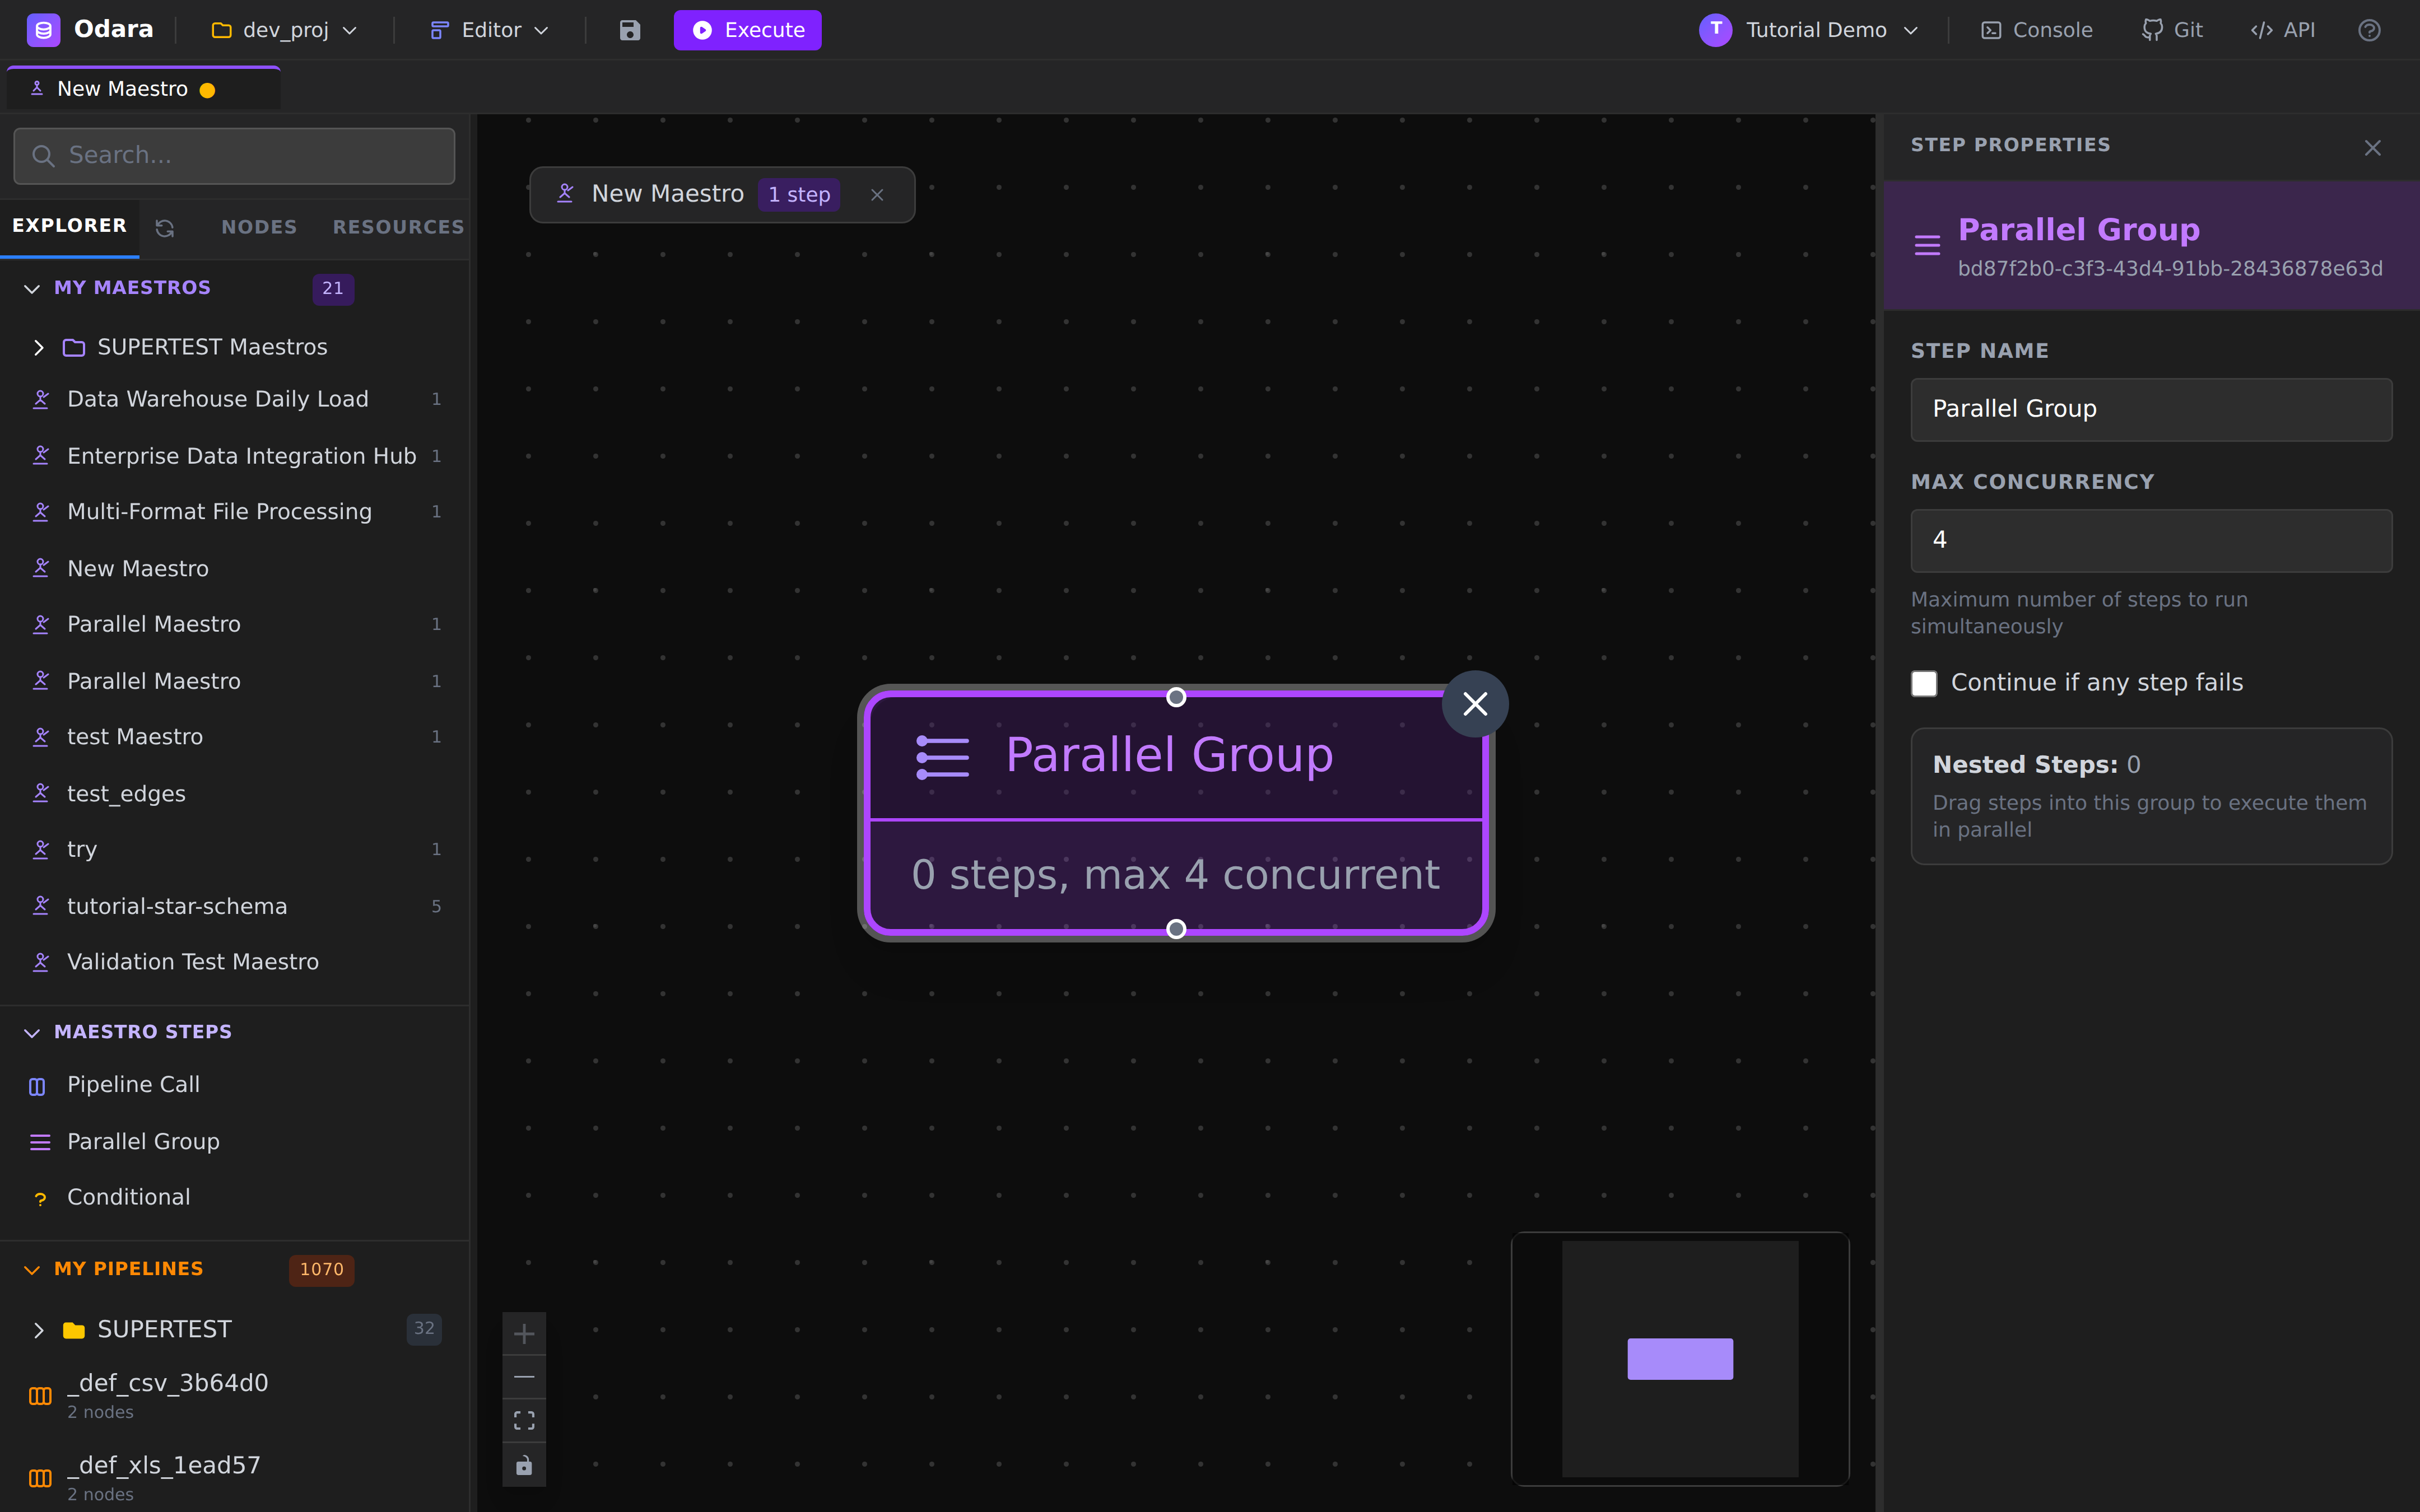
Two knobs that matter:
- Max concurrency — how many child steps can run at the same
time. The default is 4. Lower it (say
2) to stagger the load on a tiny warehouse; raise it for big fan-outs. - Continue if any step fails — when checked, a child failure doesn't short-circuit the group. Default is off (fail fast, good for star-schema loads where you want to retry the whole thing).
We'll leave both at their defaults.
4.4 — Drag a Pipeline Call into the group
Now drag Pipeline Call from the palette and drop it inside or just below the Parallel Group:
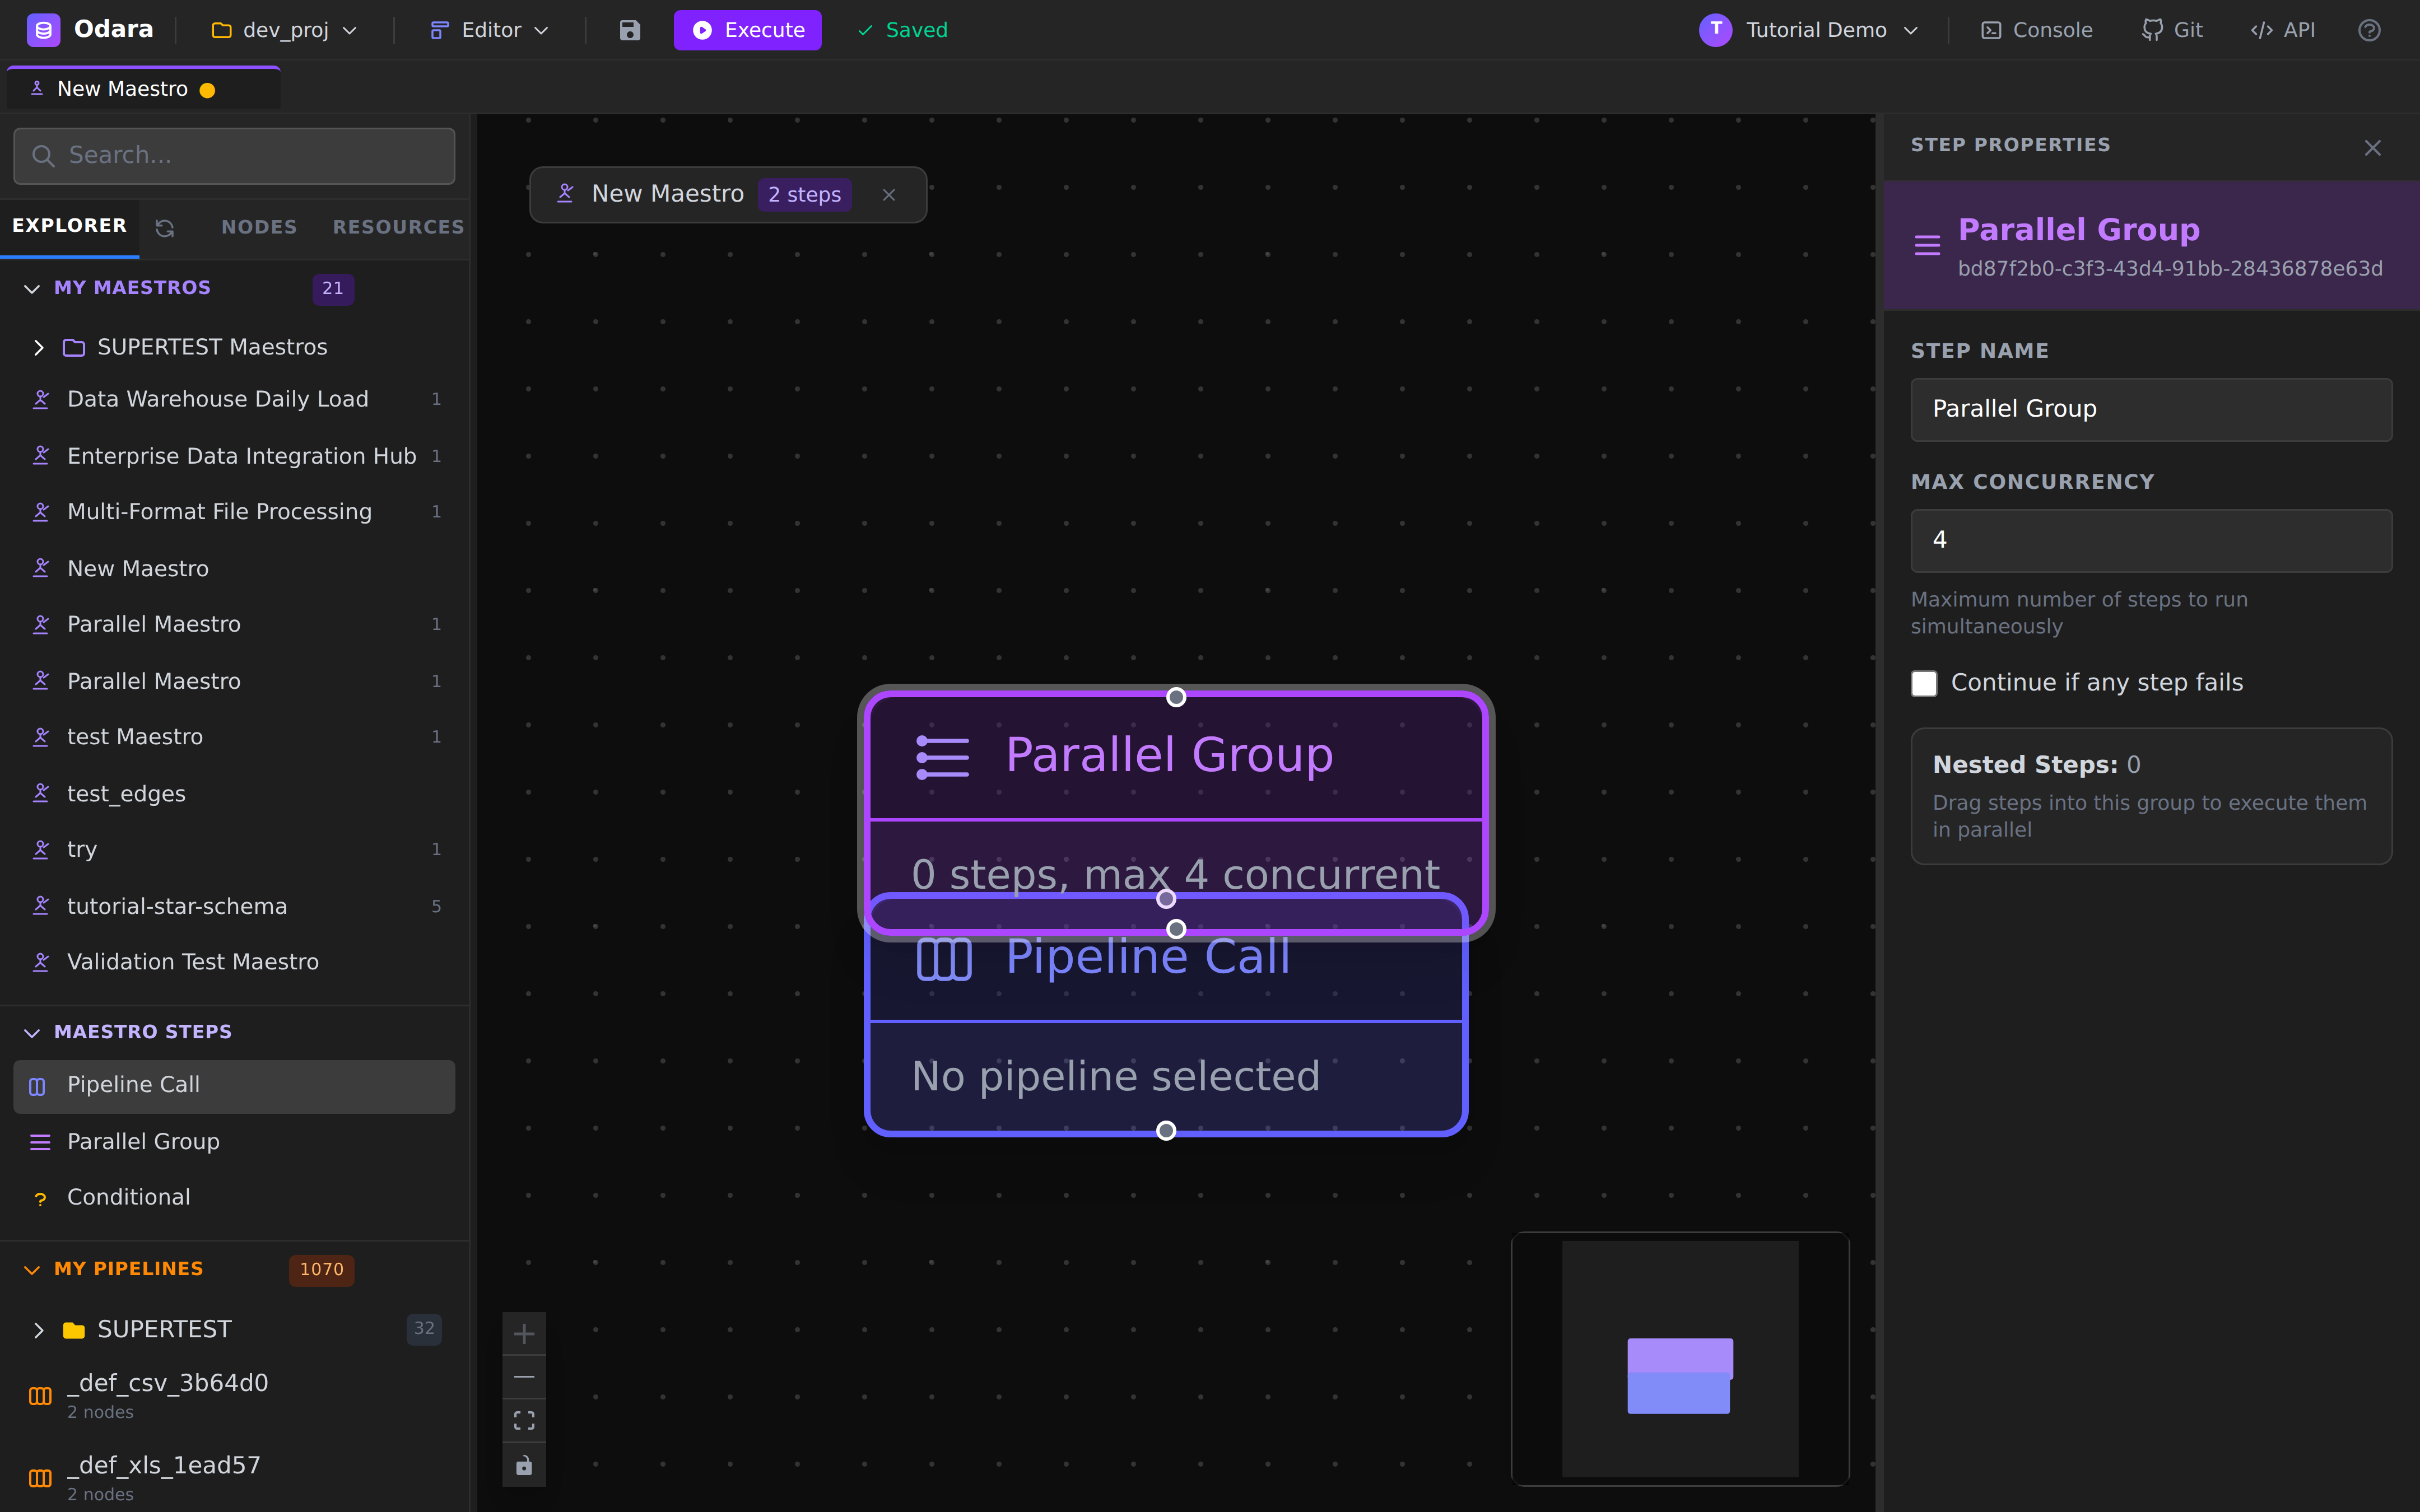
The tab counter at the top is now 2 steps — the Parallel Group plus its child. The new child reads "Pipeline Call — No pipeline selected".
4.5 — Pick the pipeline
Click the new Pipeline Call card. The properties panel now shows its config:
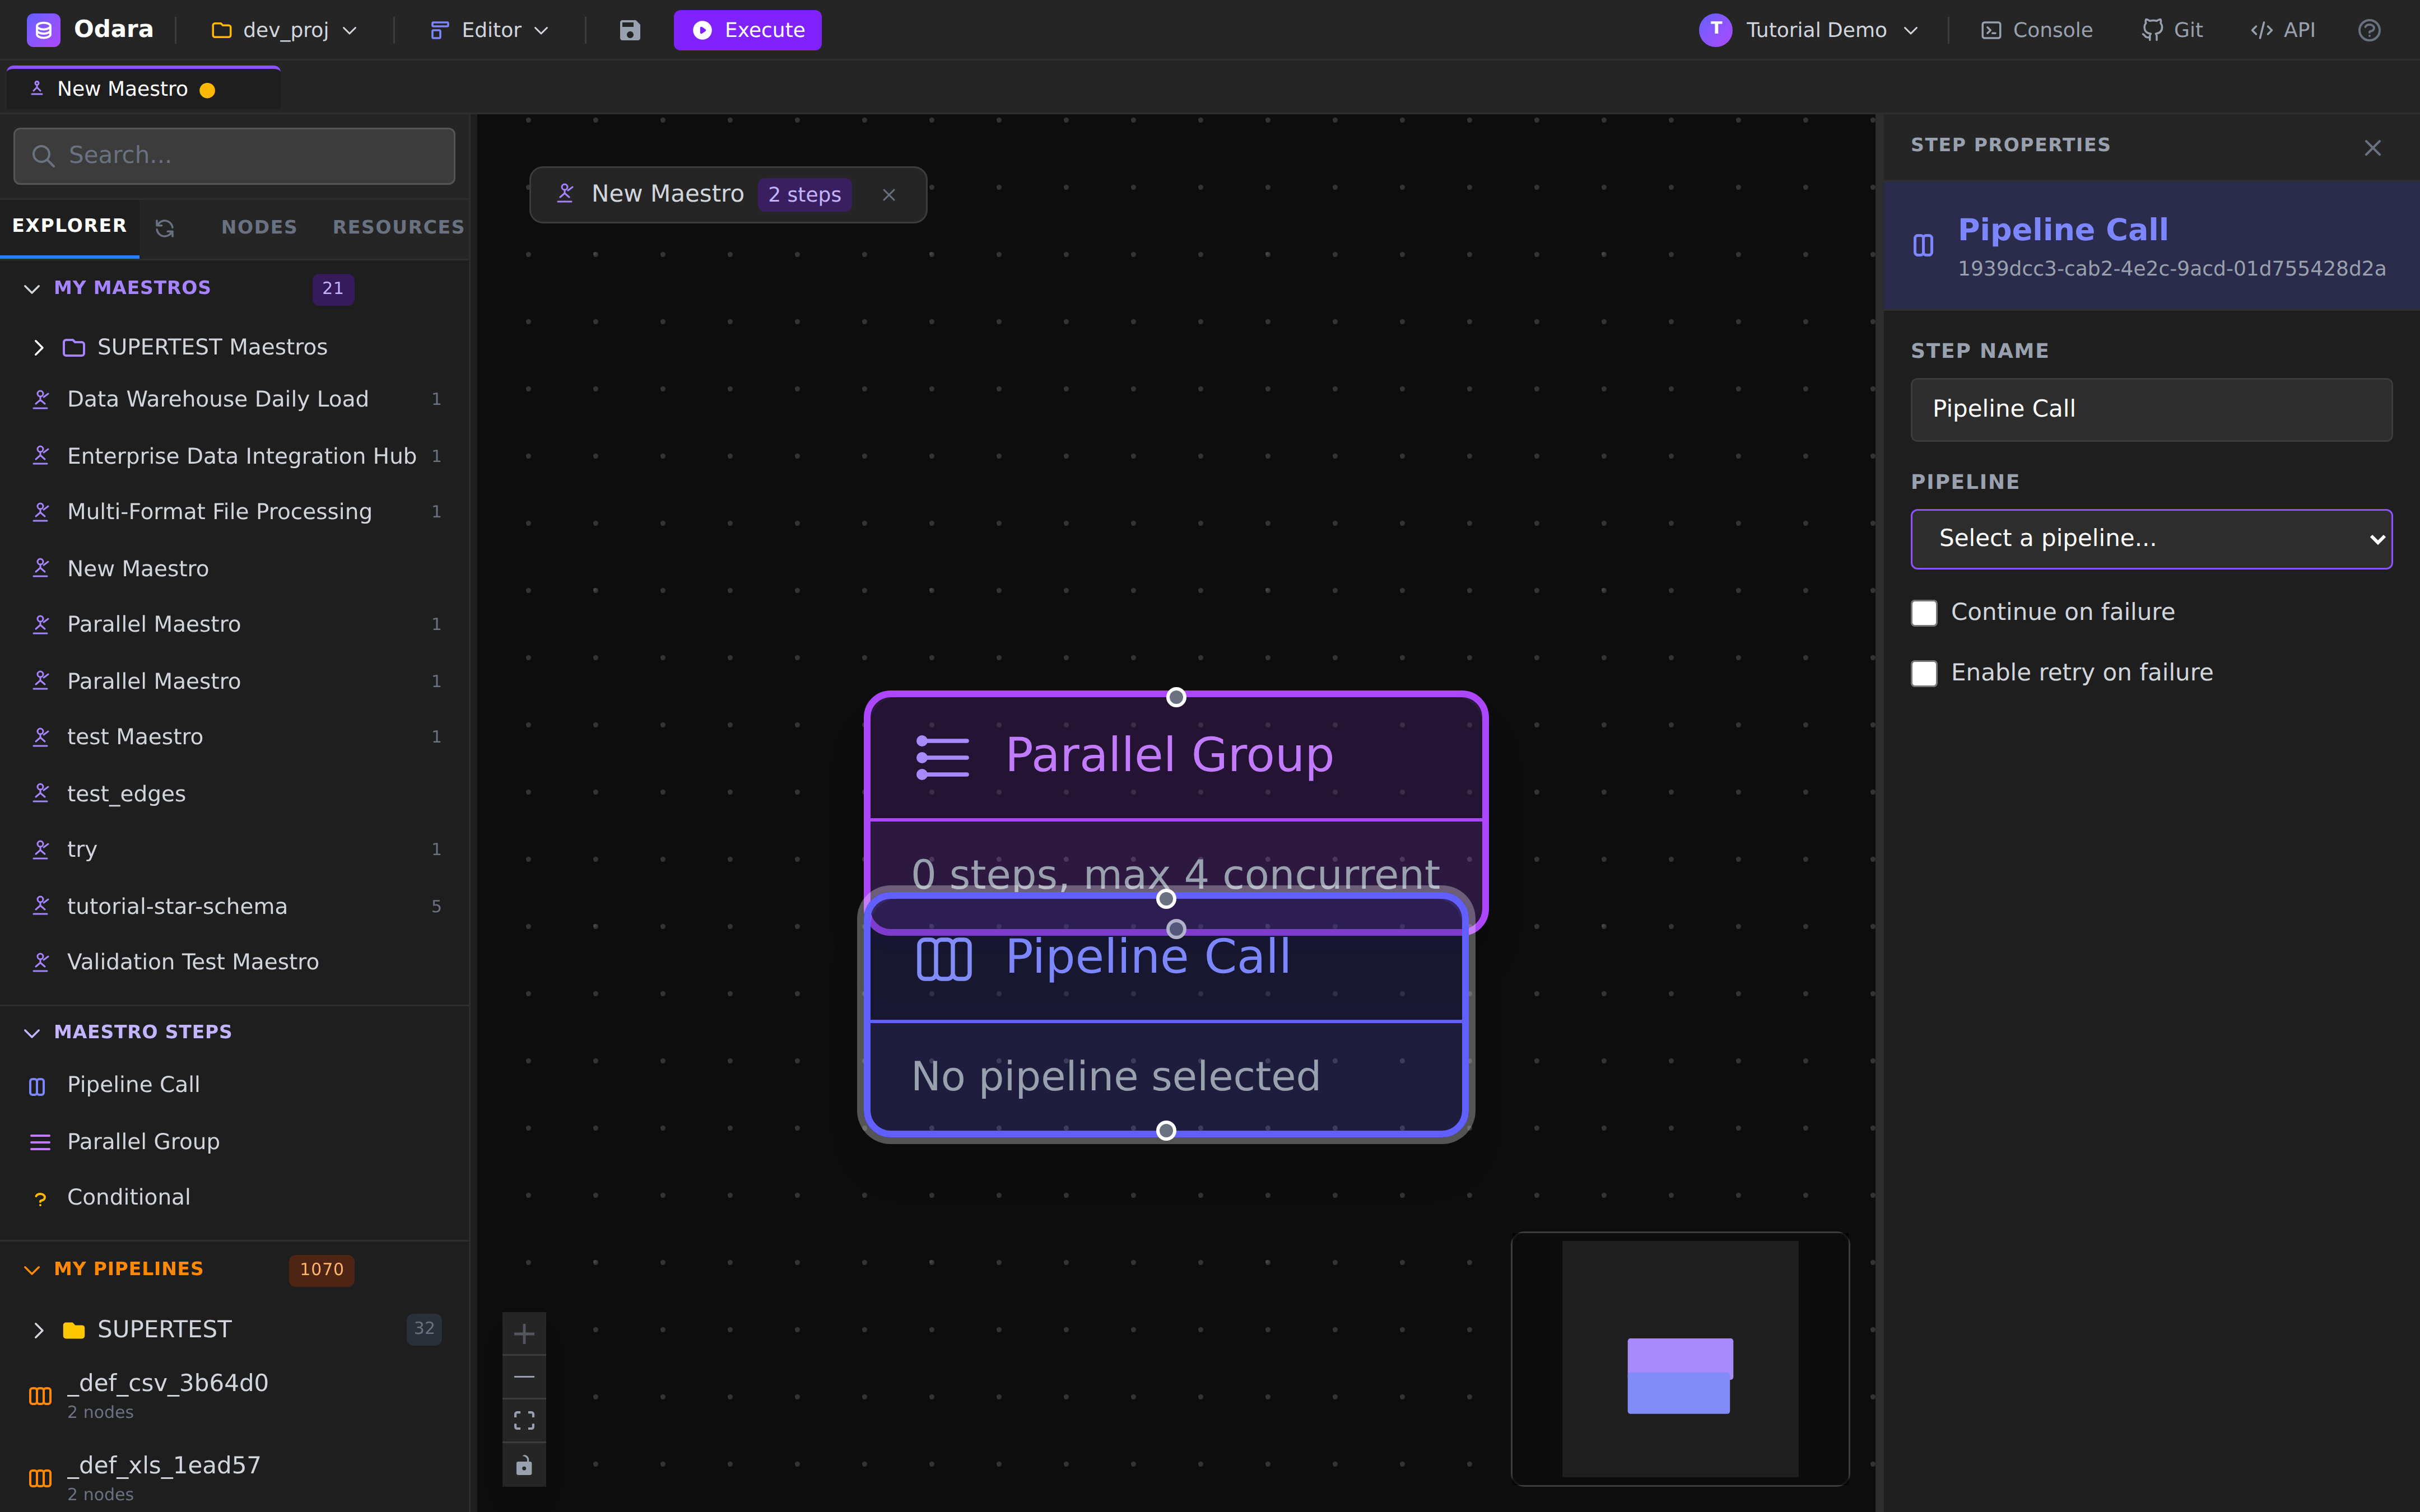
| Field | What goes in |
|---|---|
| Step Name | The label you see on the canvas (we'll rename to Load DIM_CUSTOMERS). |
| Pipeline | A dropdown of every pipeline in the project. Pick tutorial-star-dim-customers. |
| Continue on failure | If checked, a failure of this child doesn't fail the group. Independent of the group's own setting. |
| Enable retry on failure | Tick it to retry the child a few times before surrendering — useful for transient Snowflake "warehouse suspended" errors. |
4.6 — Repeat for the other three children
Drag three more Pipeline Call steps into the same Parallel Group, naming them and picking the right pipeline:
| Step Name | Pipeline |
|---|---|
Load DIM_CUSTOMERS |
tutorial-star-dim-customers |
Load DIM_PRODUCTS |
tutorial-star-dim-products |
Load DIM_DATES |
tutorial-star-dim-dates |
Load FACT_ORDERS |
tutorial-star-fact-orders |
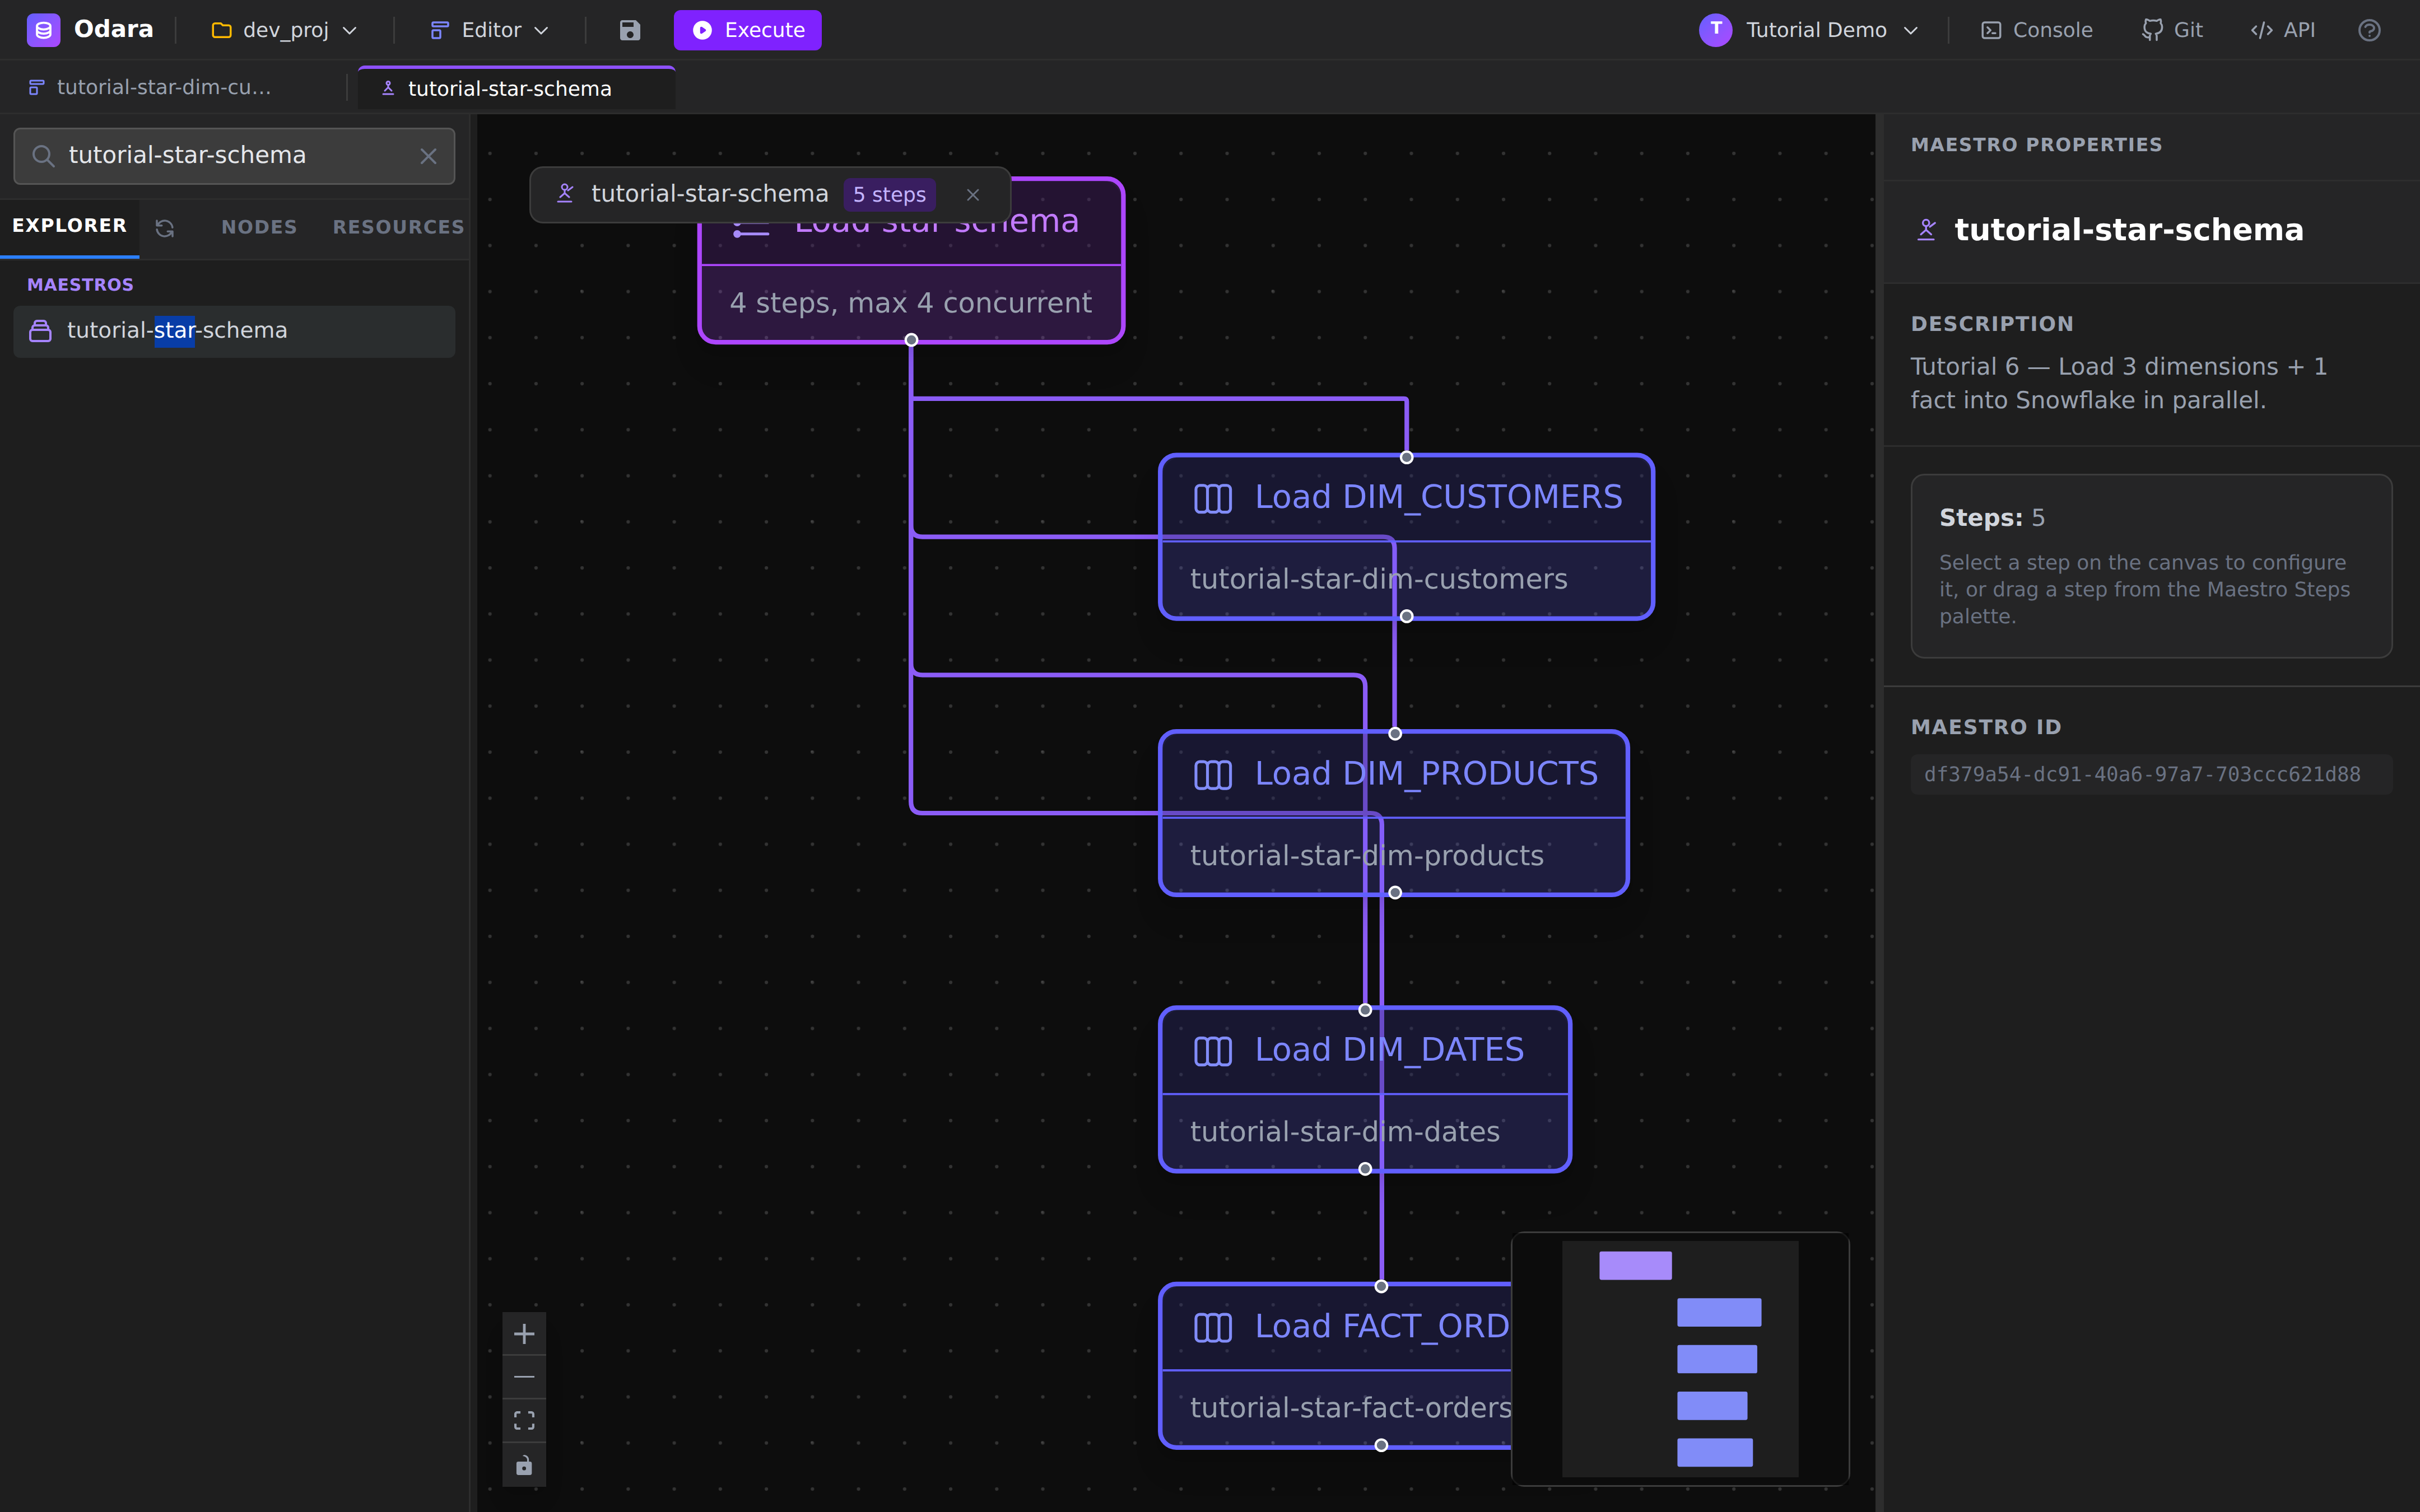
You should now have 5 steps total — one Parallel Group + four
nested Pipeline Calls. The end-state matches the tutorial-star- schema maestro shipped with the demo:
Don't forget to rename the maestro itself from "New Maestro" to
something meaningful (tutorial-star-schema-mycopy, say) by
clicking its title in the MAESTRO PROPERTIES panel and typing.
5. Execute
Hit Execute in the toolbar.
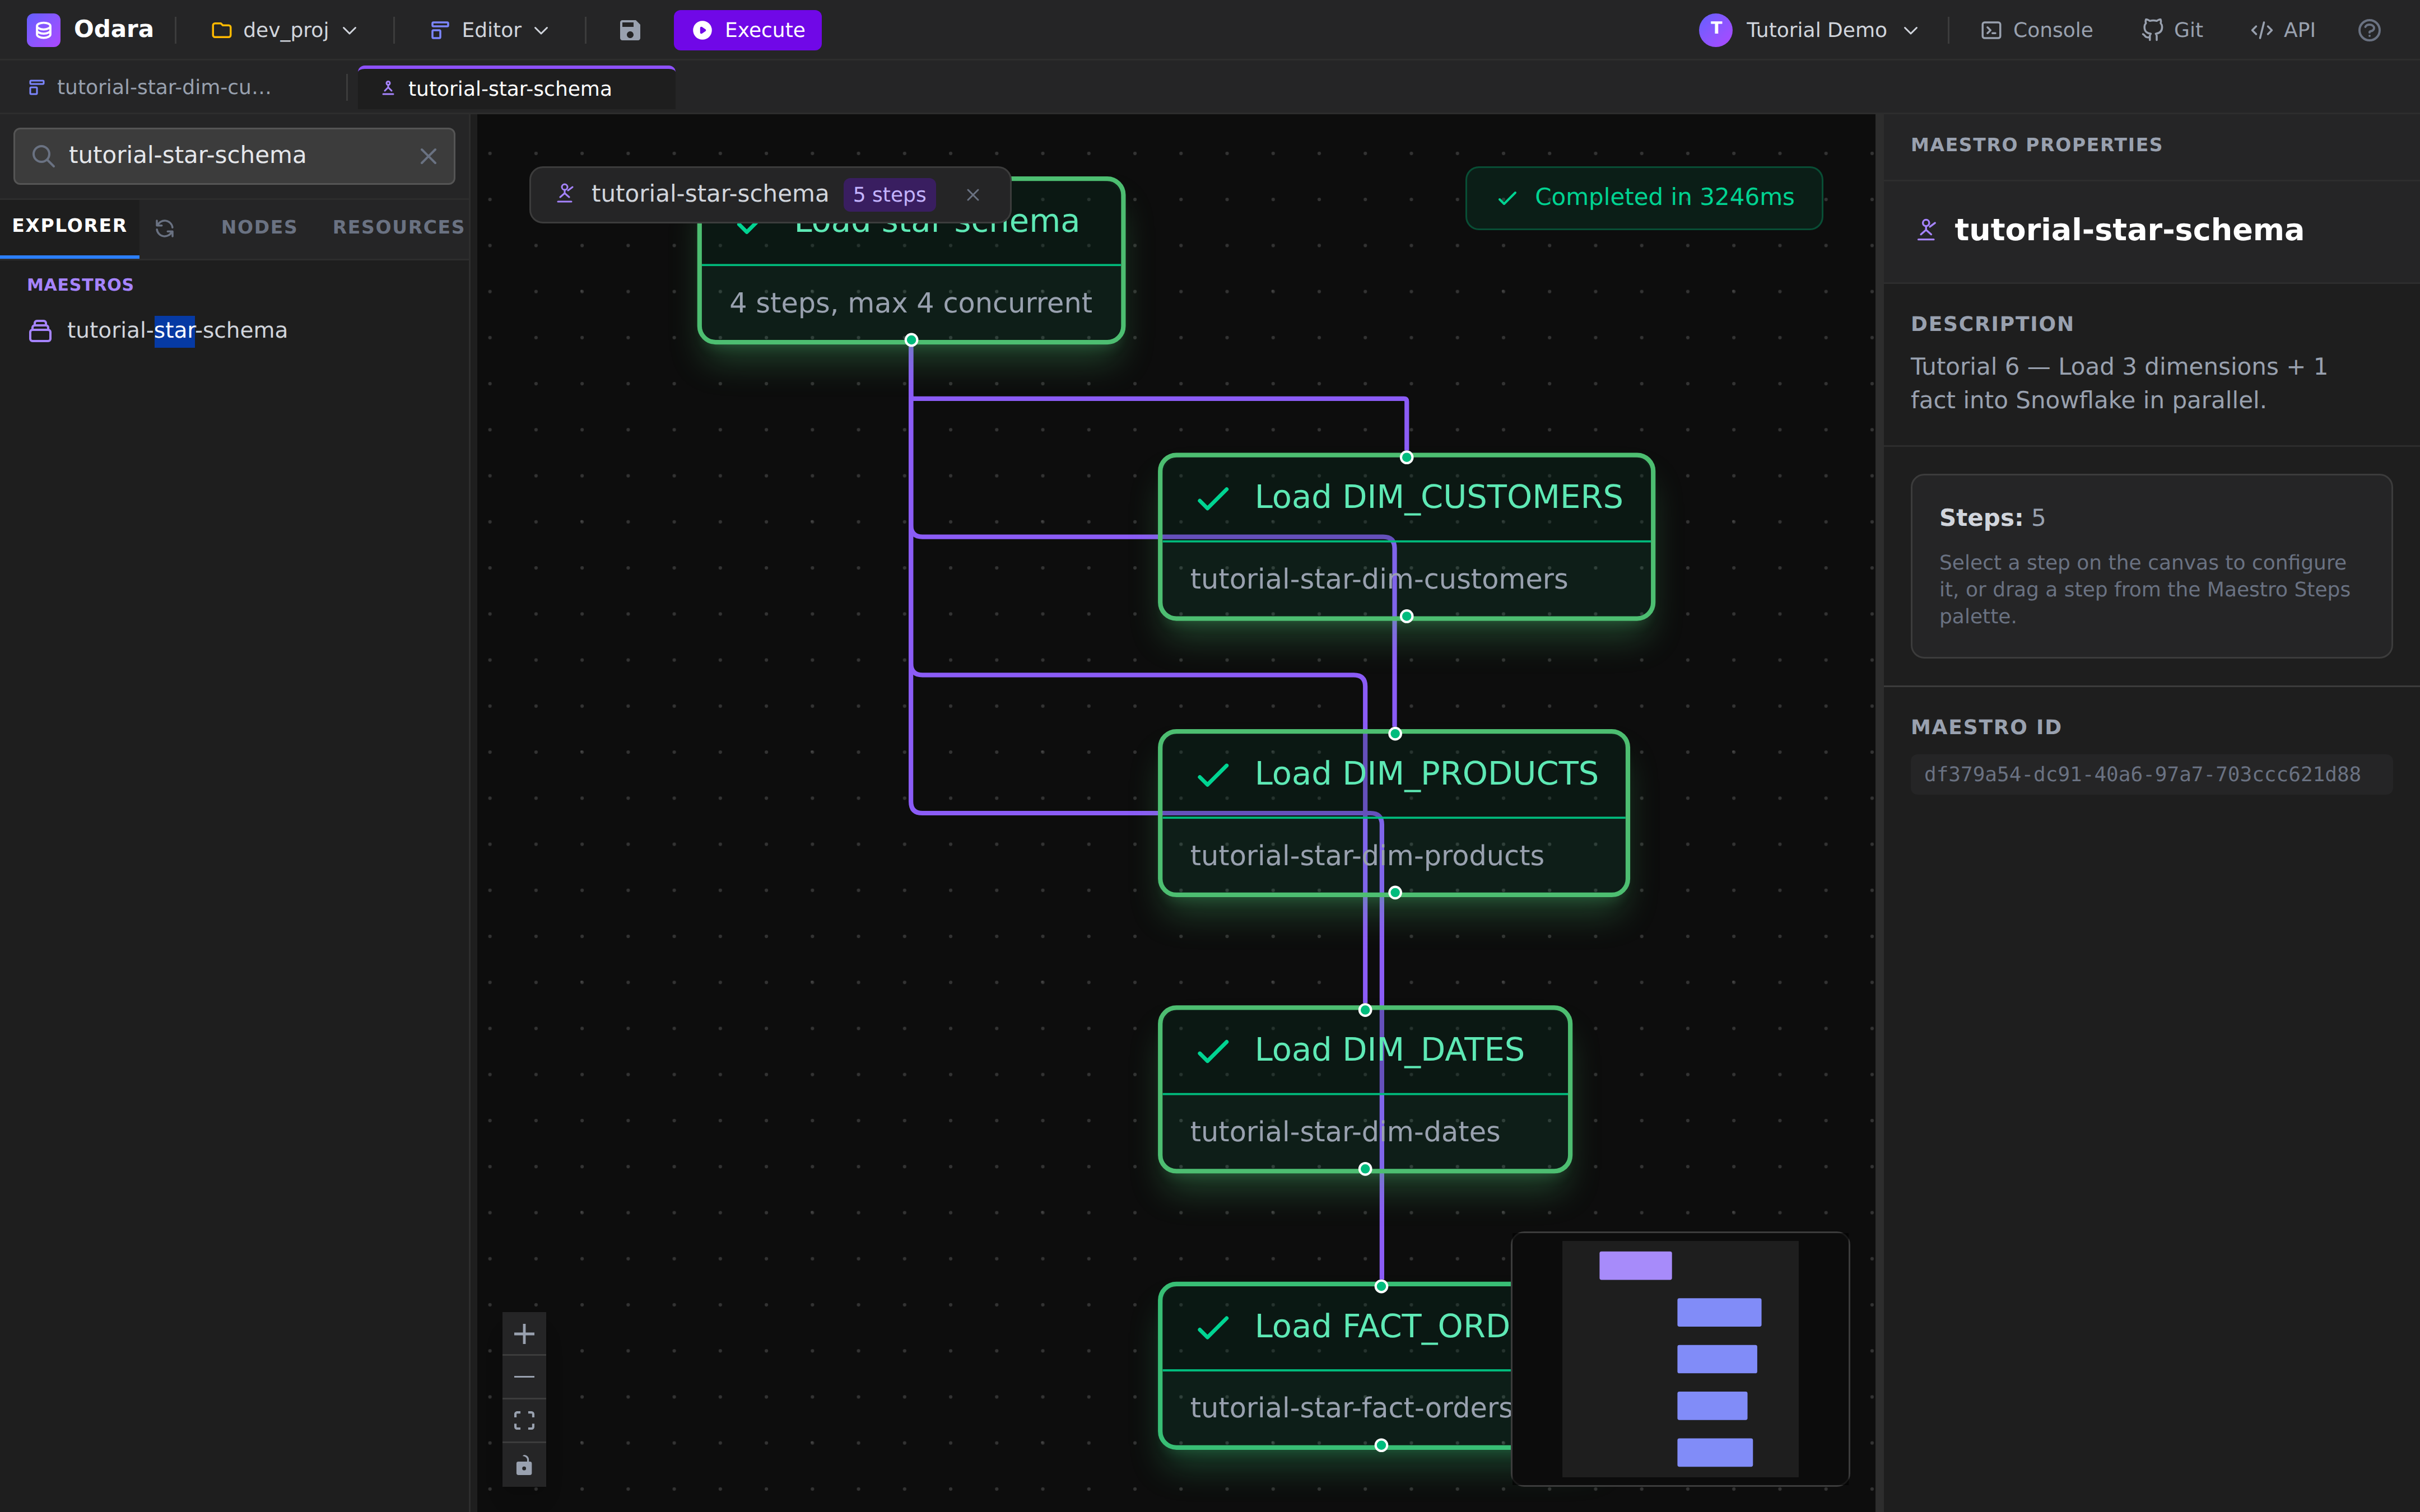
Behind the scenes the Maestro executor:
- Spawns four async tasks (one per
pipeline_call). - Each task POSTs
/api/v1/pipelines/<child_id>/run-streamagainst the API. - Joins when all four finish (or one errors, if
continue_on_failure = false).
6. Watch it in Monitor
Switch to Monitor. Filter by tutorial-star and you'll see five
fresh entries — four pipeline runs plus the parent Maestro run.
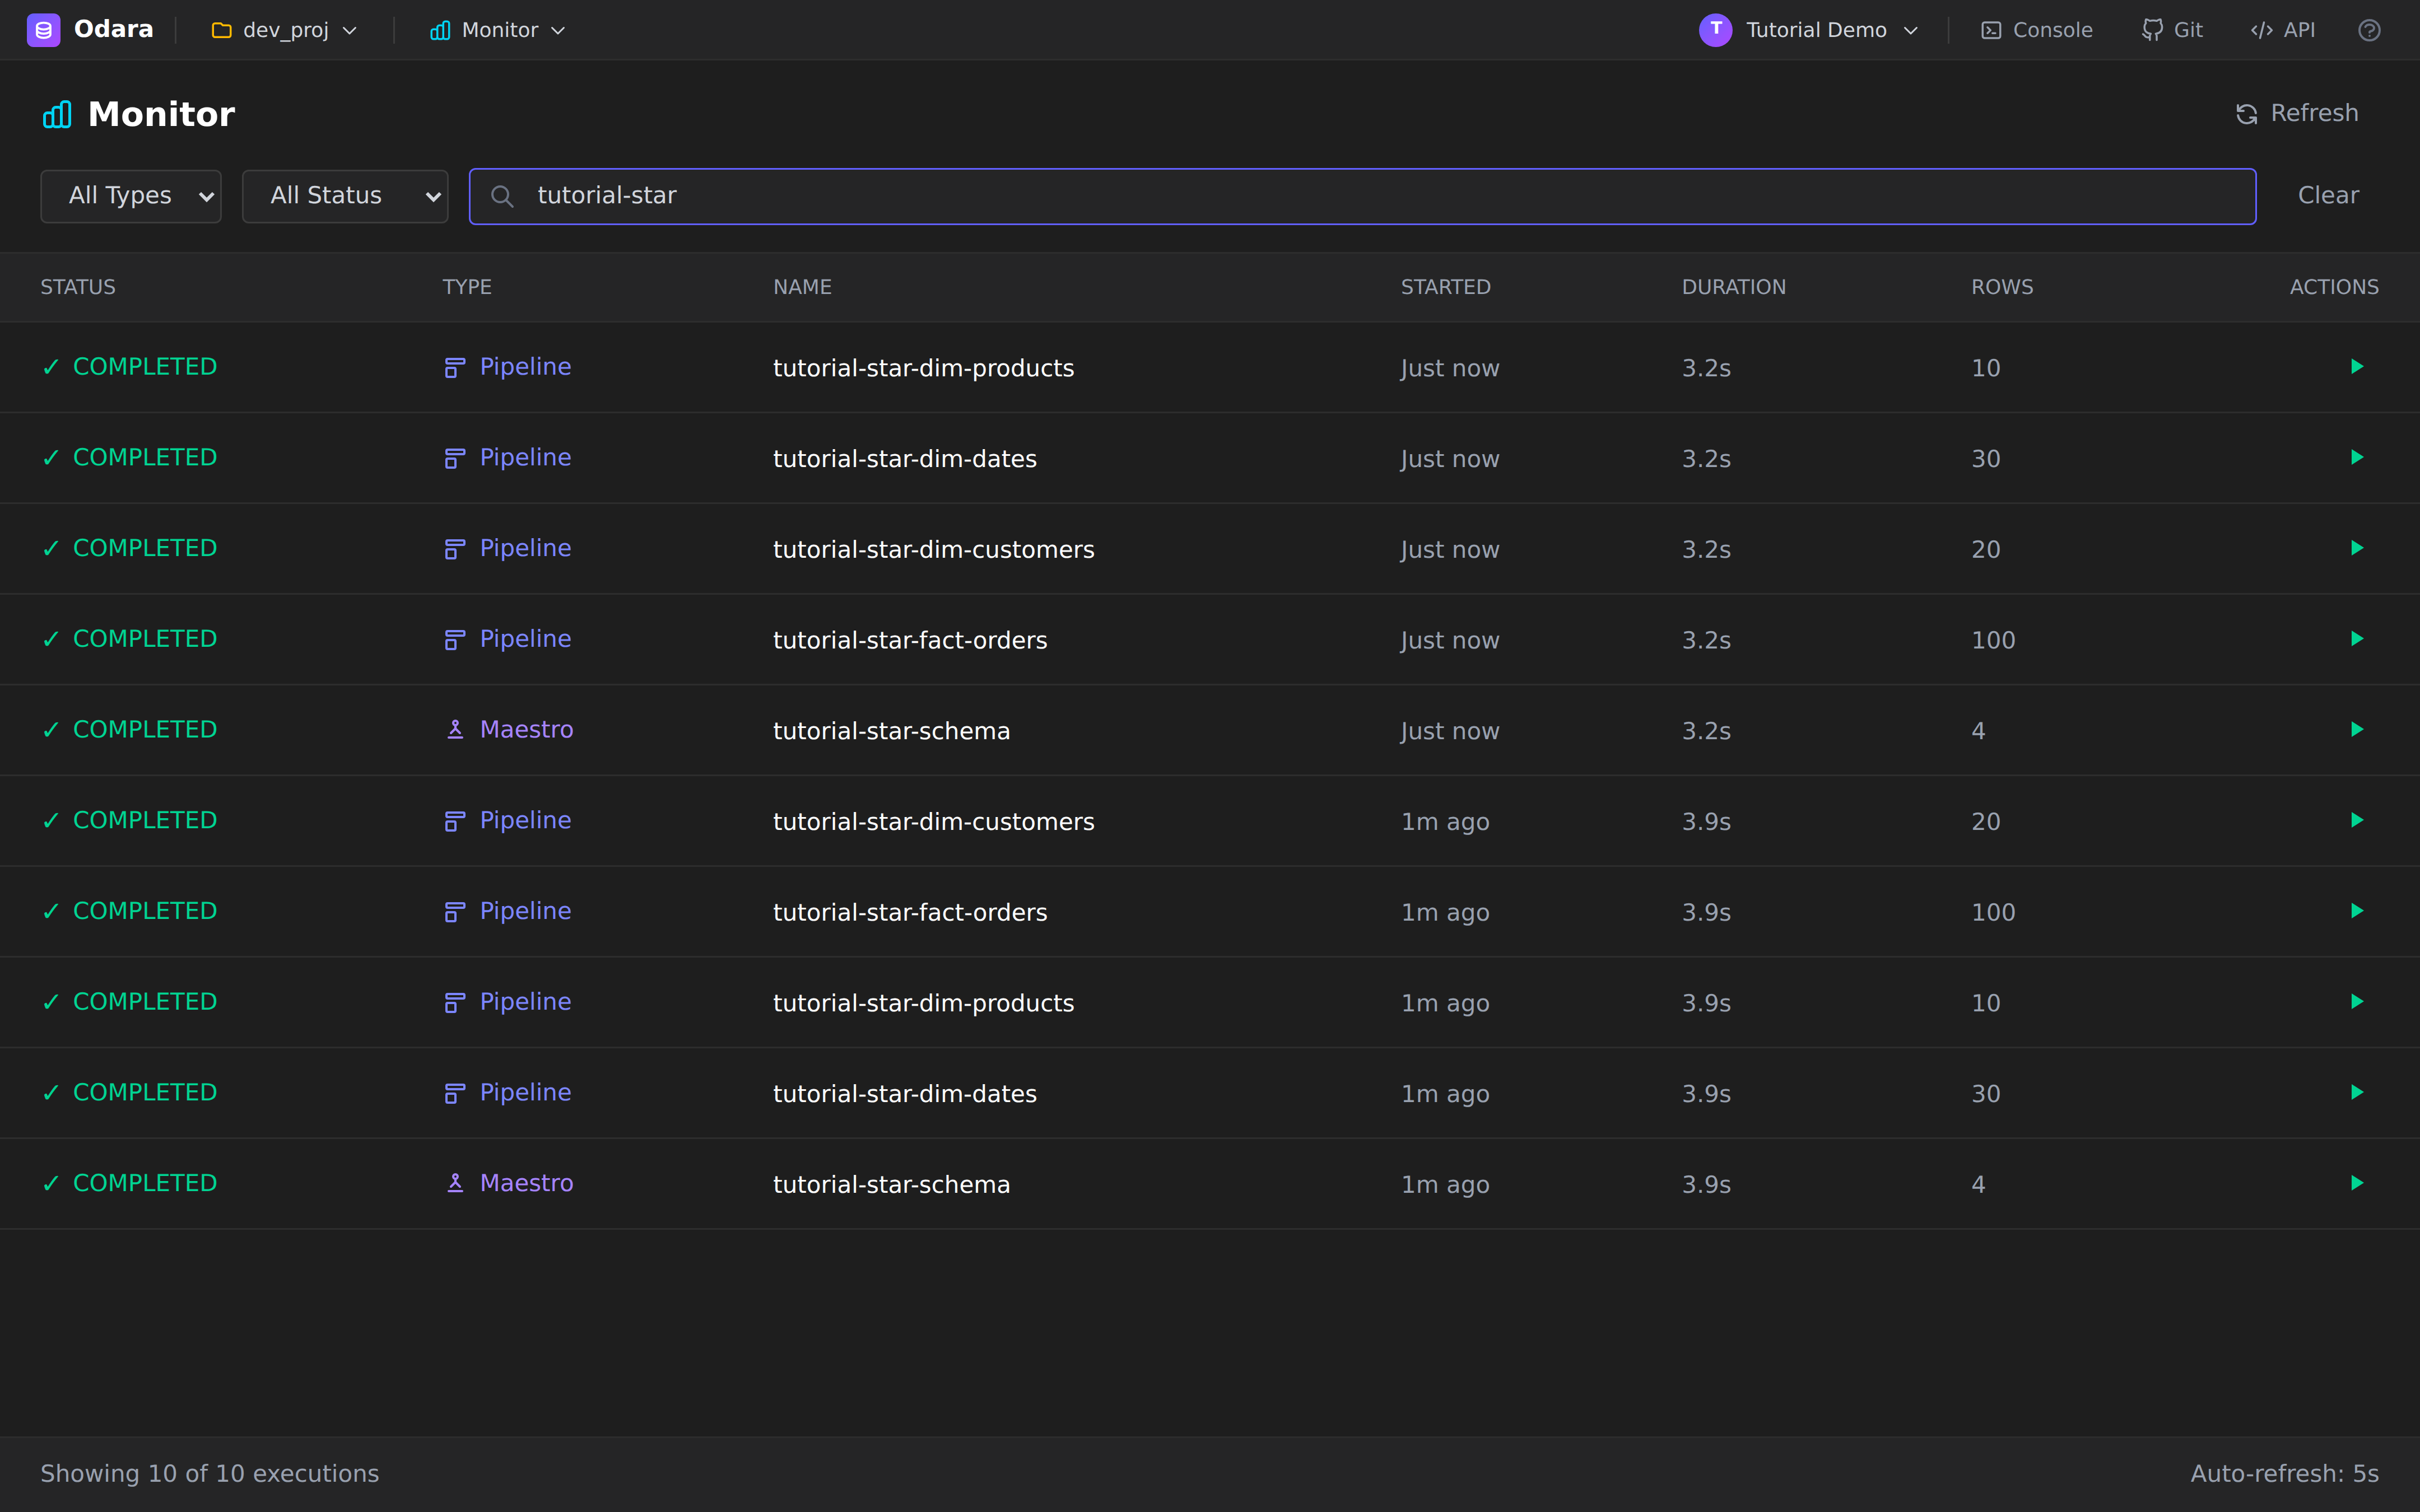
A few things to read off this list:
- Type column lets you separate
PipelinefromMaestroat a glance — useful when a maestro orchestrates dozens of children. - Started: Just now on all five — confirms they really started concurrently.
- Duration: 3.2s for every row — the wall-clock is dominated by Snowflake INSERT round-trips; CPU/network on Odara's side is negligible.
- Rows — each child shows its own row count (20 dim_customers,
10 dim_products, 30 dim_dates, 100 fact_orders); the Maestro row
shows
4(= number of child pipelines).
Click the Maestro row to see the orchestration trace:
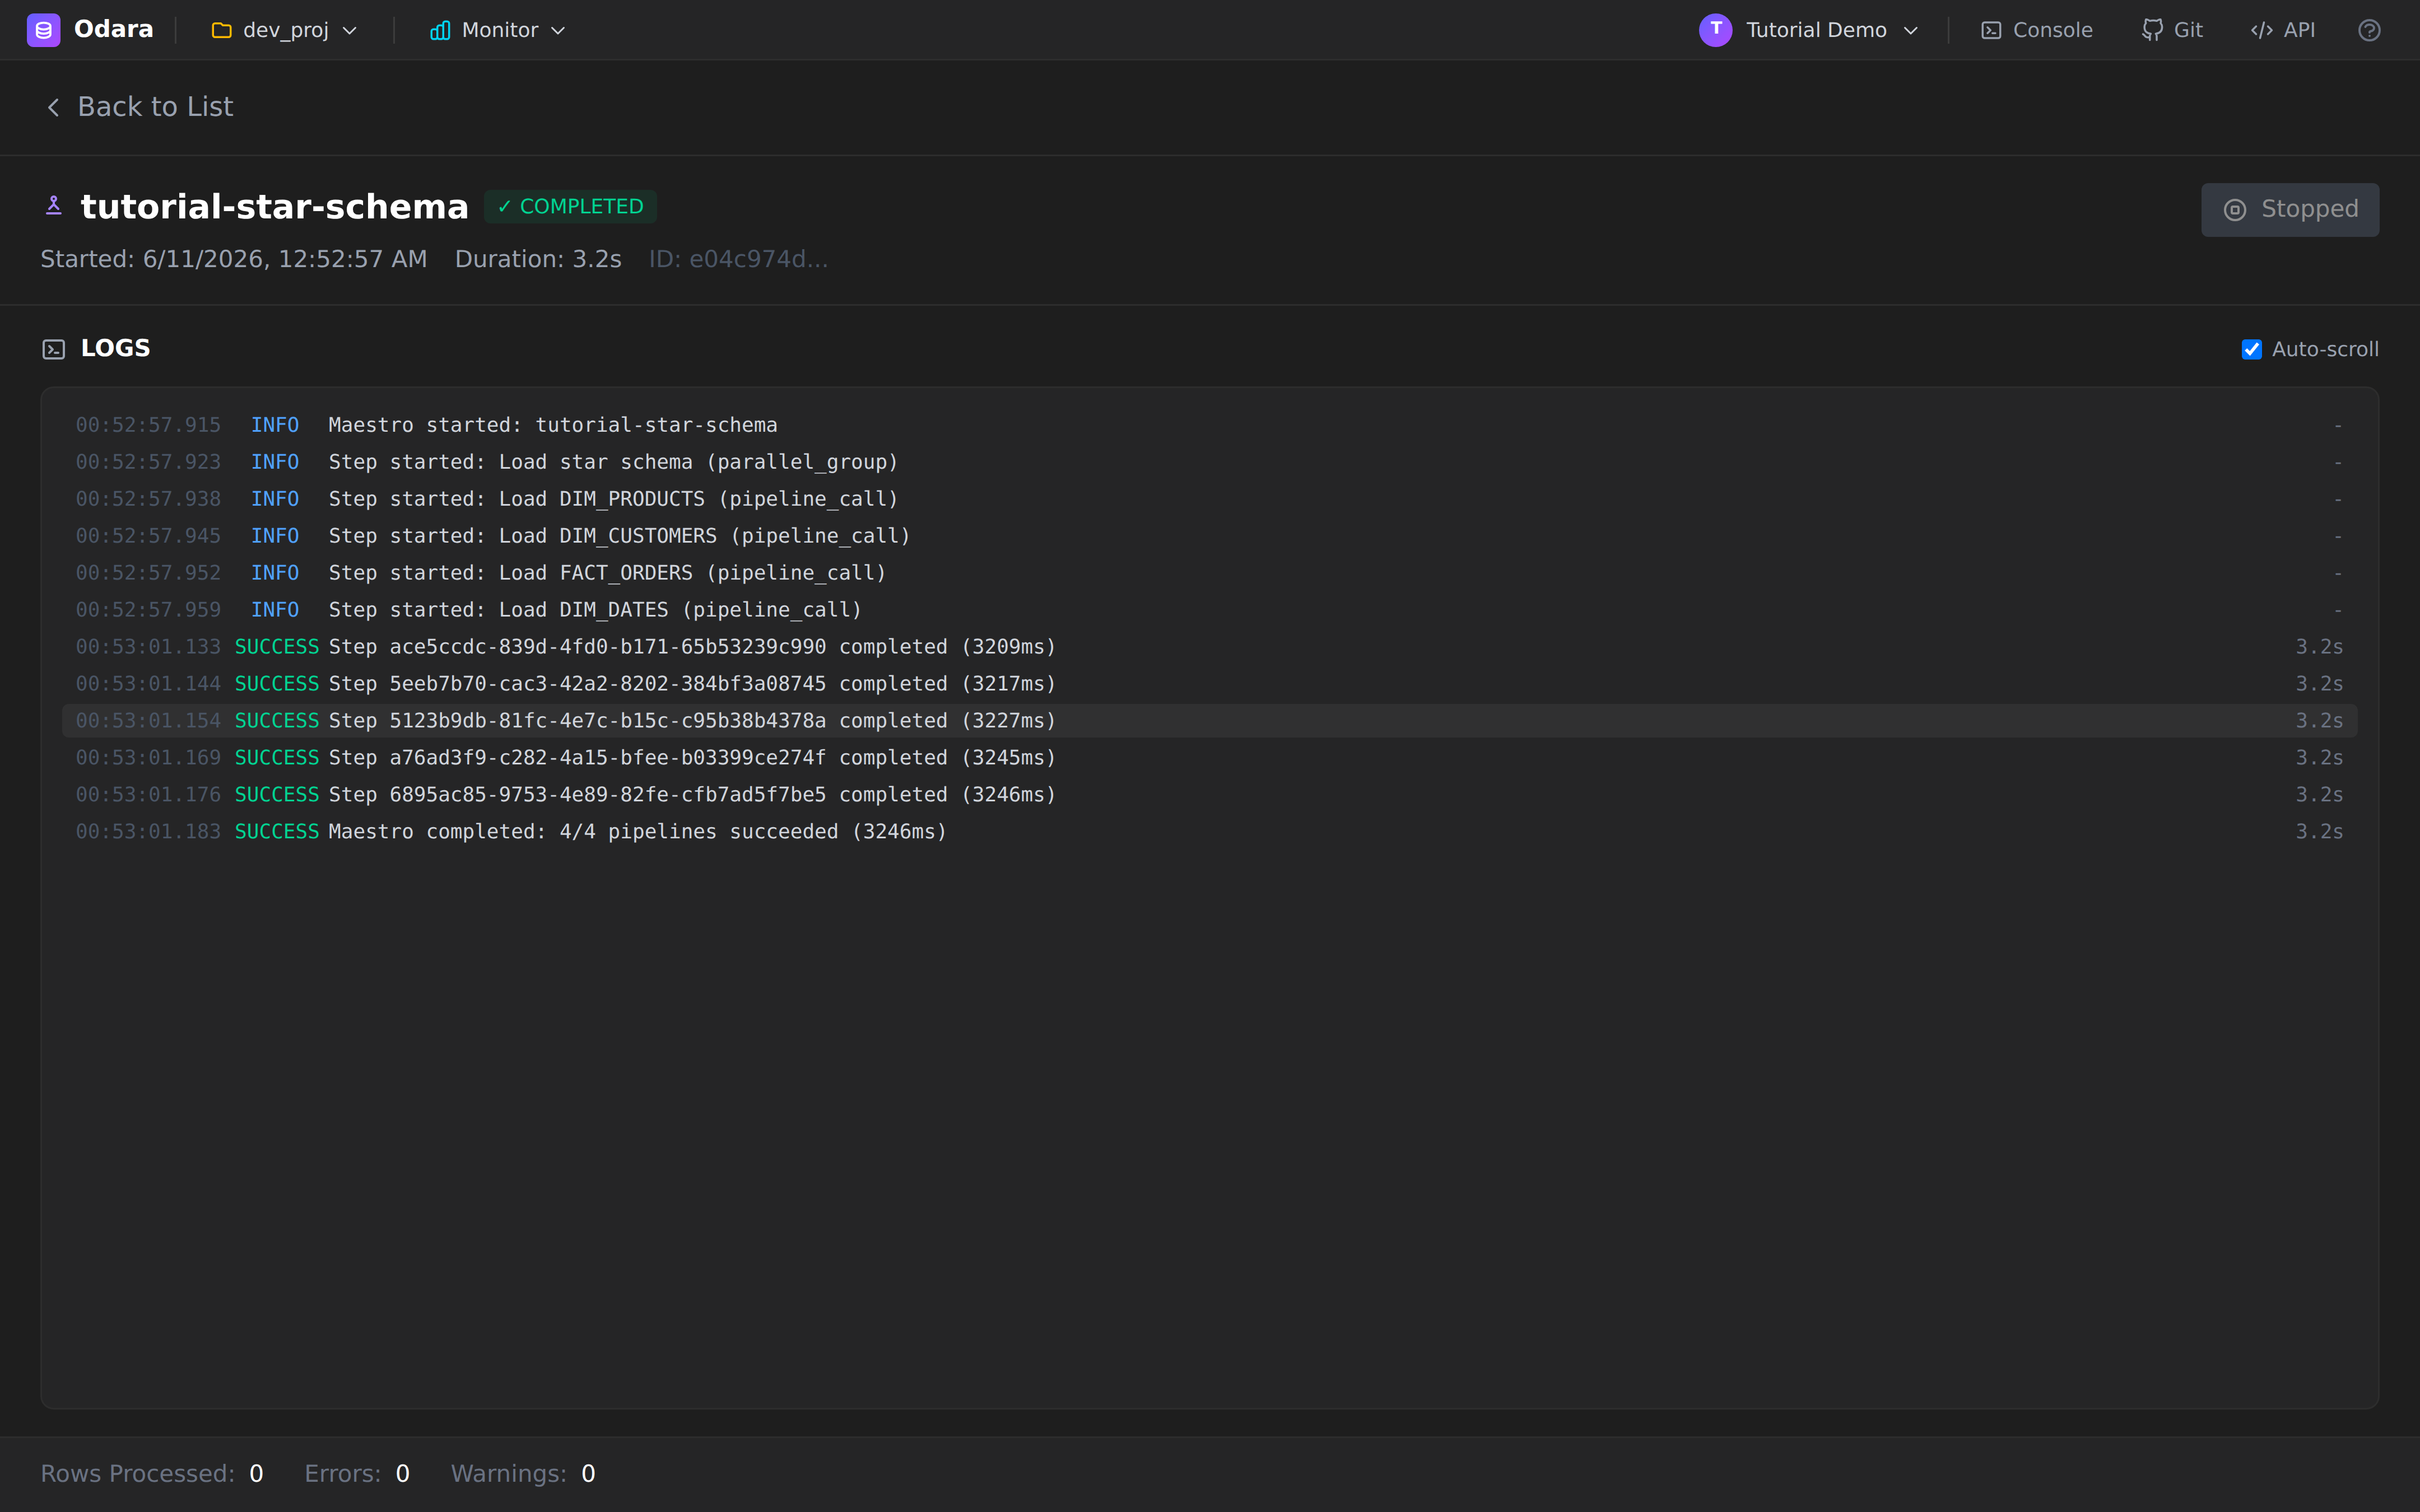
Read it top to bottom:
Maestro started: tutorial-star-schemaStep started: Load star schema (parallel_group)— the parentStep started: Load DIM_PRODUCTS / DIM_CUSTOMERS / FACT_ORDERS / DIM_DATES (pipeline_call)— all four fire in the same millisecond- four
SUCCESS Step …lines, each with its individual duration (3.2s ± a few ms) SUCCESS Maestro completed: 4/4 pipelines succeeded (3246ms)
The children are interleaved (DIM_PRODUCTS shows up first, not DIM_CUSTOMERS) — that's a real signal of parallel execution: the OS scheduler decides which Tokio task gets its first slice.
7. Where the JOINs happen
This is the question the star schema exists to answer: the joins happen at query time, in Snowflake — not in the load pipelines.
Our four pipelines each load one table, fully independent of the
others. The Odara executor never opens both customers and
orders in the same memory at the same time. The "star" is just a
shape on disk; the magic is what BI tools do with it when they
query.
When an analyst opens a dashboard, the SQL the BI tool generates is a star join:
USE WAREHOUSE <your_warehouse>;
USE DATABASE  <your_database>;
USE SCHEMA    PUBLIC;

SELECT
  d.month_name,
  c.country,
  p.category,
  SUM(f.total_amount) AS revenue
FROM FACT_ORDERS f
JOIN DIM_CUSTOMERS c ON c.customer_key = f.customer_key
JOIN DIM_PRODUCTS  p ON p.product_key  = f.product_key
JOIN DIM_DATES     d ON d.date_key     = f.date_key
GROUP BY 1, 2, 3
ORDER BY revenue DESC
LIMIT 10;
Three JOINs, one fact, three dims. Each JOIN matches the fact's
*_key column against the same-named key in the dim. The grouping
columns come from the dim sides (human-readable month_name,
country, category); the measure (SUM(total_amount)) comes from
the fact side.
This is why we built the schema as a star in the first place:
- Wide dimension tables with the descriptive attributes — written once.
- Narrow fact table with measurements + foreign keys — appended often.
- Joins computed at read time by the warehouse's SQL engine, which has all the indexes and statistics to do it well.
Quick row-count sanity check
Run this first to confirm the loads landed:
SELECT 'DIM_CUSTOMERS' AS table_name, COUNT(*) AS rows FROM DIM_CUSTOMERS
UNION ALL SELECT 'DIM_PRODUCTS', COUNT(*) FROM DIM_PRODUCTS
UNION ALL SELECT 'DIM_DATES',    COUNT(*) FROM DIM_DATES
UNION ALL SELECT 'FACT_ORDERS',  COUNT(*) FROM FACT_ORDERS;
Expected:
| table_name | rows |
|---|---|
| DIM_CUSTOMERS | 20 |
| DIM_PRODUCTS | 10 |
| DIM_DATES | 30 |
| FACT_ORDERS | 100 |
If the row counts match, the star is loaded.
Cheat sheet
| I want to… | Do this |
|---|---|
| Create a new Maestro | Right-click MY MAESTROS → New Maestro |
| Add a step | Drag from MAESTRO STEPS palette onto canvas |
| Make N children run together | One Parallel Group, drop the children inside, set Max concurrency = N |
| Make children run one after another | Add them as top-level steps (no Parallel Group) — sequential is the default |
| Mix: dims parallel, then fact | Parallel Group for the three dims, then a sibling Pipeline Call for the fact |
| Limit concurrency (small warehouse) | Parallel Group → Max concurrency = lower number |
| Keep going if one child fails | Parallel Group → Continue if any step fails |
| Retry transient failures | Pipeline Call → Enable retry on failure |
| Idempotent re-runs of the loads | Snowflake Target → Table Operation = Drop & Create |
| Fast bulk loads (> 10k rows) | Snowflake Target → Data Operation = Copy Into |
What you learned
- A star schema load doesn't need one giant pipeline — model it as one pipeline per table and let a Maestro be the only place that knows about ordering.
- The Snowflake Target has no connection string — its seven configuration fields are the connection, and the password is encrypted at rest.
- A Parallel Group with
Max concurrency = Nactually runs the children concurrently — Monitor'sStarted: Just nowon every row and interleavedStep completedlines are how you can tell. - JOINs happen at query time, in the warehouse — the load is four independent streams. The "star" is just the on-disk shape that makes the read-time JOIN cheap.
- For production loads, swap
Insert→Copy Intoon the Snowflake target — same UI, dramatically faster on real volumes.
Next
→ Magic File + Iterate — one pipeline for a folder of mixed formats