Admin
One line: Admin is the single screen where you decide who can log into this Odara install and what they're allowed to do — users in one tab, roles in another, and the catalog of permissions roles draw from in the third.
This tutorial walks through Admin end to end on a fresh install, logged in as an Administrator. You'll learn how to:
- Open Admin
- Read the Users list
- Create a new user
- Change which roles a user has (inline editor)
- Browse the Roles list and view a role's permissions
- Create a custom role
- Browse the catalog of available permissions
It takes about 8 minutes.
You need to be an admin to follow this. The Admin entry only appears in the Editor dropdown for users who hold the
Administratorrole. If you're following along on the bundled tutorial install, the[email protected]account has been upgraded to admin — on a real install, ask whoever set Odara up.
1. Open Admin
Sign in, then click the Editor dropdown in the top bar (between the project selector and the user menu). The dropdown shows the sections you have access to — for an admin, the bottom entry is Admin (highlighted in red below).
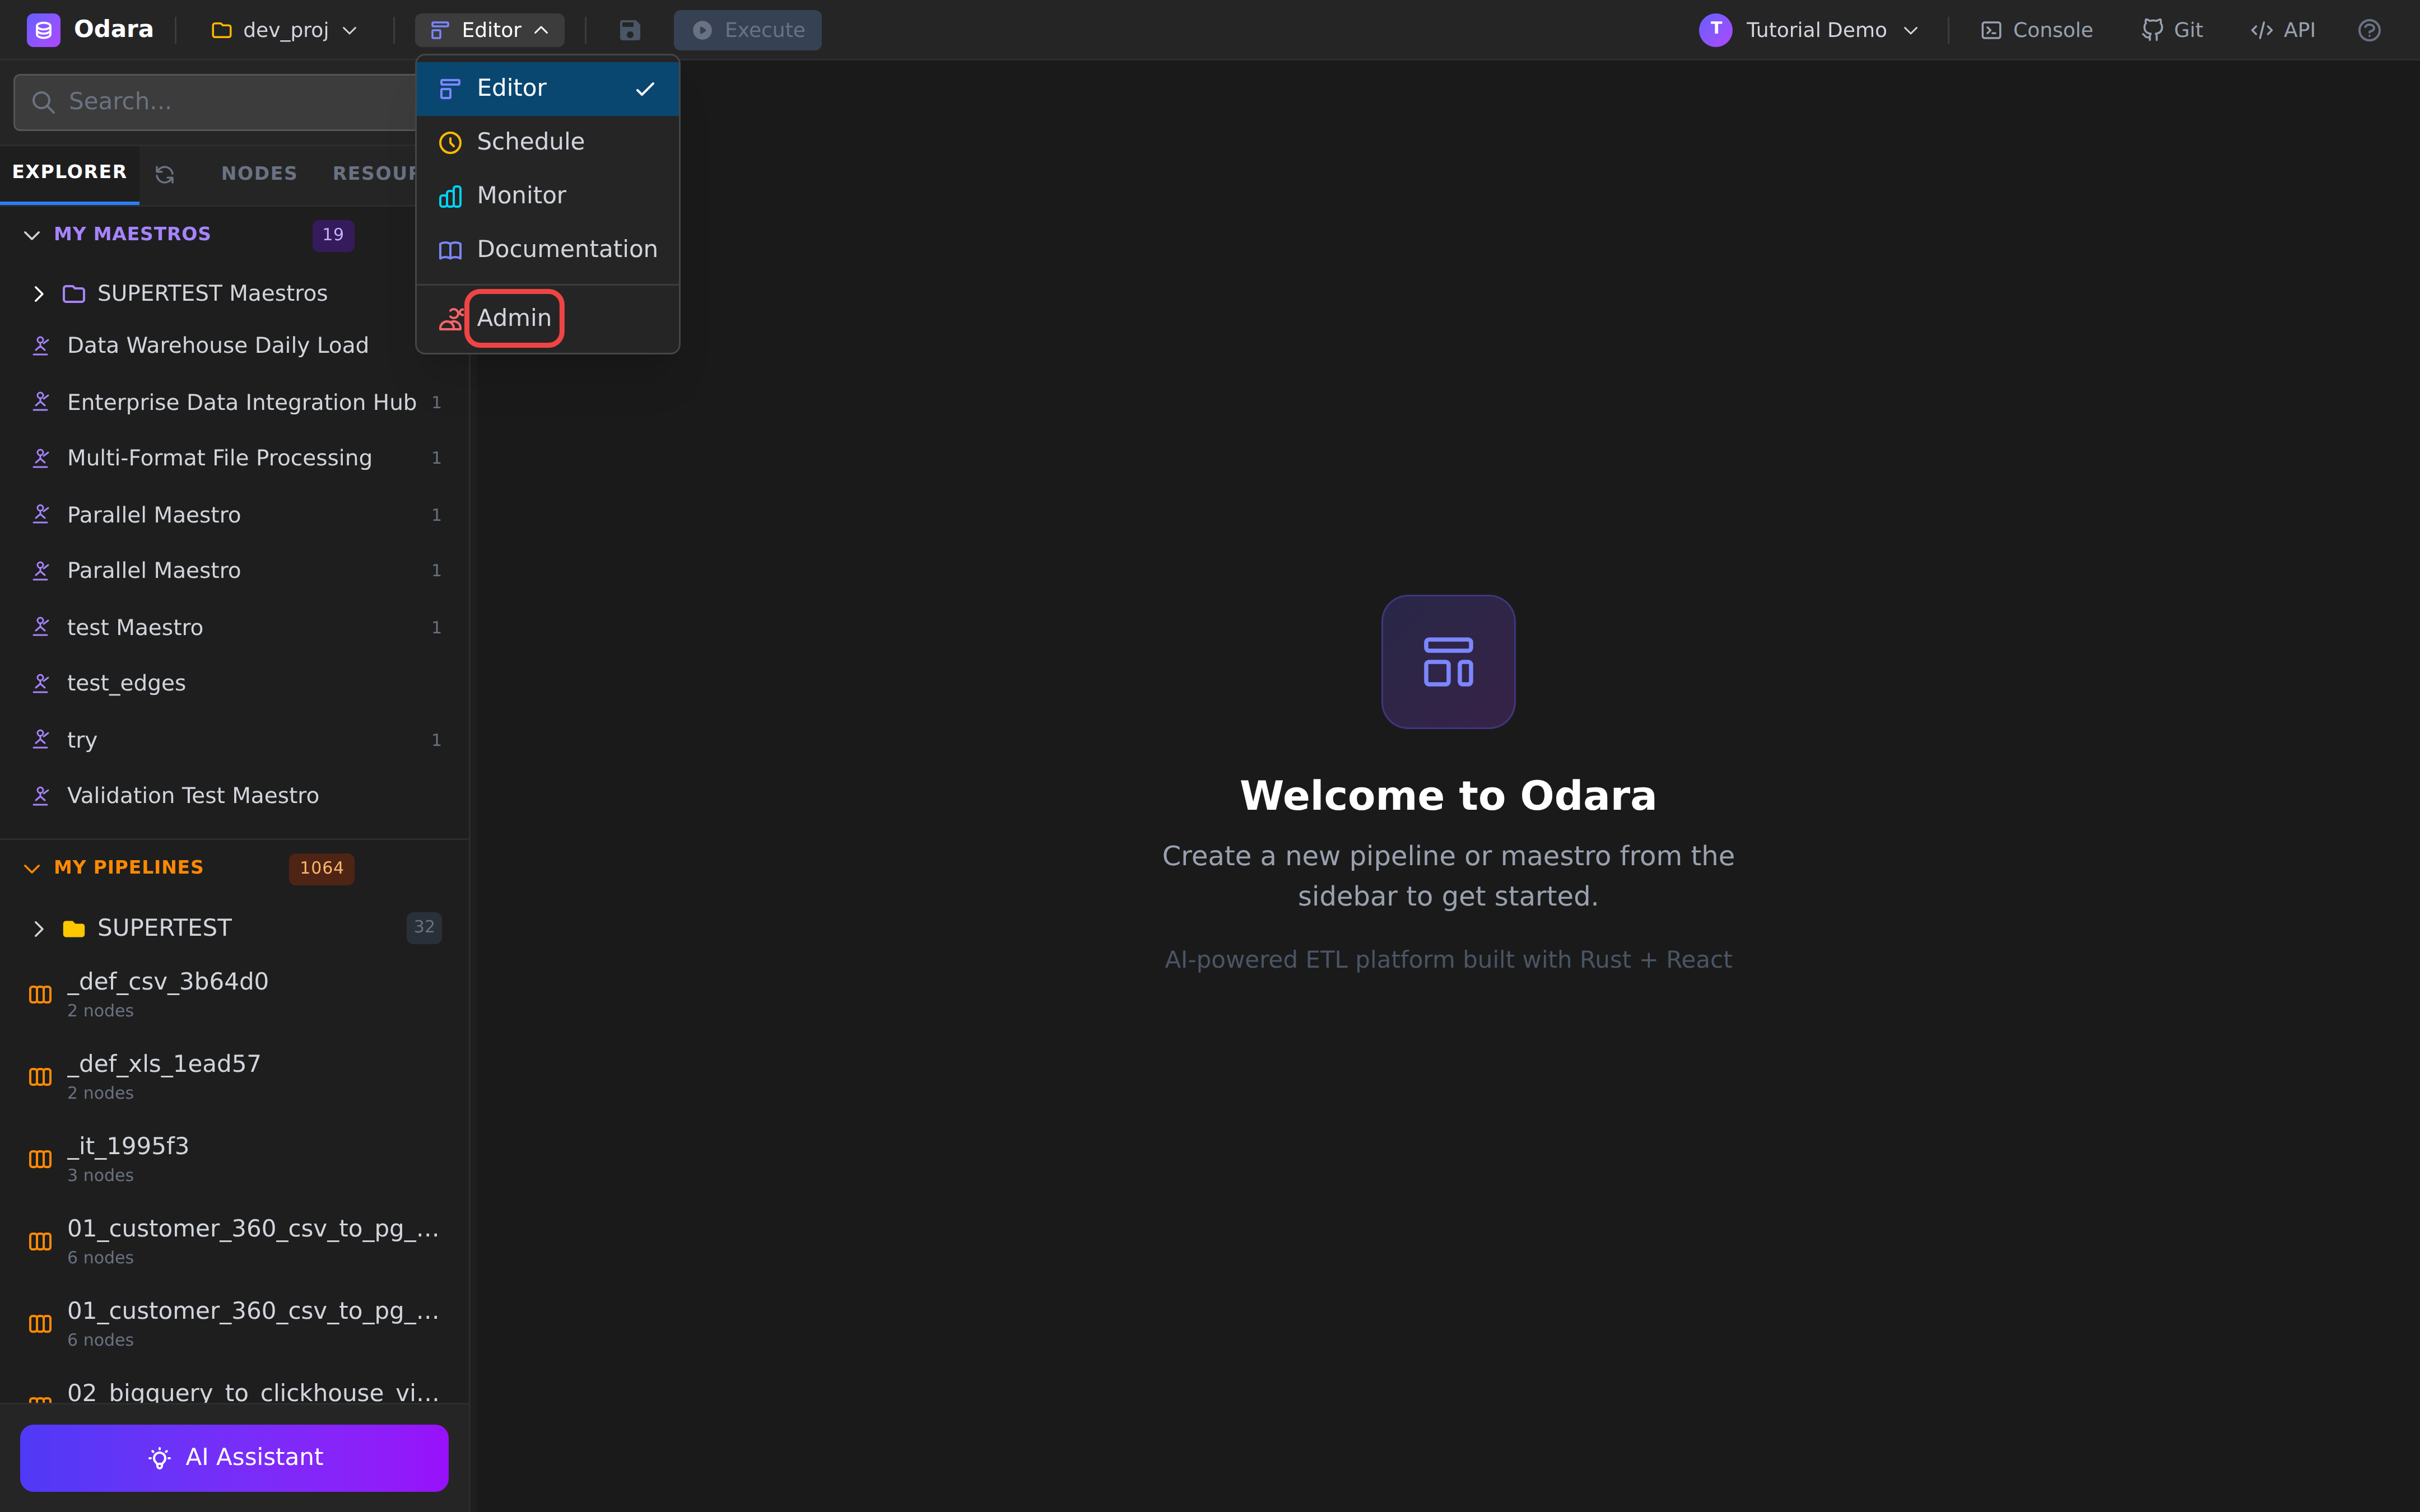
Click it and Odara navigates to Administration. The page has three tabs — Users, Roles, Permissions — and a Refresh button at the top-right that re-fetches the list (useful if another admin just made a change in a different browser).
2. The Users list
The first tab is Users. It shows everyone who can sign in to this install.
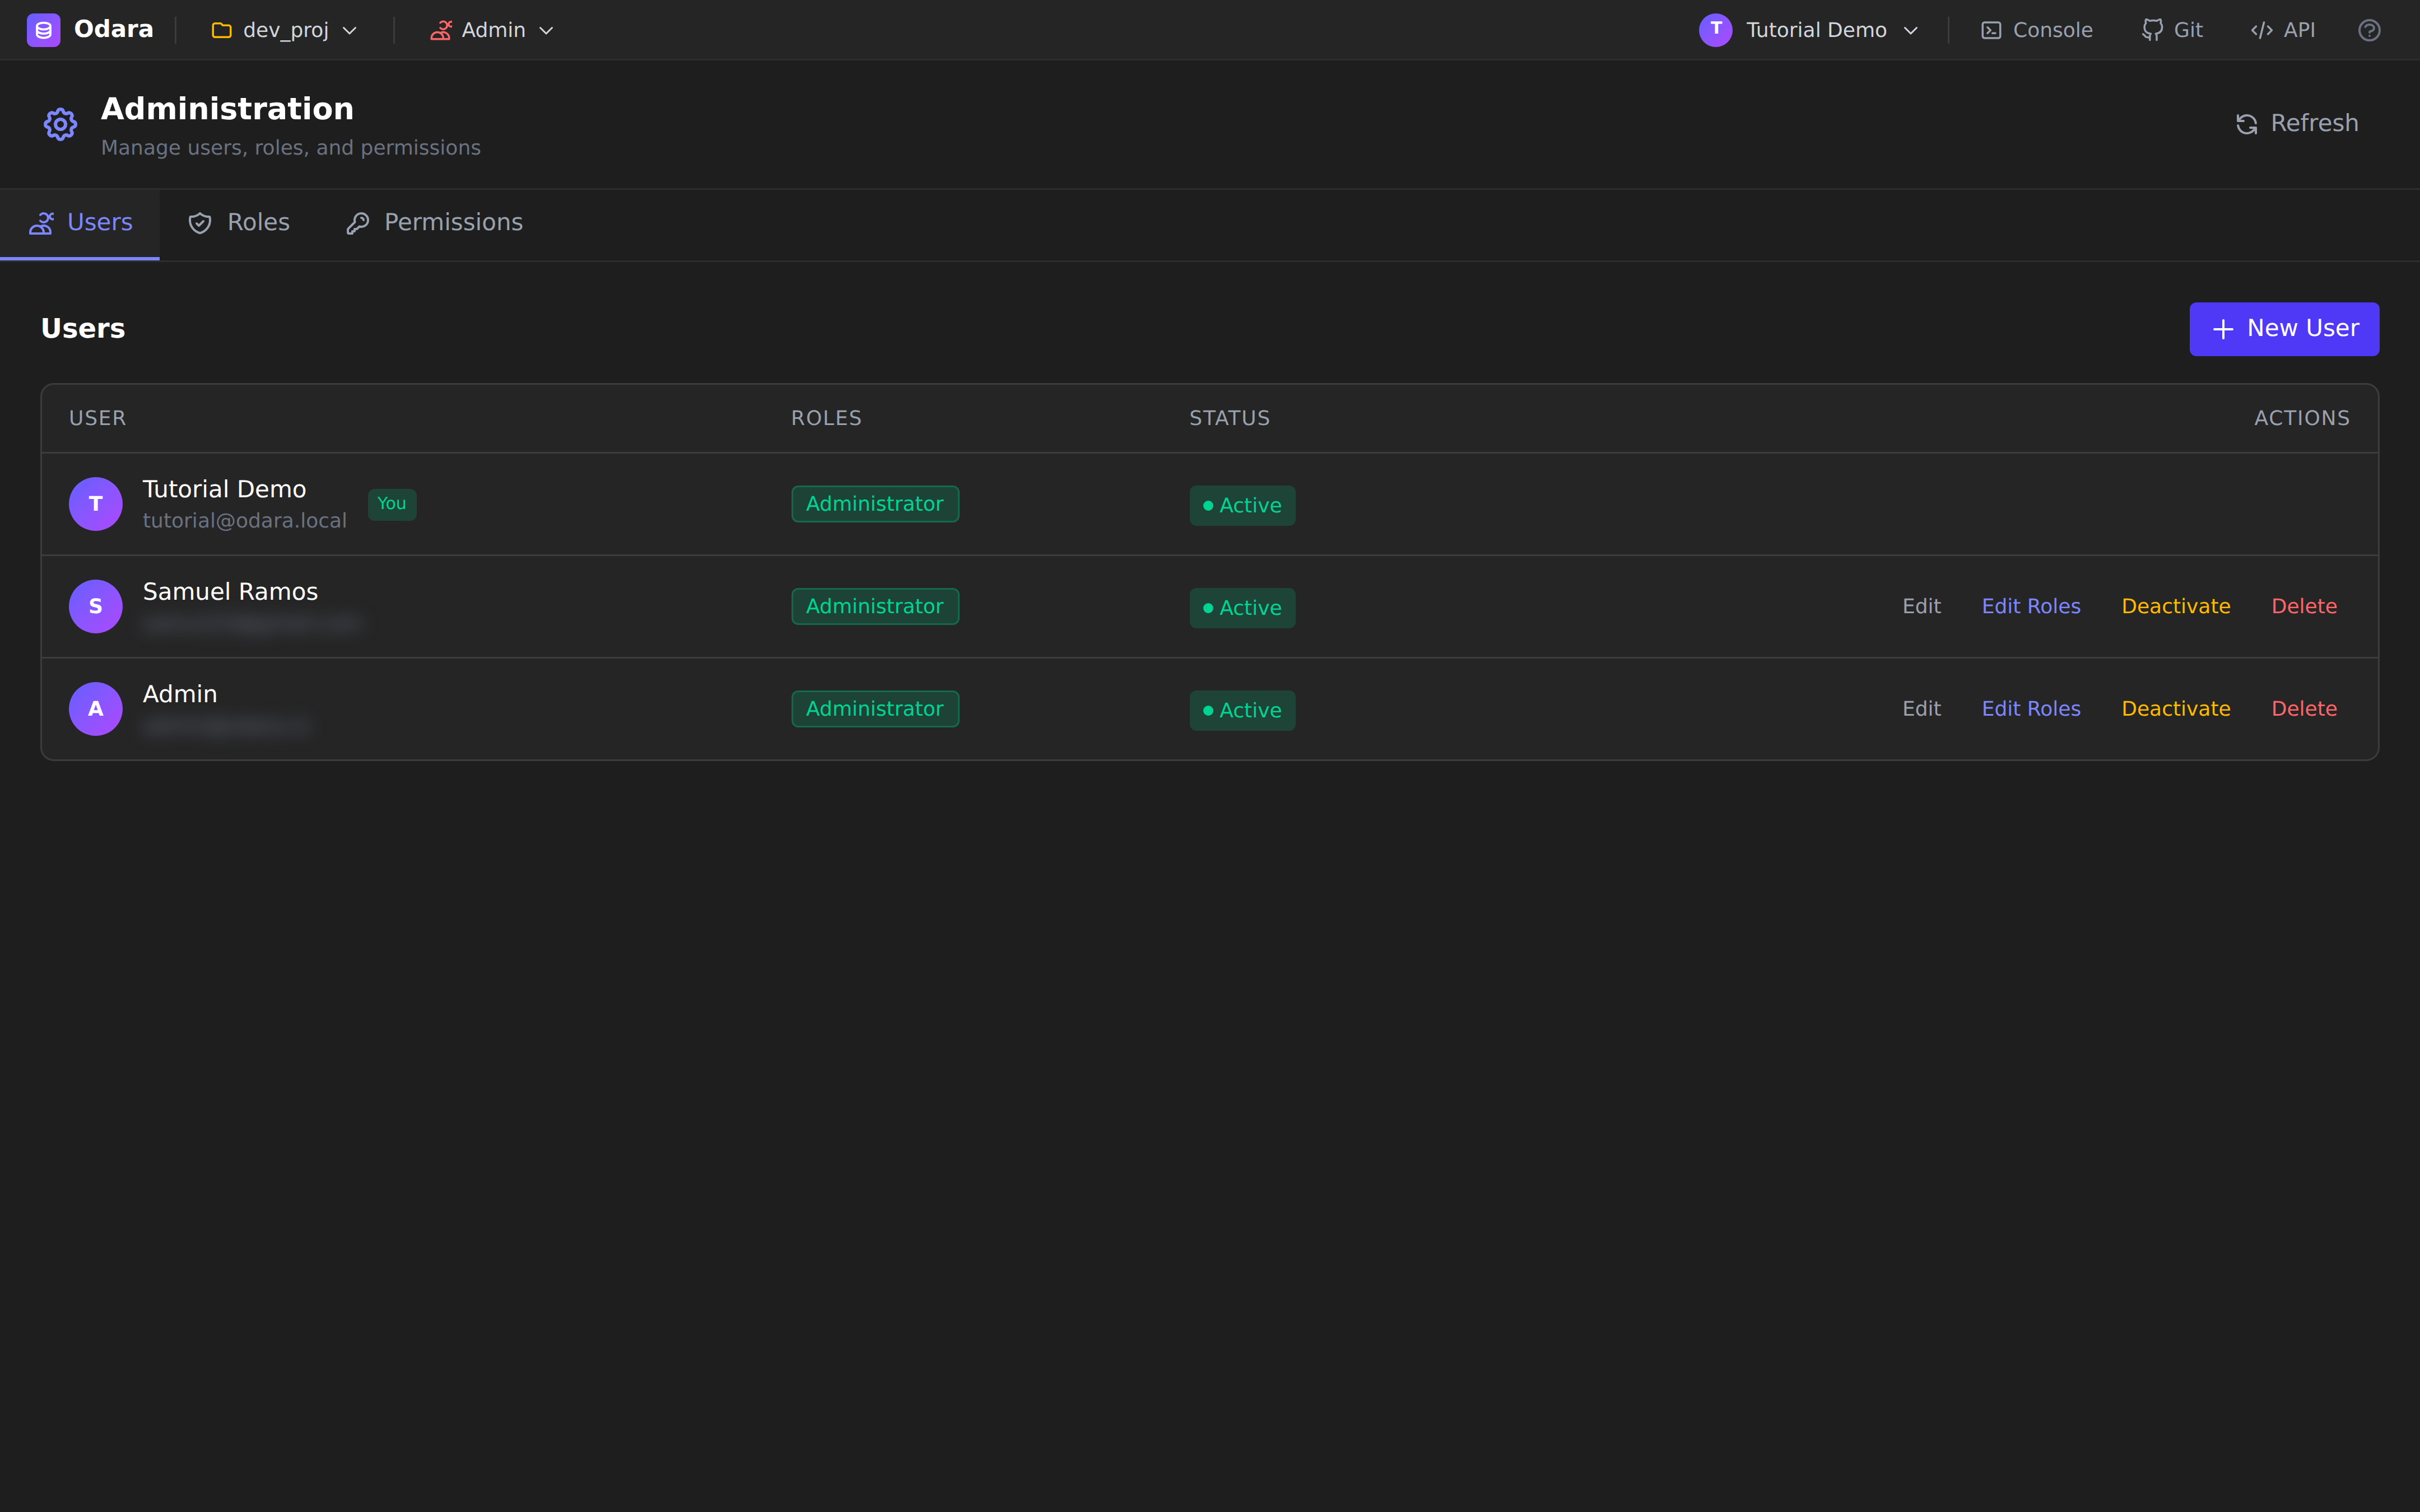
Each row gives you:
| Column | What it tells you |
|---|---|
| User | Avatar with the initial, the user's display name, and their email. Your own row carries a green You pill. |
| Roles | The role chips assigned to this user (Administrator / Developer / Operator / Viewer, or any custom role). A user can hold more than one. |
| Status | Active (can sign in) or Deactivated (kept in the database for audit history, but can't sign in until reactivated). |
| Actions | Per-row links: Edit (name, email, password), Edit Roles (inline), Deactivate (toggles to Activate if already off), Delete. |
In the screenshot above, other users' email addresses are blurred for privacy — on your install they appear as plain text.
3. Create a new user
Click the purple + New User button in the top-right.
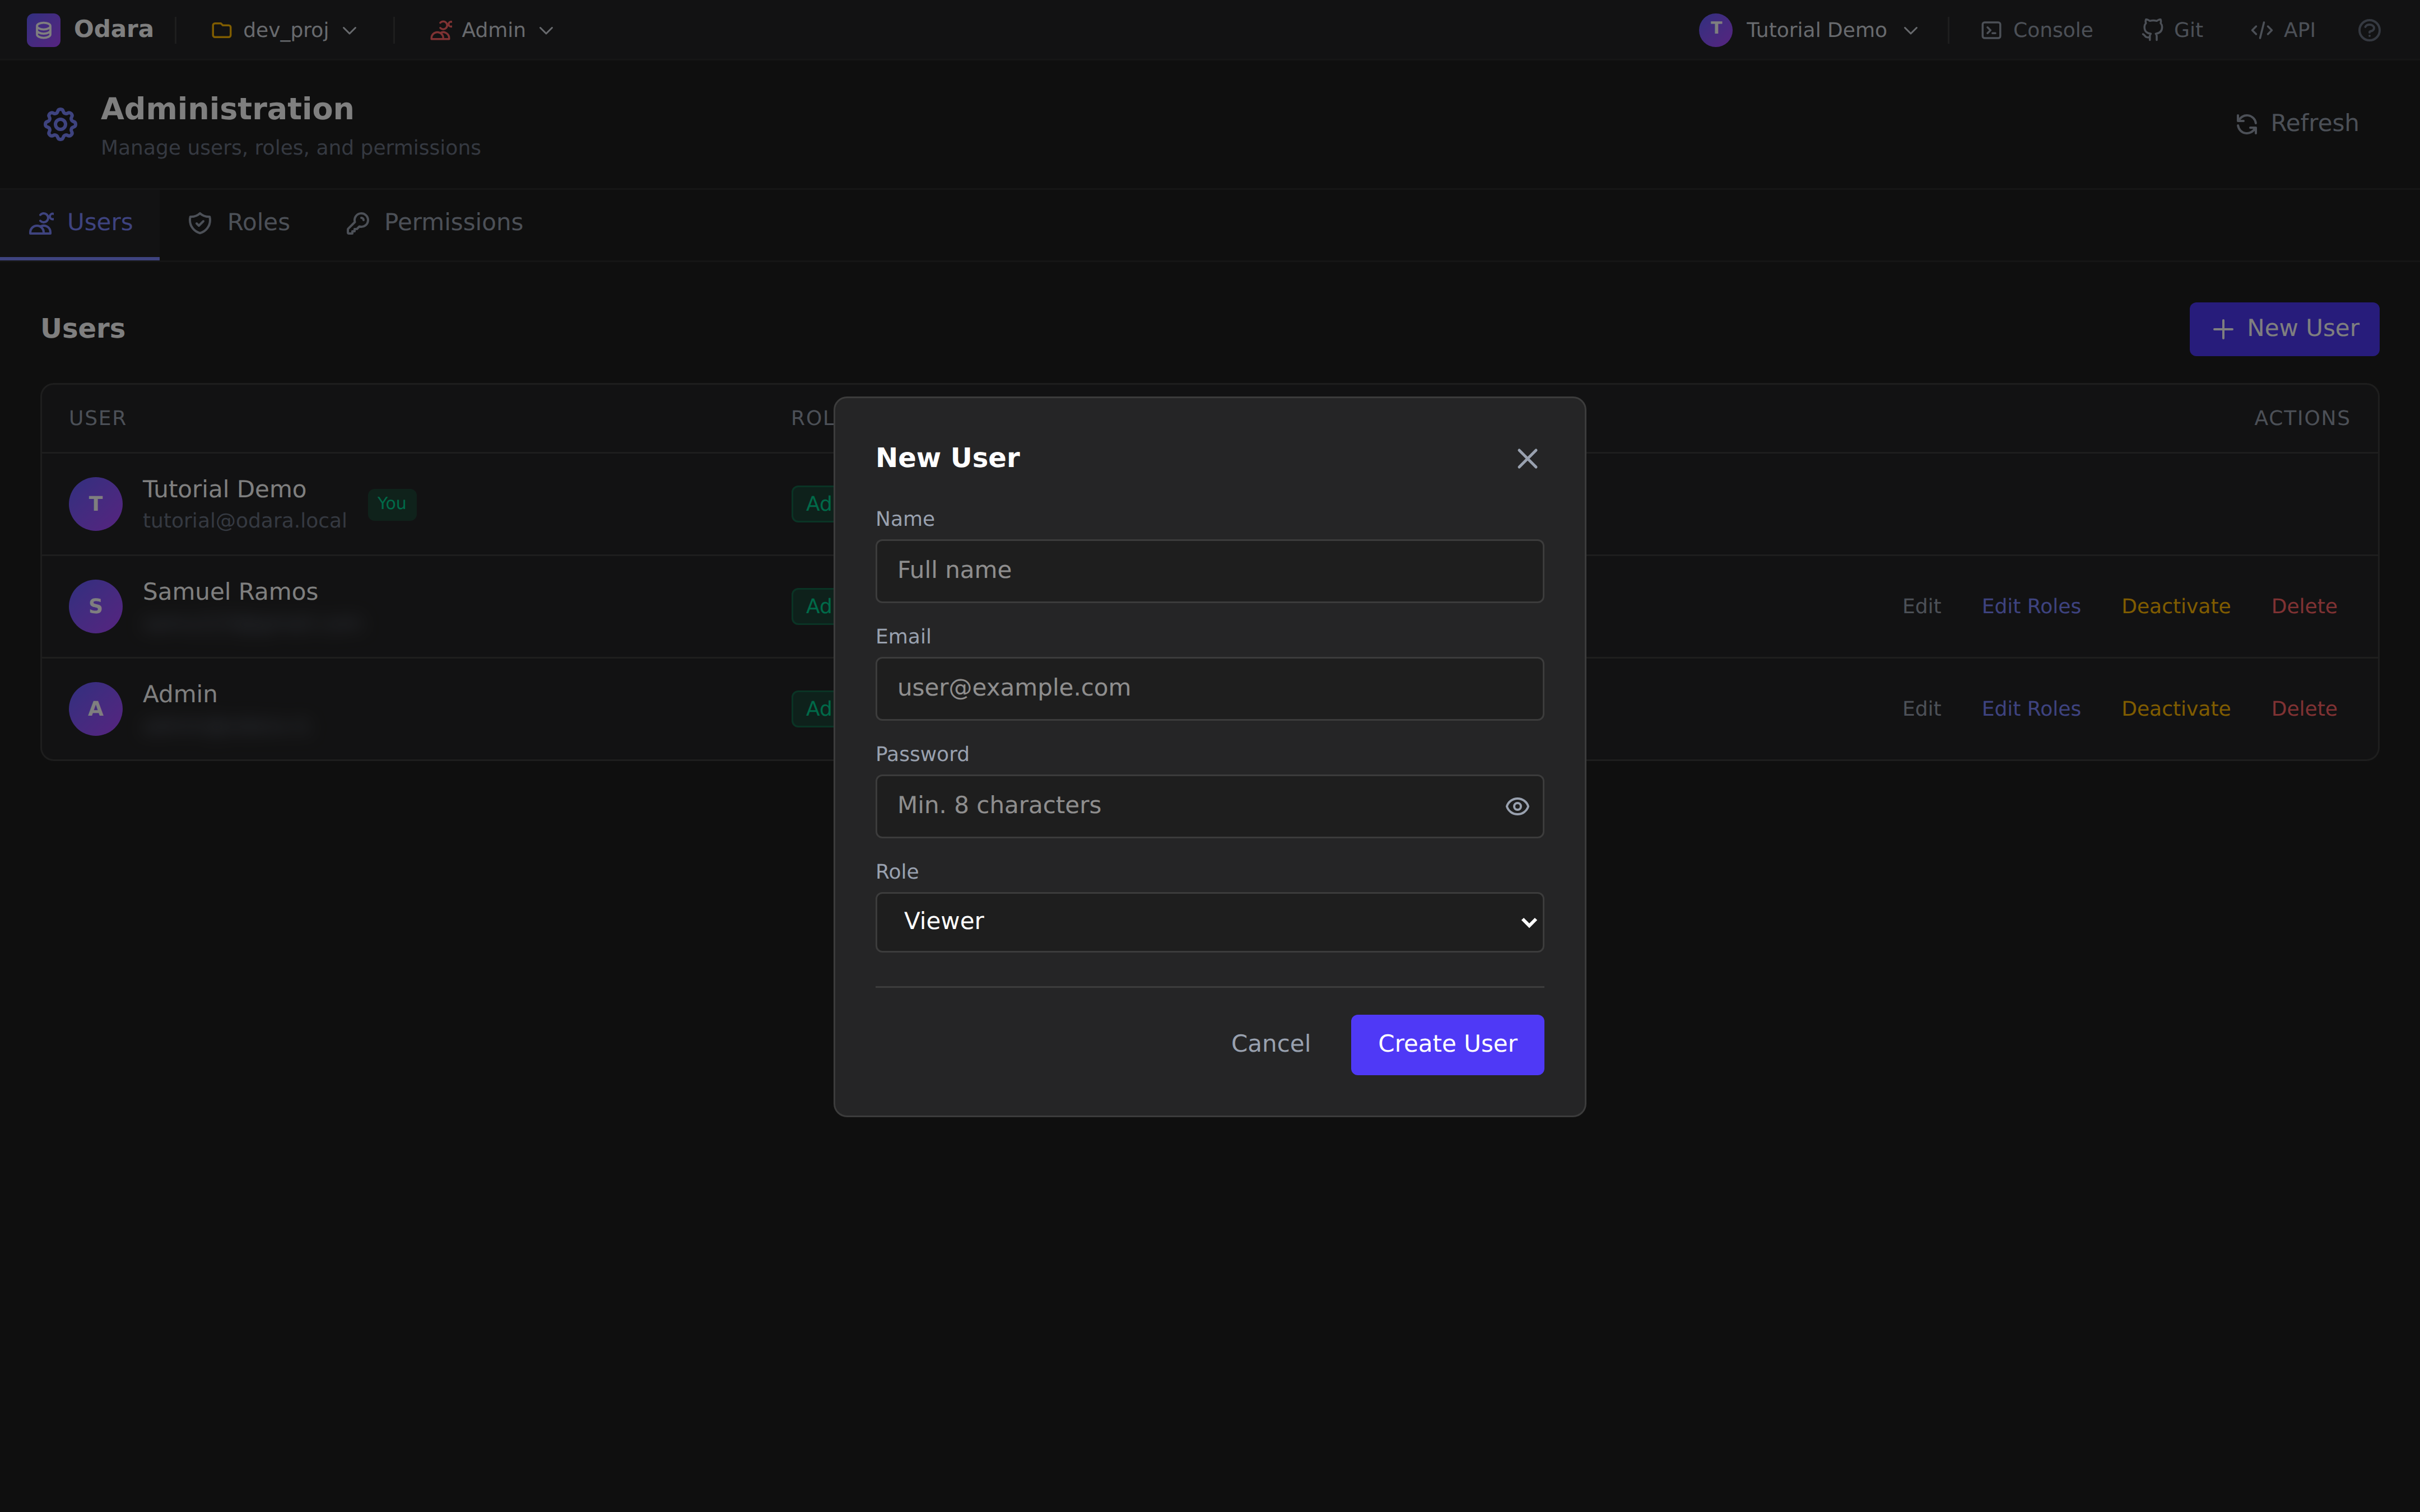
Fill four fields:
- Name — the display name shown across Odara (Monitor, Schedule alerts, audit logs, etc.).
- Email — used to sign in. Must be unique across the install.
- Password — minimum 8 characters. Stored as an argon2id hash; even an admin cannot retrieve it later — only reset it.
- Role — the starting role for the new user. Pick the least privileged role that lets them do their job; you can always add more roles later from the Users tab.
Click Create User. The new user appears at the bottom of the list, Active and ready to sign in.
4. Edit roles — inline, not a modal
Unlike many admin panels, Odara edits roles inline on the row. Click Edit Roles on any user (other than yourself) and the Roles column transforms into a row of toggleable chips:
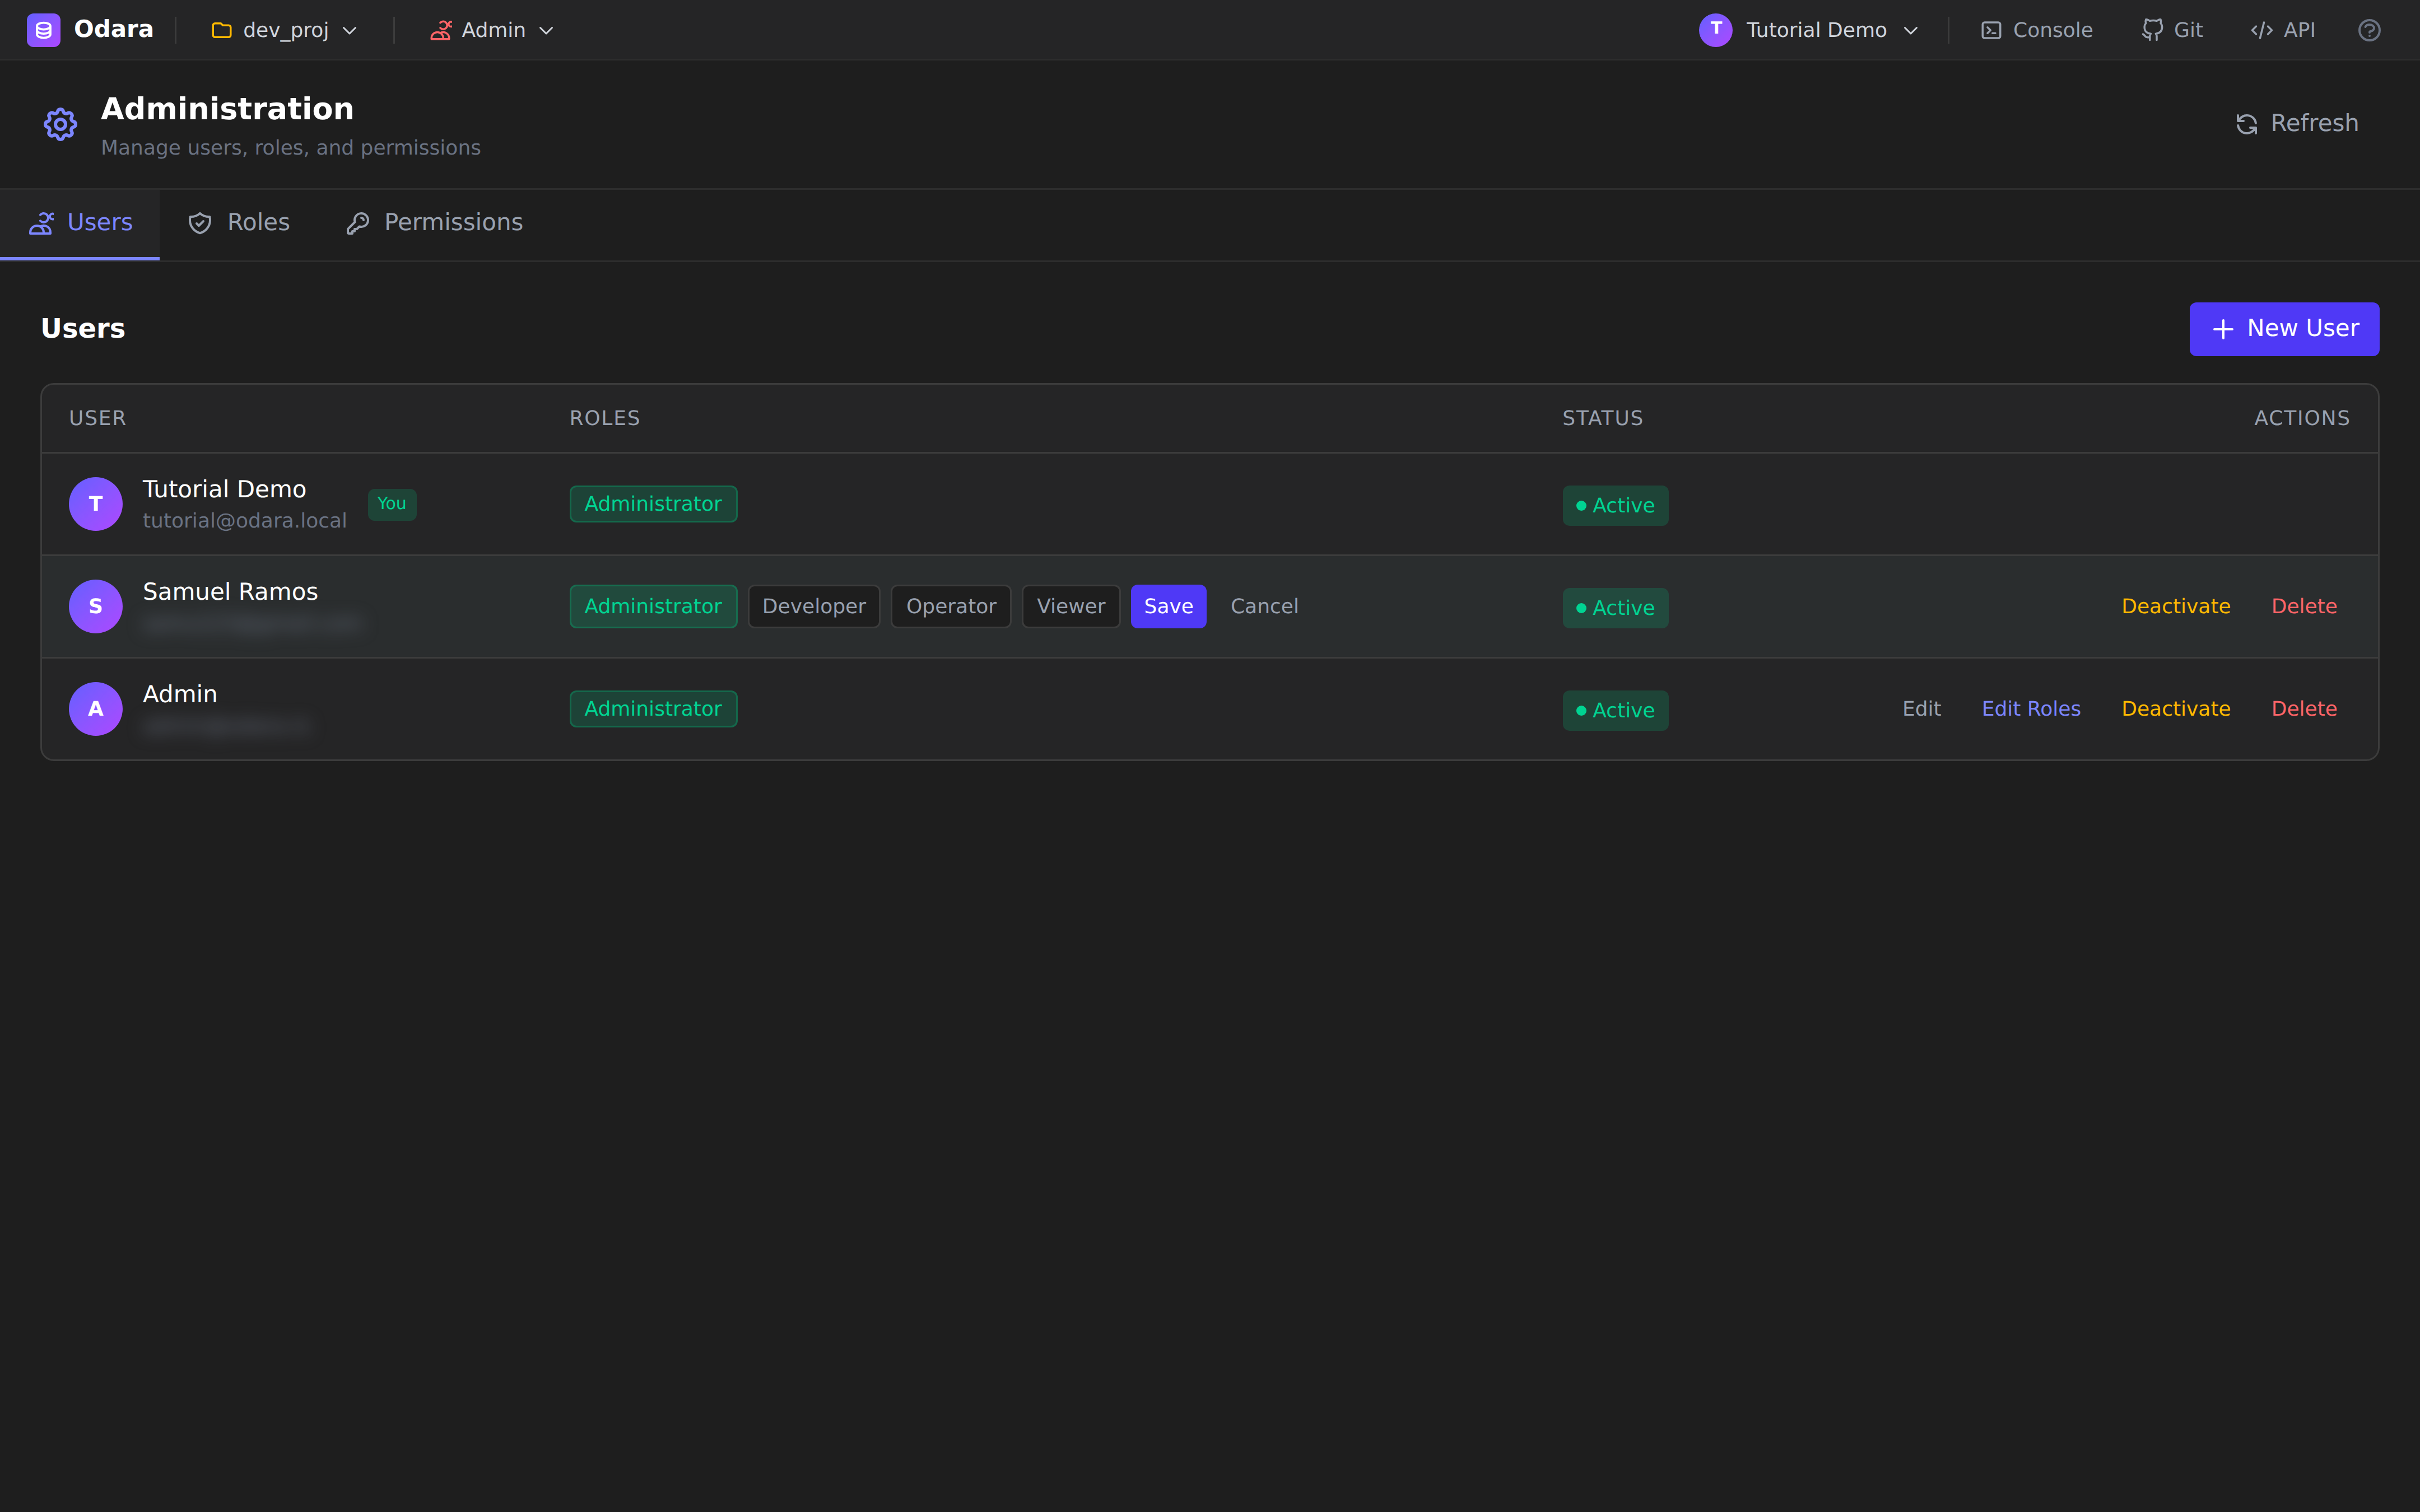
- Click a chip to add or remove that role. Filled (green) = assigned. Outlined = not assigned.
- Click Save to commit the change. The chip set becomes the new set of roles for that user.
- Click Cancel to discard.
Why inline? Role changes happen often — adding a freshly hired data engineer to the
data-engineeringrole, or removing it when they leave — and a modal would be heavier than the task deserves. The inline editor keeps the rest of the page visible so you can sanity-check who already has what.
To change a user's name, email or password, use the Edit link to the left of Edit Roles — that one does open a dialog because the field set is larger.
Deactivate vs Delete
- Deactivate → the user can no longer sign in, but their identity is preserved. Pipelines they created keep their author info, audit logs still resolve to a name, monitor history is intact. This is the right choice almost always.
- Delete → permanent. Their row is removed from the users table. Their owned pipelines stay (they aren't user-scoped), but past audit entries lose the link to a name. Use only for users you genuinely never want to see again (e.g. a duplicate account created by mistake).
5. Roles
Switch to the Roles tab.
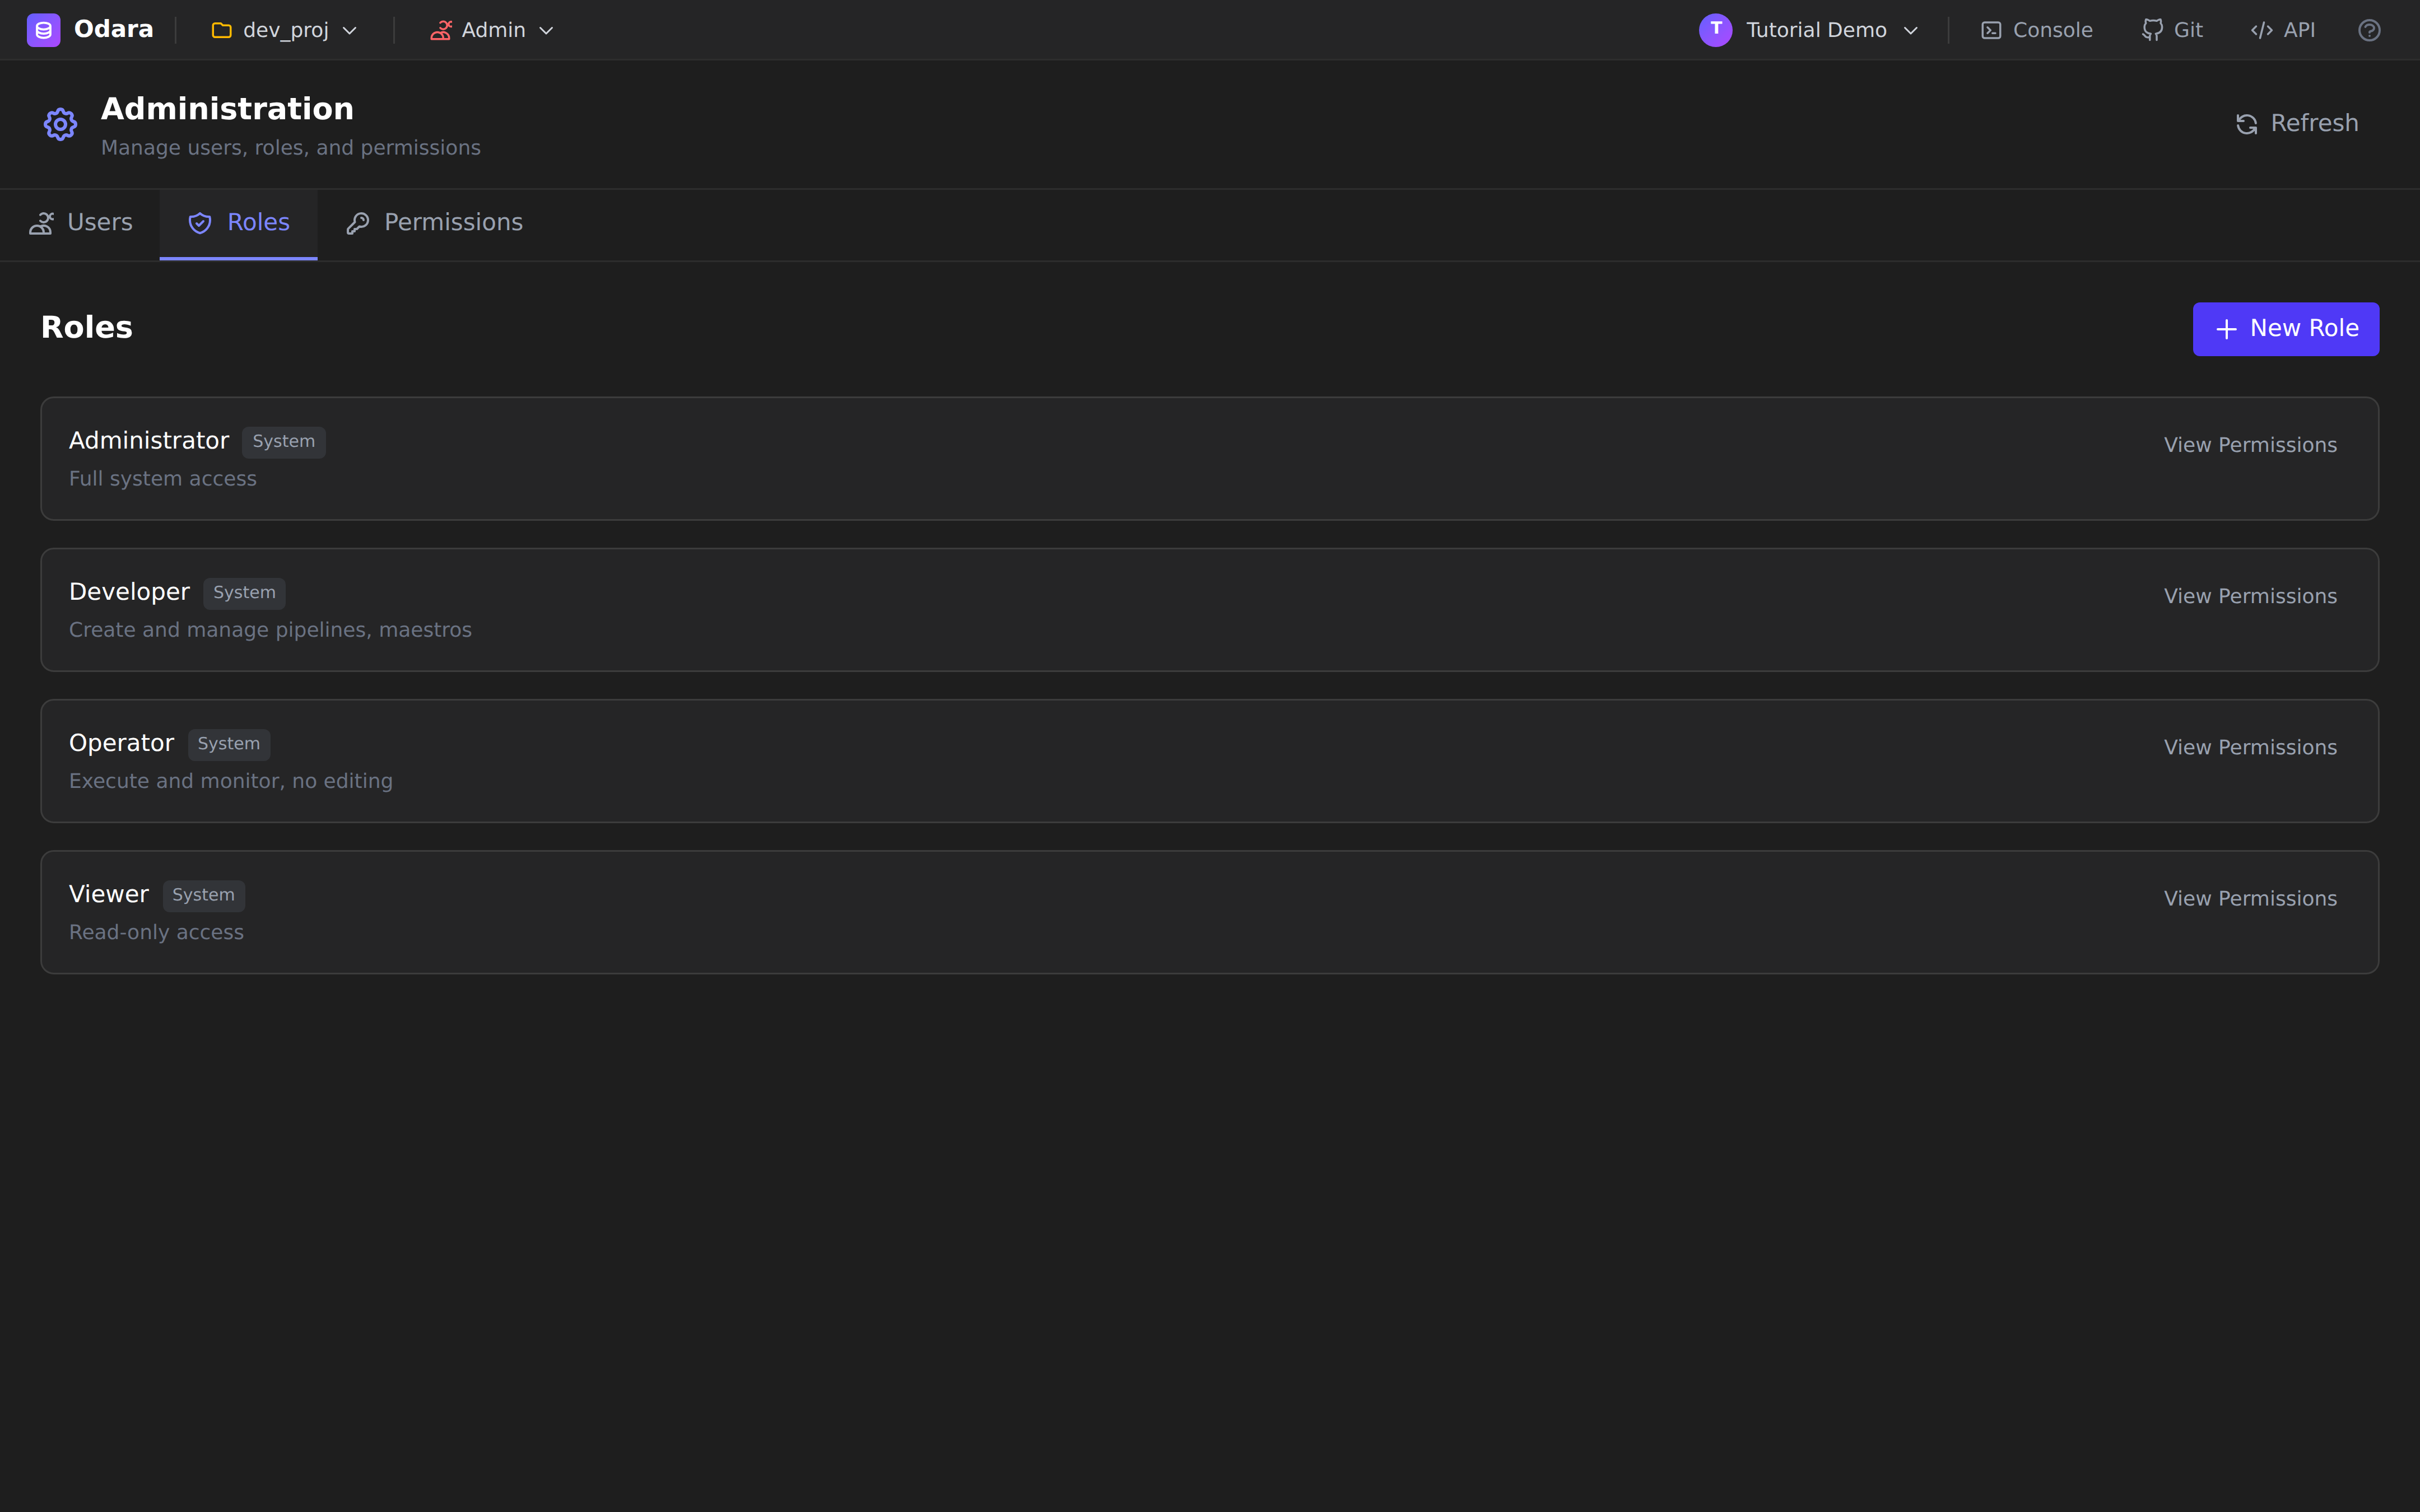
Odara ships four System roles, marked with the muted System pill:
| Role | What it grants |
|---|---|
| Administrator | Full system access — every permission in the catalog. |
| Developer | Create and manage pipelines, maestros, schedules. No user/role management. |
| Operator | Execute and monitor existing pipelines. No editing of the design canvas. |
| Viewer | Read-only — can open pipelines and Monitor, can't change or run anything. |
System roles are immutable by design — you can't delete them, and
their permission set is fixed at install time. That keeps the
baseline of "what Administrator means" stable across Odara
upgrades.
View a role's permissions
Click View Permissions on any role and a dialog opens listing every permission key the role currently grants, grouped by resource:
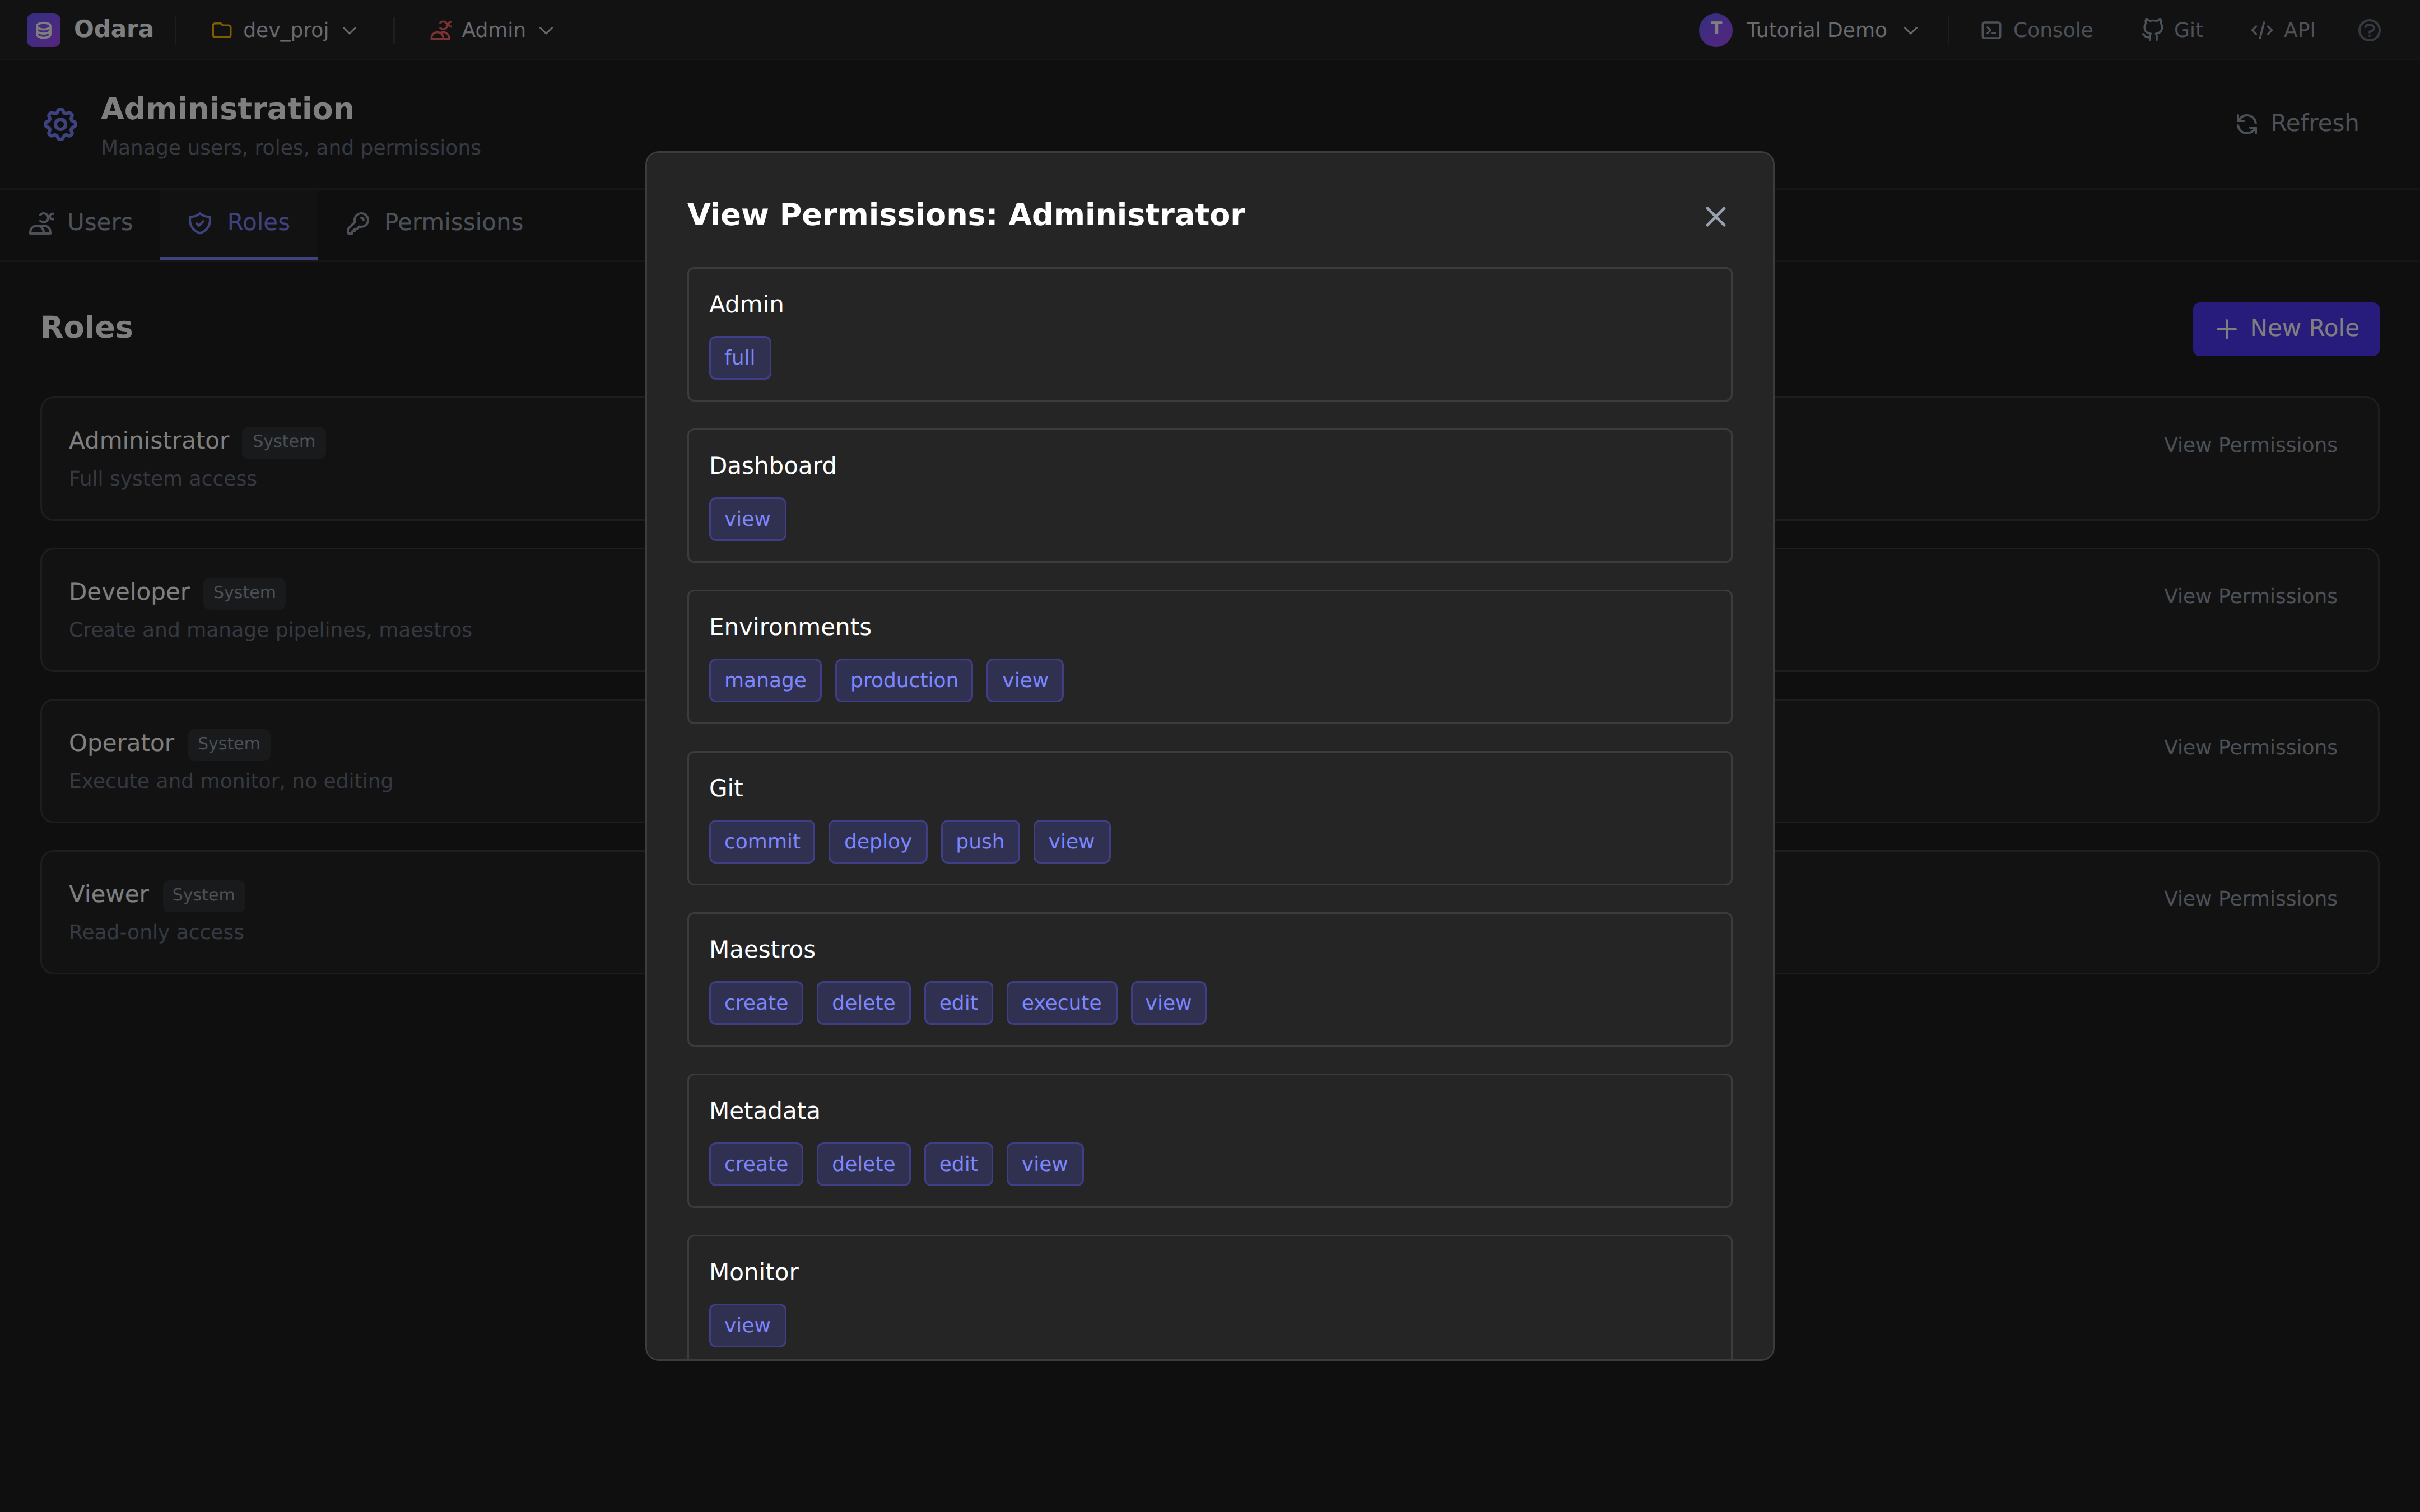
For Administrator, the list is exhaustive — admin.full,
dashboard.view, environments.manage, every git.* and maestros.*,
and so on. For Viewer, the list collapses to the *.view
permissions only. This dialog is read-only — to actually change what
a role can do, edit the role itself (and only custom roles are
editable).
6. Create a custom role
Need something between Developer and Administrator? — say, "can manage pipelines AND manage schedules but cannot touch users". That's a custom role.
Click + New Role at the top-right of the Roles tab. A small inline form opens above the list:
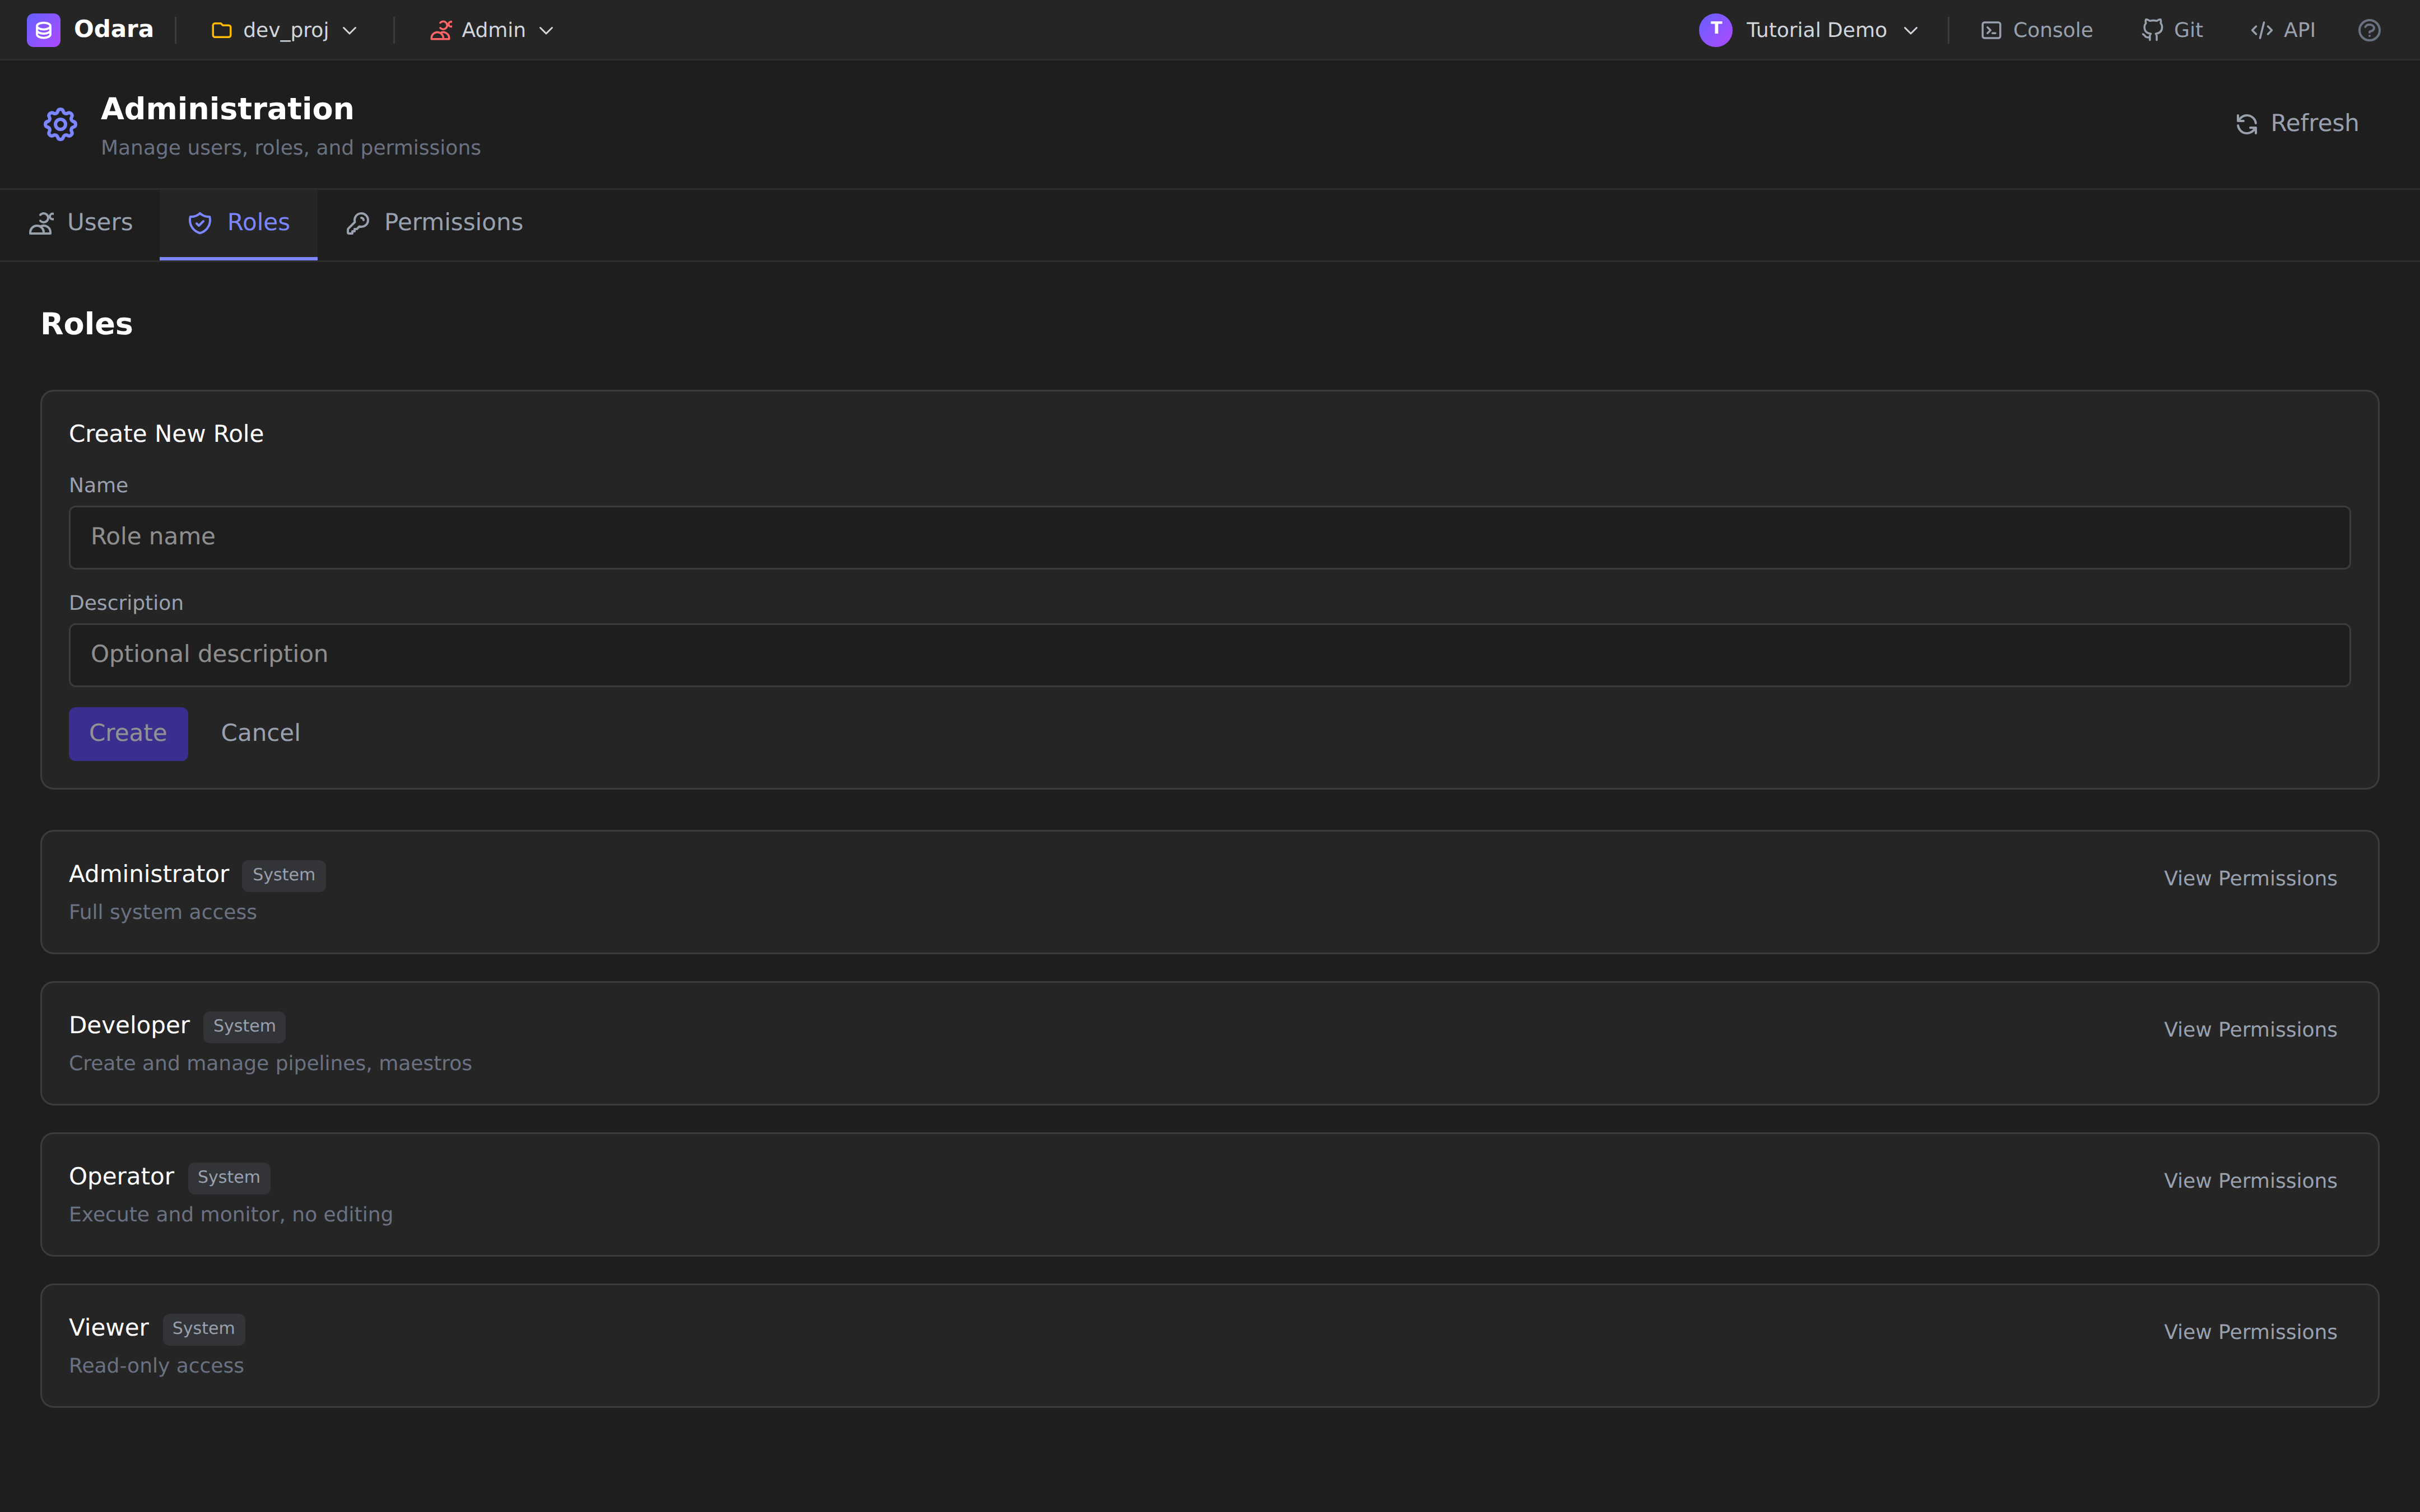
- Name — appears as a chip in the Users tab and in role pickers.
Lower-case, short, plural is the convention (
data-engineers,analysts). - Description — optional but worth filling. It's the muted line shown under the role name in this list, and helps the next admin understand who this role was for.
Hit Create. The new role appears in the list with no permissions attached yet — click View Permissions on it (or use the dedicated role-editor flow, depending on your version) to assign the permission keys you want. Then go back to the Users tab and add the new role to whoever needs it.
7. The Permissions catalog
The third tab, Permissions, is the full catalog of permission keys roles can draw from.
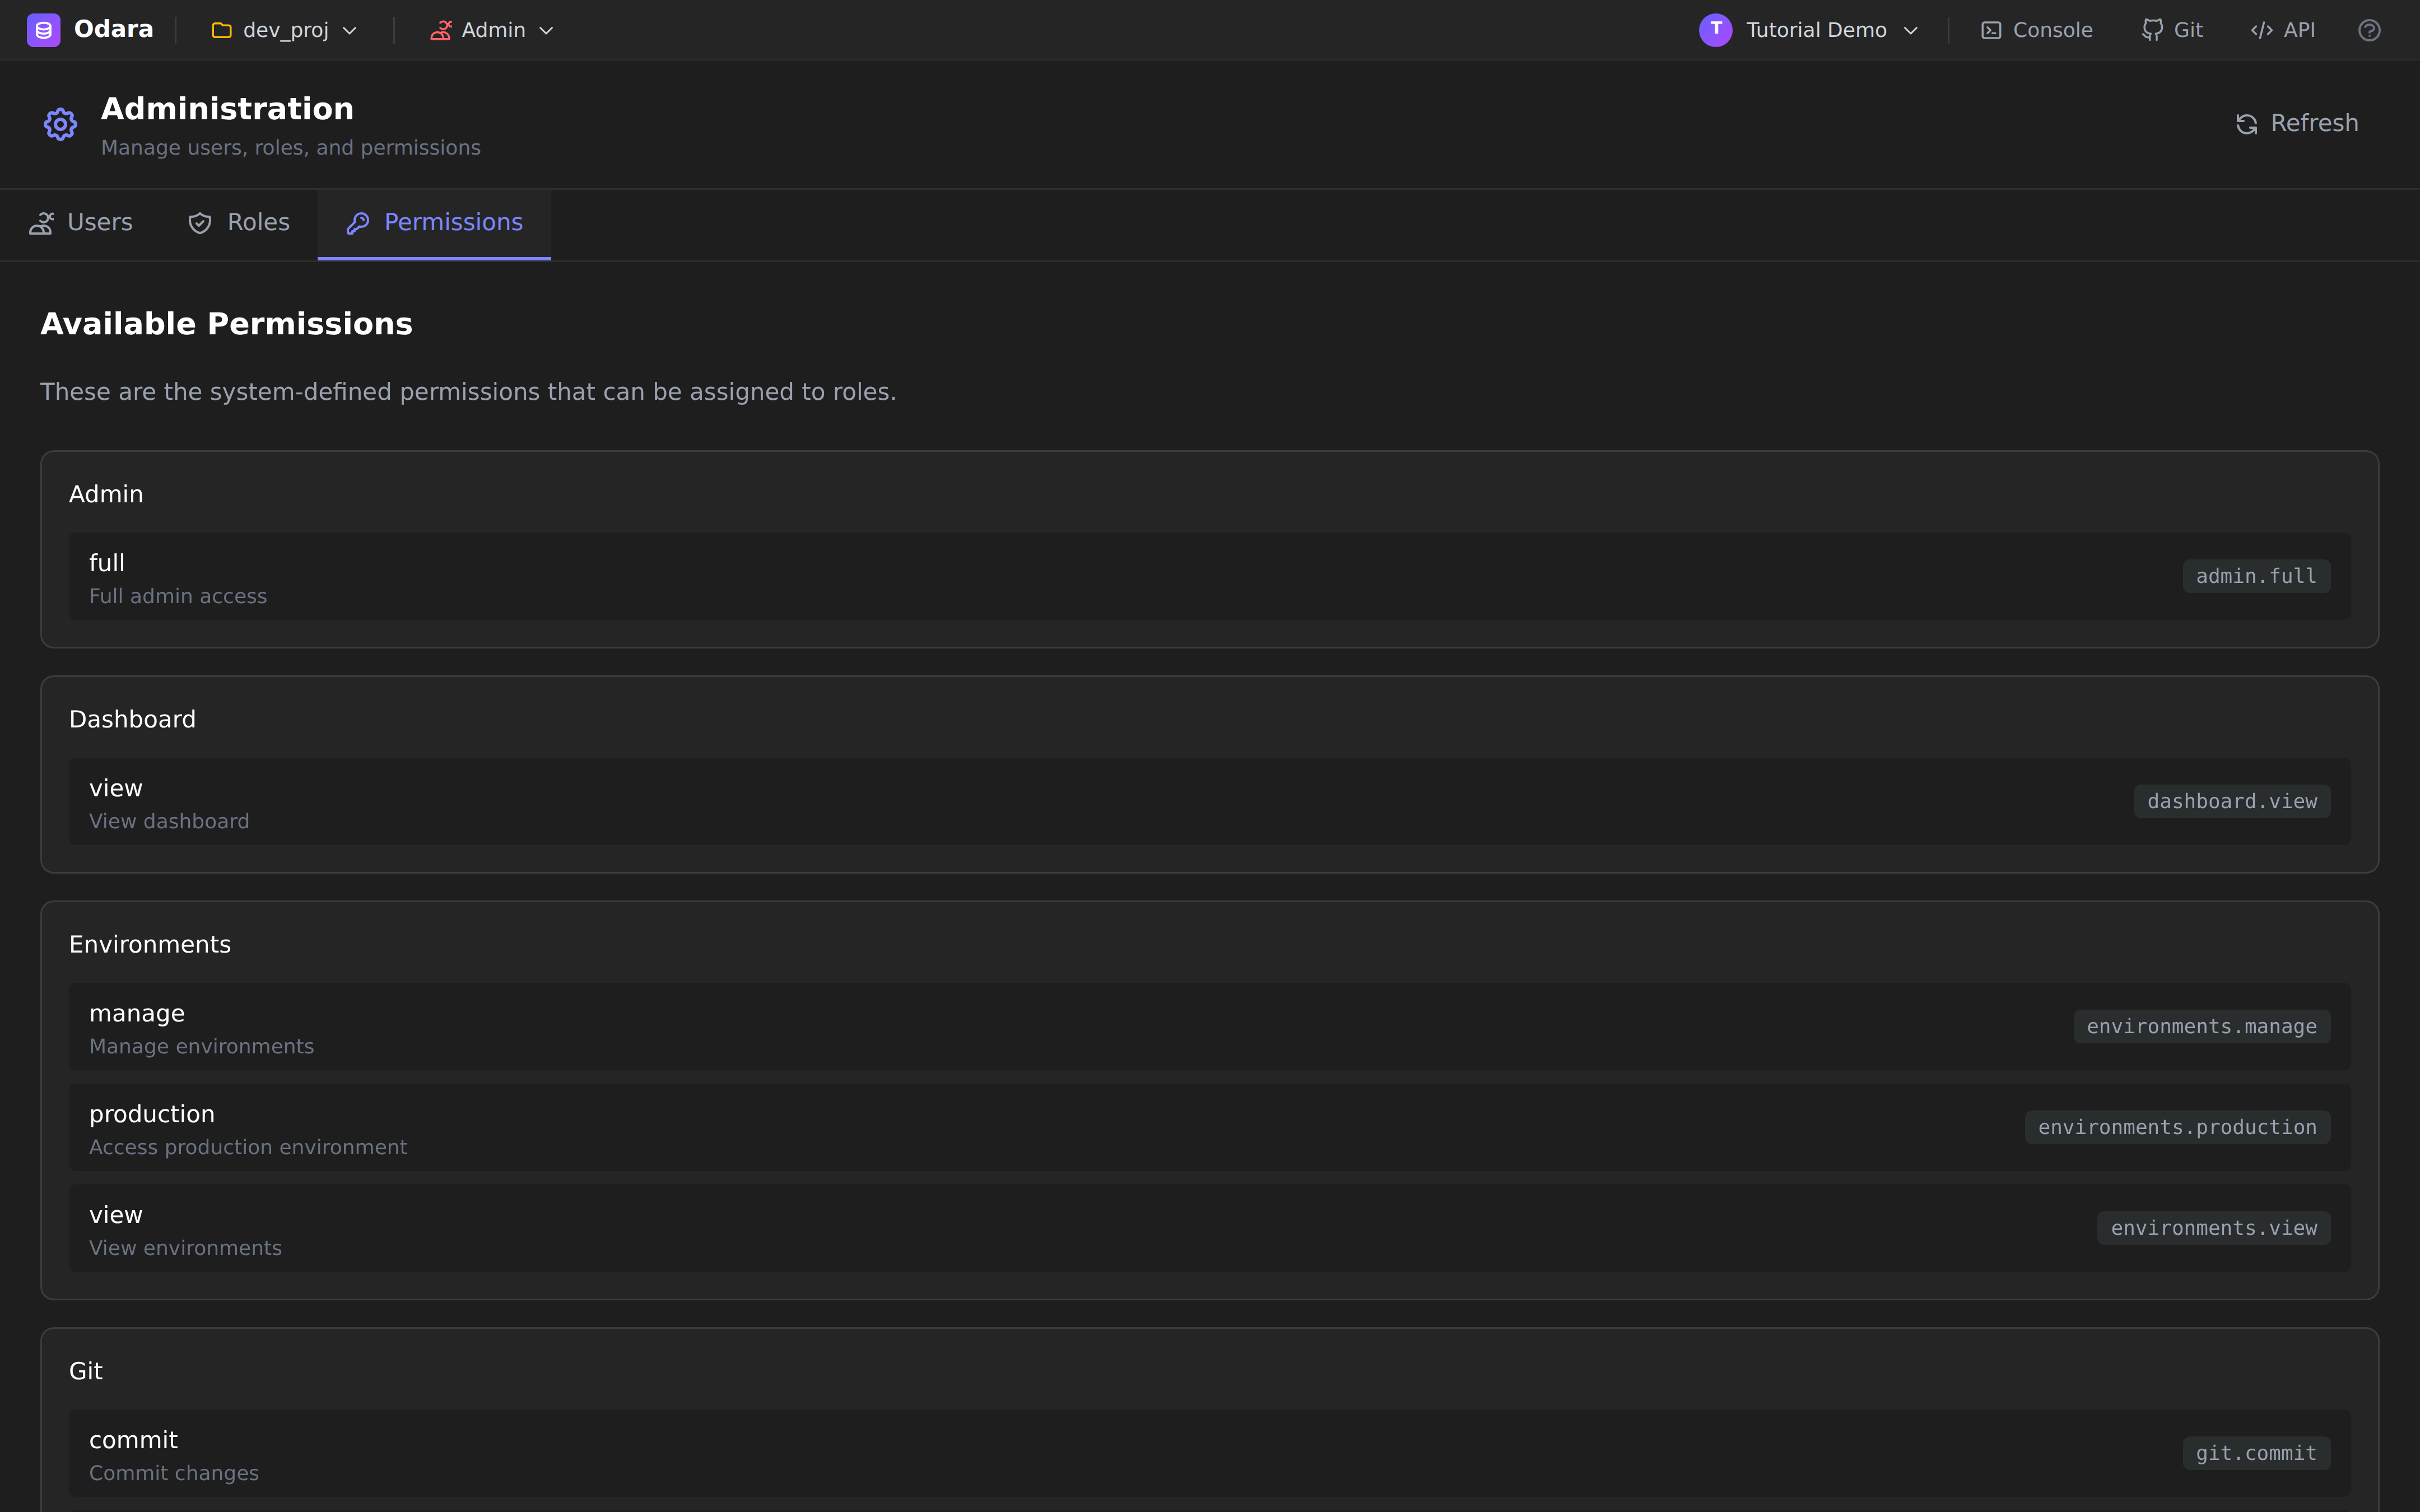
Permissions are grouped by resource (Admin, Dashboard,
Environments, Git, Maestros, Metadata, Monitor, …) and each
entry shows three things:
- The action name (
view,manage,commit,delete, …). - A short human description ("View dashboard", "Manage environments").
- The permission key in a code-style chip — e.g.
dashboard.view,environments.production,git.commit. This is the canonical string Odara checks against on every request, and the one you use in API or scripted role grants.
This tab is read-only. The permission catalog is system-defined — you can compose roles by mixing-and-matching these keys, but you can't invent new permission keys without changing Odara itself.
Cheat sheet
| I want to… | Do this |
|---|---|
| Let someone in | Users → + New User → name / email / password / starting role |
| Promote a user to admin | Users → row → Edit Roles → check Administrator → Save |
| Lock out a user but keep history | Users → row → Deactivate |
| Permanently remove a user | Users → row → Delete (rare — prefer Deactivate) |
See what Operator can actually do |
Roles → View Permissions on Operator |
| Add a custom role | Roles → + New Role → name + description → Create |
| Find the exact permission key for "view monitor" | Permissions → Monitor group → copy monitor.view |
What you learned
- Admin lives behind the Editor dropdown and only an Administrator can open it.
- Users tab manages identities; role changes happen inline, more substantial edits use the Edit dialog.
- Deactivate is almost always preferable to Delete — it preserves audit history.
- The four System roles (Administrator, Developer, Operator, Viewer) cover most installs and are immutable.
- Custom roles compose permission keys from the Permissions catalog, which is itself system-defined.
That's the whole Admin section. You now know who's who, what they can do, and where to go when that needs to change.